Rix SA-6 Parts

Please register or login

Welcome to ScubaBoard, the world's largest scuba diving community. Registration is not required to read the forums, but we encourage you to join. Joining has its benefits and enables you to participate in the discussions.

Benefits of registering include

  • Ability to post and comment on topics and discussions.
  • A Free photo gallery to share your dive photos with the world.
  • You can make this box go away

Joining is quick and easy. Log in or Register now!

@Golan68 why would you want to get water on the teflon inside the cylinder? To me, the statement in the manual is simply saying not to soak the walls / rings. I can imagine it would gum the rings up pretty bad.

Actually, I read a post by @SurfLung where he put his Rix back together and it was't 100% dry (or something along those lines) and it gummed things up. He found a good buildup when he took things back apart and had to replace the rings (maybe he can chime in and confirm / clear up that part).

I "think" it would make more sense to remove pitons, remove the rings, clean the pistons / cylinders, then make sure everything is 100% dry and reassemble (or replace rings). I can't see any point to cleaning teflon rings / riders or viton o rings with any type of detergent, and especially not while they're together... but I'm not sure. Just my take.

@iain/hsm I'm with @grf88 .... waited with baited breath for the last few videos. I'm sure you've had a busy weekend. I've watched the 1st 4 numerous times and each time I pick up on something else. Very grateful for your efforts.
what I like about the Rix , among many other things, is its ability to resuracte. it's very easy to recover parts and make them like new again. as lain mentioned regarding valve cleaning and glaze removal. I socked the rings in acid then soup and also rubbed them with light abrasive kithen sponge, they came back as new. but when I saw the issue with detregant I was afraid that due to the special composition I might changed something chimicaly ... so just reading understanding problem.
 
Before I start. You should gently remind @iain/hsm to show you and explain the piston storage tube for the third stage. If it is anything like the one I had (for the 4VX's 4th stage) it is very important and helps a lot getting that floating piston and all those rings back in the bore hole!

I believe that Iain stated it pretty clearly when he said: "One of our extreme tests was to submerge the compressor block only underwater by hanging on its side by a hook then pull it out attach the power cable and start up with some small additional no tool hand adjustments such as opening the condensate drains and turning the compressor by hand before re starting."

There is a huge gulf between what you can do and what you should do. Also add in liability and the stupid factor e.g. Iain told me that I could take the compressor underwater. LOL

When I was a young welder I wanted to fill my smaller 25 Cu.Ft. Oxygen cylinders and the cost per fill was 3/4 of a 200 Cu.Ft. Cylinder. So I went to the local Hydraulic Hose manufacture and purchased a 6' (2 METER lol) 10,000 PSI hose for OIL. I purchased 2 CGA 540 nipple and nut and have trans-filled many O2 cylinders. This hose was neither made or meant for Oxygen service!!!

Back to the show!
On my 4v compressor, in the original data my compressor was designated a Nitrox compressor. So when I ordered parts from RIX they had 2 part numbers one was normal and the other was O2 cleaned. The second was quite a bit more expensive (and more time)! So I ordered the standard part and I cleaned it. I unfortunately did not know that Iain was probably here on the forum all along. I had NO advice other than RIX. I purchased chemicals from GMC, Global Manufacturing Company (Now GSM Global Scuba Mfg out of Texas). I used ultrasonic cleaning solution to thoroughly clean the part then use Oxy safe citrate tank cleaner #44050 to re-clean the parts but also the new: orings, rider rings, pressure breakers and the pressure rings. Never touched the cylinder liners (Usually. See follow up) thoroughly dried them of course and re-assembled in the cleanest way possible! I am by no way saying that this is the correct way to do it and I am sure we will hear Great things from Iain tomorrow about this. But, I had no problems with cleaning the PTFE parts with a citrate cleaning solution meant for tanks and valves.

Where was I going with this???? Oh yes.... Things you probably, maybe, outa, shouldn't do! (like taking your compressor diving! I just love that!)LOL

Touching the cylinder:
When I inherited the position and compressor, everyone had been using it like a home appliance and it had not been serviced in a LONG time. They did not even ask themselves: Why does it take all day to fill the banks now? I dug out all of the paperwork. Fortunately for me they saved it all. I contacted the last guy that the shop had work on it and when he showed up in a big diesel service truck with black grease on his hands clear up to his elbows I told him "you can't touch the pistons with grease on your hands" he said "Why not?" I told him I would do it myself! When I removed that 4th stage piston for the first time. The rings were gone. GONE! some of the orings to! Pressure breakers gone! I replaced them all and they wore out rather quickly. After many telephone conversations with (Rick Stolquist If memory serves and Christina Torncasa in purchasing) I was informed that running the free floating piston with insufficient rings will allow the piston to slop around in the cylinder and cause wash boarding of the cylinder walls. I was told to hold the cylinder up to a bright light (My cylinders were removable) that you could see the wash boarding. Yep. That is what happened. Then I was informed that a new cylinder was $2500, + shipping and I had to wait for one to be manufactured! I read the manual from cover to cover and it was one of those field service manuals Iain talks about. It stated that if you measure the bore and it was within tolerance that you could hone the cylinder! WOW field repair! Now I have honed automotive cylinders but this a precise instrument? (A good time to mention that the liners of the 4V are not removable) So I purchased a 1200 grit ball hone, it was not long enough. build extension. But what about the oil? You have to use LOTS of oil and what of the steel, stone and oil left behind? Well I called my longtime hotrod mechanic friend Bill McFeeters and he said: "I put mine in the dishwasher"! So this delicate instrument was field honed with lots of oil, dishwashered (Is that a word?) and reassembled after lots of O2 cleaning and it worked perfect till the day I replaced the whole compressor. (Very sad day)
By the way. RIX told me over the phone that I could not do it. It was not part of the specifications! I did it.
So to end. Like Iain said, Don't touch it or do it right!!!

Wow this went long! I can not wait to see the replies!
I sure like your attiude, why pay so much on a new sleeve when you can get more from the old one? it's imoral ! of course if you put into considiration risk managment and down time, some times it's wrong, but if it's about trial and error, sure I would do the same.
 
@Golan68 That is a very good point that I don't think I made clear enough!

When I want parts from RIX, Say the 4th stage cylinder assembly I was quoted 8 weeks lead time. They do not have these specialized items laying around on the shelf. If memory serves, I was quoted 12 weeks for the intercooler assembly. And even a week minimum lead time for any parts that I wanted Nitrox cleaned. So in the case of the 4th stage cylinder honing I had purchased all the tools online, made the extension, ordered standard rings from RIX and had the whole thing back up and running in less than 2 weeks. (I also had a spare 4th stage cylinder lying around (Because they had done this before) used in case I screwed up the first one.

Also as my best friend and fellow instructor Andy said. I was on a shoestring budget. In fact I was on NO budget. I would have to come to the owner every time and ask. Can I spend $198 for new Lawrence Factor filters? Ours are shot. Imagine there surprise when I wanted to finally replace the 1st, 2nd and 3rd stage rings all at the same time! Can I spend $1892.54 on the compressor? WHAT??? Not this month!
 
So I went through and gathered all the part #'s / pieces needed from Rix to rebuild all 3 pistons and all 3 heads. I believe this would be 100% rebuild as long as the sleeves / pistons / bearings (basically all metallic parts) were still in good shape (which I would imagine most are after a good cleaning).

Total came to $512.62, which I don't think is too bad. When I first got my Rix I was told just the 3rd stage would be closer to $1000. If I was to order the 3rd stage "kit" ($682.95!!) it includes a brand new piston. That alone is $248.95, which I would imagine most don't need.

If I ordered all the parts to include the 3rd stage "kit" it would be around $1000 ($907.07 to be exact, which I included 3rd stage Rider Ring for the Follower that's not included in the kit).

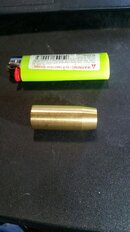
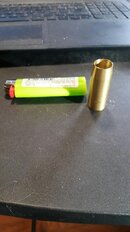
I'm also torn about the "Piston Storage Tube" ($147.50 included in the above $512.62) that you're supposed to use to install the 3rd stage rings and be able to slide the piston into the cylinder. Something tells me you could get away without this but I'm not sure. I'm sure it would make the job easier.

Attached is my parts list, how many needed (in parenthesis), part #, part name, and cost (good until Dec 2022).
 

Attachments

Rob...you will need that piston storage tube for the 3rd to install the piston in the bore...it is basically a piston ring compressor.
 
Thanks for posting Rob, that is really helpful. Can you post a photo of the storage tube when you get it and let me know the bore diameter and if it is tapered, I might try to make one before placing an order.
 
Rob...you will need that piston storage tube for the 3rd to install the piston in the bore...it is basically a piston ring compressor.
Well that's a debby downer, lol
 
Thanks for posting Rob, that is really helpful. Can you post a photo of the storage tube when you get it and let me know the bore diameter and if it is tapered, I might try to make one before placing an order.

I will try to coax @1bubbleoff to send me a pic as he owns one and I'll post it up.
 
I will try to coax @1bubbleoff to send me a pic as he owns one and I'll post it up.
Dimensions, especially bore diameter and any taper would be really helpful and any details of how it is used. I suspect it may just be a tapered tube to compress the rings but it could be something else.
 
Dimensions, especially bore diameter and any taper would be really helpful and any details of how it is used. I suspect it may just be a tapered tube to compress the rings but it could be something else.

@1bubbleoff just sent me these. Sucks this costs so much for what it is.
 

Attachments

  • 20230113_105832.jpg
    20230113_105832.jpg
    76.5 KB · Views: 83
  • 20230113_105903.jpg
    20230113_105903.jpg
    71.8 KB · Views: 84
Back
Top Bottom