Scubapro 108HP

Please register or login

Welcome to ScubaBoard, the world's largest scuba diving community. Registration is not required to read the forums, but we encourage you to join. Joining has its benefits and enables you to participate in the discussions.

Benefits of registering include

  • Ability to post and comment on topics and discussions.
  • A Free photo gallery to share your dive photos with the world.
  • You can make this box go away

Joining is quick and easy. Log in or Register now!

Looking at Kupu's post and photos it looks like the guts of the really early 108's could be removed from the body. ? ! I wonder if Kupu's double valve 108 also has the plastic tipped lever?.
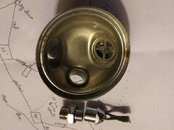
Yes, all the components can be fully removed from the body (photo is better than words). No plastic tips on lever.
1083.jpg
 
Caution! The following is for nerds only.
There is an interesting amount of parts commonality between the 108HP and the R190. Attached are diagrams of those models from 1997.
 

Attachments

Caution! The following is for nerds only.
There is an interesting amount of parts commonality between the 108HP and the R190. Attached are diagrams of those models from 1997.
I almost made similar comment earlier. Nerds come out ahead in the long run, just ask Lewis Skolnick.
 
Good to hear. Please share the particular process you used. Is the lever height now correct?


Either side of the spring would work. Easiest to install would be poppet-->washer-->spring. I've not done it, but I would imagine trying to put the washer on the other side of the spring would take a Puppet Master (or should that be a Poppet Master) to get everything to line up. It would also be a simple matter of taking the spring and poppet to the hardware store to find the right size.
Started out with the orifice turned all the way in backed out one and half turns, Nylok nut showing a little over a thread, put on the diaphragm and cover, turned the air on, adjusted the orifice a bit to stop the free flow, purges really well. Cracks .7

I’d like it to crack somewhere closer to 1, may fiddle a little more or try the washer idea.
 
Good job.
One advantage of having a classic downstream dual adjustment demand valve is the ability to raise the cracking effort with the adjustable orifice, then "pick up the slack" in the lever with the nyloc nut. I would try that before adding the washer. Please remember to hold the purge when adjusting the orifice.
So after fiddling I can get the cracking to 1, and then going back-and-forth taking up the slack in the lever goes back to .7-.8, but if I have the lever just a little bit low so when you’re sucking on it you can feel the diaphragm pulling in before it touches the lever it’ll stay at 1, not easy to tune because the orifice and the nut or so interrelated.
 
The following assumes you have the correct IP going to the second stage. (135 +/- 10 psi)

How many poppet stem threads are showing on the outside of the nyloc nut? Less than 3? Continue with adjusting the orifice in a little further (press the purge while adjusting) then turn the nut clockwise to adjust the lever height back to full. If you cannot get the cracking effort into specs before exposing 3 threads then I think it's time to shim the spring. Regardless, do a flow check after final adjustment because the further you screw the nut on the less travel & separation the poppet will have.

BTW SP does not like any slack in the lever. A small gap between the lever and diaphragm pad is desired, but no gap is acceptable as long as the diaphragm does not put pressure on the lever.
I’m at 136 IP, have about 2 threads showing, cracking between .9 and 1, with a gap meaning when I inhale on the regulator I can feel/hear the diaphragm move before I get air it’s not instantaneous.

Slack in the lever equals a gap correct?

“but no gap is acceptable as long as the diaphragm does not put pressure on the lever” this one I may need you to explain a little more. I gap is desirable but?
Gap between lever and diaphragm is driven by lever height. So the larger the gap, the less total effective throw in the lever, the less maximum flow capacity of the poppet valve. conversely, if the lever is too high, the diaphragm will be pulling it down just by being installed. In a perfect world, the lever would be adjusted to meet the diaphragm with zero contact pressure.
To see what he means about the pressure, adjust the lever as high as you can and then rest the diaphragm on it. The edges probably won't sit on the reg housing... if you put the diaphragm cover and face-plate on and clamp it together, now the diaphragm is pulling the lever down. The amount of pressure it's exerting is driven by how much the lever is too high. with your earlier tuning (1 inch dropping to .7 inch when lever slack is taken up), I would suspect that you took just a smidge too much slack out, and the diaphragm is exerting .2-.3 inch water pressure just by being installed.

Respectfully,

James
 
Back
Top Bottom