Tore My Rix SA-6B Apart

Please register or login

Welcome to ScubaBoard, the world's largest scuba diving community. Registration is not required to read the forums, but we encourage you to join. Joining has its benefits and enables you to participate in the discussions.

Benefits of registering include

  • Ability to post and comment on topics and discussions.
  • A Free photo gallery to share your dive photos with the world.
  • You can make this box go away

Joining is quick and easy. Log in or Register now!

From memory its a 3M 7447 scotch bright rectangular pad Aluminium oxide brown in colour and a little water nothing else, clean with a wet clean paper towel and dry using dry paper or just leave to dry
I missed this little gem (or forgot). So clean the cylinders with the 3M 7447 and then use 600-1200 grit sandpaper to get rid of the gloss? Will the 3M 7447 damage it if used too much?

I tried vinegar and baking soda and a nylon brush and that didn't put a dent in getting the patina / verdigris off. I mean, it looks like it would work but it would take forever:(

I don't think it technically matters (because the piston doesn't travel back that far), but it sure would be nice to clean it up as much as I can.

Also, as per one of your posts, there is no "lip" at the top of either 1st or 2nd stage cylinders (at least not that I can feel or see). Just that bit of corrosion we already discussed at the top of the 3rd stage cylinder.


20231013_130645.jpg
 
Vinegar then baking soda?

I laid a series of white Heinz cooking vinegar dampend paper towels to break the verdigris, green an/or blue Scotchbrite, then wiped it down with a series of wet paper towels.
 
Vinegar then baking soda?

I laid a series of white Heinz cooking vinegar dampend paper towels to break the verdigris, green an/or blue Scotchbrite, then wiped it down with a series of wet paper towels.
I don't know.. I read that a vinegar and baking soda slushy would help. I even let it sit for 15 minutes. It barely touched it.

I can try wet vinegar paper towels.

So apparently Scotch Brite 7447 is 320-400 grit, green is 600 grit and blue is 1000 grit.
 
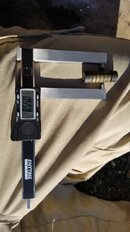
Well... somewhat good news. I didn't trust the micrometer so I borrowed a little bit better one (still not professional by any stretch, but it's what a buddy had).

3rd stage piston is right on the money, which means it has a good bit of life left. Probably more then I'll ever need.

The rider rings are a different story. I've tried measuring them multiple times and I either get a little out of spec or right at the lower end of spec. It's definitely time to change them, but now it's a matter of do I put them back in there for another 1000cf or wait until January when parts come in:(

I almost ordered the parts earlier this year and put it off... all on me.
 

Attachments

  • 20231023_161549.jpg
    20231023_161549.jpg
    69.1 KB · Views: 68
Put it together if its easy to do.😀
Keeps thing clean and organized.
And you'll remember how to assemble it....

Especially if you are needing to pump air...

But I often don't take my own advice...
Reminds me... I have a NV 4500 Transmission apart on my bench for a few months... oh well I'll do it when it colder outside...
 
Y'all check my thinking here but ...

Come January, pull the 3rd stage rod/follower and toot some air into the 2nd-stage drain. You might want a 3rd hand (or wadded blanket) to catch your new bouncing baby 3rd stage piston when it pops out. Ring it and reassemble. Easy-peasy ...
 
Y'all check my thinking here but ...

Come January, pull the 3rd stage rod/follower and toot some air into the 2nd-stage drain. You might want a 3rd hand (or wadded blanket) to catch your new bouncing baby 3rd stage piston when it pops out. Ring it and reassemble. Easy-peasy ...
This is pretty much where my head is.
 
Well... somewhat good news. I didn't trust the micrometer so I borrowed a little bit better one (still not professional by any stretch, but it's what a buddy had).

3rd stage piston is right on the money, which means it has a good bit of life left. Probably more then I'll ever need.

The rider rings are a different story. I've tried measuring them multiple times and I either get a little out of spec or right at the lower end of spec. It's definitely time to change them, but now it's a matter of do I put them back in there for another 1000cf or wait until January when parts come in:(

I almost ordered the parts earlier this year and put it off... all on me.
Heck Rob
It's still a vernier gauge. How many times? Stop calling it a micrometer. LOL
Or I'm off onto that Coltri post for an engineers rest.

Now onto your piston:
1. Your 0.558" measurement is this the same measurement in 6 places? ie just below the pressure breaker and compression rings retaining walls

2. Also the 2 leading and 2 trailing diameters (in 4 places at each end ) holding the two rider rings should be smaller

3. At the trailing end (push rod end) that small spherical radius indent in your photo looks a little big to me in overall diameter. The diameter should be around 0.25" yours looks in the photo much bigger
Now if the original spherical was around say .190" matching the push rod ball diameter then I think this has pushed deeper into the piston. If this is so your piston to head clearance is now much shorter so you maybe consider adjusting the push rod length to lower the dead space and increase flow

At TDC unscrew the bolt holding the push rod to the rod end bearing.
Unscrew the rod until it touches the bottom end of the piston
Ensure that the floating piston is all the way up onto the head firm
Then mark the rod position with a fine marker pen line. Then screw back into the rod and bearing just under 3/4 of a turn.
Then tighten back up the retaining nut and the small movement of the rod should rest at 3/4 of a turn
This now gives you the required 30 thou clearance from piston at TDC to head clearance and no borrowed tools are required.

Also put a new stainless nut on while your at it (3/8 UNF) and remember if you ever fit a new piston after doing this you will have a to re adjust for a new longer piston due to the shallower radius indent. Iain
 
Here is where judgement is required. The SA-6 piston is machined from soft brass and the liner is machined ground externally and internally then honed internally then heat treated and case hardened. To manufacture the piston is cheap and the liner expensive by comparison.

The original design philosophy was to discard the piston with the rings than to faff about trying to re ring in the field. So the soft brass was allowed to wear while the hard steel liner remains intact.

Times though have changed. The original users requirements are not the same as recreational scuba divers who now mostly operate these mostly ex government SA-6 blocks so a change of consideration could be argued.

Increasing the piston life by using some of the non leaded nickel bronze materials than a brass would add pence to the cost of manufacture while increasing wear on the liner only marginally would IMHO be a useful balance.

However a change of ring polymer material for the compression rings that would increase the existing life expectancy from 150 hours into the 500 hour range the trade off cost that would more than double the ring life would also cost more than double the price so making it a little like the same issue with modern molecular sieve material. Twice as long life but at double the cost has little benefit to recreational end users so I'm told.

Further this would also require changing the cheap throw away $2 Dupont Viton 0-rings to the eye watering but predictable fail time rate over pressure over temperature performance you can achieve with some of the rarer compound modern perfluroelastomers. Iain
 
https://www.shearwater.com/products/perdix-ai/

Back
Top Bottom