Tore My Rix SA-6B Apart

Please register or login

Welcome to ScubaBoard, the world's largest scuba diving community. Registration is not required to read the forums, but we encourage you to join. Joining has its benefits and enables you to participate in the discussions.

Benefits of registering include

  • Ability to post and comment on topics and discussions.
  • A Free photo gallery to share your dive photos with the world.
  • You can make this box go away

Joining is quick and easy. Log in or Register now!

Heck Rob
It's still a vernier gauge. How many times? Stop calling it a micrometer. LOL
Or I'm off onto that Coltri post for an engineers rest.

Now onto your piston:
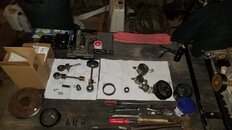
1. Your 0.558" measurement is this the same measurement in 6 places? ie just below the pressure breaker and compression rings retaining walls
See attached
2. Also the 2 leading and 2 trailing diameters (in 4 places at each end ) holding the two rider rings should be smaller
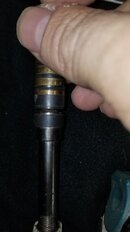
See attached, the hole is slightly larger than 1/4"
3. At the trailing end (push rod end) that small spherical radius indent in your photo looks a little big to me in overall diameter. The diameter should be around 0.25" yours looks in the photo much bigger
Now if the original spherical was around say .190" matching the push rod ball diameter then I think this has pushed deeper into the piston. If this is so your piston to head clearance is now much shorter so you maybe consider adjusting the push rod length to lower the dead space and increase flow
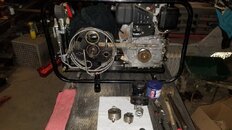
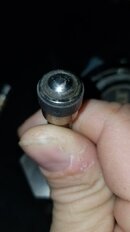
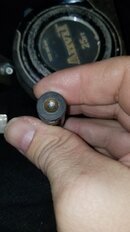
Hard measurement to get, looks like .273 across the indent. See attached pics?
At TDC unscrew the bolt holding the push rod to the rod end bearing.
Unscrew the rod until it touches the bottom end of the piston
Ensure that the floating piston is all the way up onto the head firm
Then mark the rod position with a fine marker pen line. Then screw back into the rod and bearing just under 3/4 of a turn.
Then tighten back up the retaining nut and the small movement of the rod should rest at 3/4 of a turn
This now gives you the required 30 thou clearance from piston at TDC to head clearance and no borrowed tools are required.

Also put a new stainless nut on while your at it (3/8 UNF) and remember if you ever fit a new piston after doing this you will have a to re adjust for a new longer piston due to the shallower radius indent. Iain
Understood.

I understand that some things might not be "perfectly to spec, but before I tore the thing apart I was consistently getting 5cfm whenever I times it. It was so "on the money, that it was easy to figure how much time I had left to fill a certain tank.
 

Attachments

  • New.pdf
    65.9 KB · Views: 62
  • 20231025_153952.jpg
    20231025_153952.jpg
    28.5 KB · Views: 49
  • 20231025_154001.jpg
    20231025_154001.jpg
    43.5 KB · Views: 49
  • 20231025_154012.jpg
    20231025_154012.jpg
    40.5 KB · Views: 44
Forget the pdf, here's a picture better;

I do not claim to be a wizard measuring this by any stretch.

edit: fixed one measurement. Original measurement to the left in the picture was drastically off, I think I had .556?!

3rd Stage.JPG
 
Forget the pdf, here's a picture better;

I do not claim to be a wizard measuring this by any stretch.

edit: fixed one measurement. Original measurement to the left in the picture was drastically off, I think I had .556?!

View attachment 807446

I have assumed for reference that the indent is on the right of picture. If so then

From left to right

1 and 2. show no wear as these house the rider rings and are smaller in diameter, same for last 7 measurement.

3, 4, 5, and 6 show some wear from original manufacture but are just within the required allowance

Item 3 showing with the .555 measurement gives you the understanding of how the rings work
with the leading ring doing all the work until it fails then the 2nd ring takes up the work and so on down the line.

Now the tricky part.

If it were me I would fit the piston back into the liner as is and run it as is. Cheap no cost option
But before sealing it all up I would fit the piston and feel the slip if the piston holds or slips down the liner
when vertical and pushed gently with a pencil

If it drops like a stone without touching then you need new rings but if the expanders are still working
you may get 50 hours more life and if its a no cost option use as is.
It's a 20 minute job to replace the rings.

You will need a small compression tool that comes with a complete piston kit or if you don't its nigh on impossible to fit the new uncompressed rings into the liner without damaging them

The trick to do it without the tool will take some time to explain fully hence why the tool make it a breeze.
and if you don't add a couple of extra rings to the order just in case.

I should also discuss the importance and principle of the rider rings and pressure breaker rings remind me later Iain
 
View attachment 807444
[/QUOTE]
I have assumed for reference that the indent is on the right of picture. If so then

From left to right

1 and 2. show no wear as these house the rider rings and are smaller in diameter, same for last 7 measurement.

3, 4, 5, and 6 show some wear from original manufacture but are just within the required allowance

Item 3 showing with the .555 measurement gives you the understanding of how the rings work
with the leading ring doing all the work until it fails then the 2nd ring takes up the work and so on down the line.

Now the tricky part.

If it were me I would fit the piston back into the liner as is and run it as is. Cheap no cost option
But before sealing it all up I would fit the piston and feel the slip if the piston holds or slips down the liner
when vertical and pushed gently with a pencil

If it drops like a stone without touching then you need new rings but if the expanders are still working
you may get 50 hours more life and if its a no cost option use as is.
It's a 20 minute job to replace the rings.

You will need a small compression tool that comes with a complete piston kit or if you don't its nigh on impossible to fit the new uncompressed rings into the liner without damaging them

The trick to do it without the tool will take some time to explain fully hence why the tool make it a breeze.
and if you don't add a couple of extra rings to the order just in case.

I should also discuss the importance and principle of the rider rings and pressure breaker rings remind me later Iain
Wel thank goodness the piston is still good to use. The issue that I do have is with all the rings on I can push it right back in without any resistance at all:(. Using a pencil it'll pop right in and come right back out.

I do have the piston installer tool for the 3rd stage (borrowed from a friend). So that settles that part anyway.
 
If it drops like a stone without touching then you need new rings but if the expanders are still working
you may get 50 hours more life and if its a no cost option use as is.
It's a 20 minute job to replace the rings.
Let me reiterate that I took the piston out, it was very easy to take out. I could also very easily put it back in without the 3rd stage tool. I don't know if it would "fall out, but there's very little meat left.

From reading the manual it specifically says "piston should not be removed unless there is evidence of significant leakage past the rings" I have never had this from the bottom of my 3rd stage, so there must be "some" meat left.

I need to try and take better measurements of the rider rings. They are at the end of their life. The question is, are they good for another few hours of running, or am I pushing my luck:( I'll see if I can get better measurements tomorrow. I haven't attempted to remove any of the other rings and don't know if I should try (and get a measurement) or leave well enough alone.

I'll also get a .015 feeler gauge to see if I can measure the ball / indent on the piston and rod.

Edit: Rider rings measure .49-.51 around 2 and .51-.53 around the 1. They're supposed to start new @ .55 and be changed at .52
 
Rob.

I let you know the part number of the original vendor SKF N 08 for a reason
These parts are in hand, going to hopefully give a whack at swapping these out this week.

Plan to start swapping bolts for SS this week also, just need to get to a store to match them up.
 
Just a current state of affairs, not really much new. Cleaned the pistons up some, just waiting on parts from Rix. Still need to install nuts and locks on either side...

Should be getting a shipment sent end of next week for most of the parts, would be nice to rebuild the heads while I'm waiting for the rest of the parts.
 

Attachments

  • 20231109_075322.jpg
    20231109_075322.jpg
    72.2 KB · Views: 34
  • 20231109_075351.jpg
    20231109_075351.jpg
    82.5 KB · Views: 45
Sorry for jumping in, trying to get a hold of Iain/hsm .. can not send PM to him directly as of yet, I am newly here.
Any suggestions ?
 
Sorry for jumping in, trying to get a hold of Iain/hsm .. can not send PM to him directly as of yet, I am newly here.
Any suggestions ?
Well... he won't respond.... probably not ever. Very smart man, but with all the the smarts comes almost zero time for us common folk. You'll just have to sift through the old threads, wait for him to drop some bread crumbs or cruise the internets like the rest of us!

No offense, just facts:)

Is it something you'd want to post about? Or start a new thread? I won't claim to be an expert on all things Rix, but I can get around a good bit and have torn one almost all the way down. Plenty of us help each other in that regard.
 
https://www.shearwater.com/products/swift/

Back
Top Bottom