Spec Boot For Mk-15

Please register or login

Welcome to ScubaBoard, the world's largest scuba diving community. Registration is not required to read the forums, but we encourage you to join. Joining has its benefits and enables you to participate in the discussions.

Benefits of registering include

  • Ability to post and comment on topics and discussions.
  • A Free photo gallery to share your dive photos with the world.
  • You can make this box go away

Joining is quick and easy. Log in or Register now!

I suspect the old silicone packing will hold up much better against water. It really is thick. You could always use a bead of Christolube at the head and stem of the piston and silicone for the main filler.

I think the groove is important to provide space for the 0.1+ cu inches of packing material that has to go somewhere when the piston moves from the fully open to the locked up position. I wonder if Herman could mill a groove into a mk5 ambient chamber.

I don't think milling a groove into the MK5 body is needed. I have an idea I'll try in the next week or so.

As for boot material: Silicone packing and silicone elastomer aren't compatible. How about using a non-silicone packing compound (such as christolube) to avoid the in-compatibility. The silicone elastomer is easy to cast and inexpensive...
 
Christolube is expensive and limiting the packing to fluoro silicones really limits the boot's attractiveness. Many people just dive air.

I think that it is best to get the boot right for anything that the chamber is likely to be packed with. I'd be willing to pay a premium for a boot that will hold up over time and not require any particular packing.

Yeah, really regret having to move away from simple casting compounds. Maybe there is something out there, still looking...
 
A groove is one way to help the boot hold a little pressure so the inside space can enlarge to contain the packing material overflow and keep water out. I suppose you might try to use the small grooves at the joints between the ambient chamber and the body at one end and the turret at the other. Otherwise, I expect it will leak packing out and water or air in.
 
I suppose you might try to use the small grooves at the joints between the ambient chamber and the body at one end and the turret at the other. Otherwise, I expect it will leak packing out and water or air in.

That is exactly what I was going to use, with a space between the ambient chamber and the boot in the center.


Christolube is expensive and limiting the packing to fluoro silicones really limits the boot's attractiveness. Many people just dive air.

I think that it is best to get the boot right for anything that the chamber is likely to be packed with. I'd be willing to pay a premium for a boot that will hold up over time and not require any particular packing.

Yeah, really regret having to move away from simple casting compounds. Maybe there is something out there, still looking...

Since I really have no need of a boot, but am enjoying the challenge, I'll continue to work on the mold and let lowviz work on the actual boot material.
 
...//... am enjoying the challenge, I'll continue to work on the mold and let lowviz work on the actual boot material.
I'm sure that the MK5 divers will appreciate you coming up with a boot. Please send me a boot in any material if/when you develop one. I'm working on a liquid injection system for your molds.

I just today received cured VytaFlex samples in durometer 40, 50, and 60. Forget 60, too stiff. 50 is a "maybe", it would make a pretty tough boot. 40 seems about right. I've ordered Mold Max 30 and three more cured VytaFlex samples in durometer 10, 20 and 30.

Edit:
Just to avoid confusion, I'm only using VytaFlex for prototyping. The fluorosilicone that I'm currently interested in is just too expensive to waste on set-up and development.
 
Last edited:
Tigger,

I'd like to replace your clay cone with the mixing dispenser tip shown in the attached file.

I'm pretty sure that I found a way around a lot of complicated equipment for liquid injection. Once my mixing tips arrive, I'll make an aluminum block that will contain the tip. The tip will protrude into a machined cavity and then it should be back to your procedure for making a mold within that cavity.

:)
 
File won't upload on "Edit". Got it, see attached file. This is starting to look good.

Just for fun, here is how to do it commercially:
 

Attachments

  • Two-Part, Side by Side Kit Adapter Instructions.pdf
    806.8 KB · Views: 476
Last edited:
Been playing with Mold Max 30 and Ease Release 200. Amazing.

The implant grade fluorosilicone isn't here yet, any day now. I am now convinced that I not only need a mold, but something to contain the mold under pressure. Went to my fav steelyard today. Total Bliss.

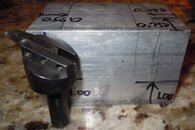
Got a 4' length of 2024 T351 2.5" x 2.5" aluminum at a good price. Maybe not my first pick of an AL alloy, but nice enough stuff. Plan to bore a hole and then run a fly cutter through it to get a nice finish on the wall so that the mold can be parted. See pic. Once I get the airless mixing nozzles with my med grade silicone, I'll get a tapered end mill that matches the nozzles and it is "game on".
 

Attachments

  • Lets Make a Mold.jpg
    Lets Make a Mold.jpg
    73 KB · Views: 44
......keep the cards and letters coming.
 
Been playing with Mold Max 30 and Ease Release 200. Amazing.

The implant grade fluorosilicone isn't here yet, any day now. I am now convinced that I not only need a mold, but something to contain the mold under pressure. Went to my fav steelyard today. Total Bliss.

Got a 4' length of 2024 T351 2.5" x 2.5" aluminum at a good price. Maybe not my first pick of an AL alloy, but nice enough stuff. Plan to bore a hole and then run a fly cutter through it to get a nice finish on the wall so that the mold can be parted. See pic. Once I get the airless mixing nozzles with my med grade silicone, I'll get a tapered end mill that matches the nozzles and it is "game on".

OK, so now you are addicted. Your shop is clearly more sophisticated than mine is. I talked with Smooth-on and they say their platinum cure silicone (Smooth-Sil series) is compatible with silicone oil. I have some cured samples coming for my other project (TiggzCraftworkz).

Pressure casting at 60 psi makes the cast material bubble free. Make yourself an air chamber good to 60 psi that you can cure your parts/molds in. If you make the mold big enough I don't see any reason why you need a fancy casting machine for a few parts. Not that it isn't fun to make the stuff.
 
https://www.shearwater.com/products/peregrine/

Back
Top Bottom