Bauer Utilus U1

Please register or login

Welcome to ScubaBoard, the world's largest scuba diving community. Registration is not required to read the forums, but we encourage you to join. Joining has its benefits and enables you to participate in the discussions.

Benefits of registering include

  • Ability to post and comment on topics and discussions.
  • A Free photo gallery to share your dive photos with the world.
  • You can make this box go away

Joining is quick and easy. Log in or Register now!

vbk

Registered
Messages
17
Reaction score
0
Hello!

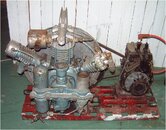
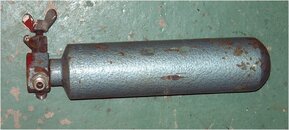
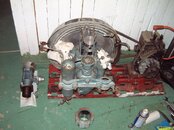
Im taking apart (for cleaning/upgrade) an old Bauer Utilus U1, 1970, 80l/min, 225bar.
Im looking for manual, parts list, service manual or any other information that can be of help.
Anybody got information regarding this compressor?
Any specific I should look after during the take apart?

What i have noticed so faar is:
* Really small filter cartridge.
* No intermediate separator after second stage.
* No pressure maintaing valve?
* No piston rings on 3rd stage floating piston?!?

Do you have any comments of above or any other information regarding this compressor, please feel free to comment!

What is your suggestions for having nitrox compatible air out of this compressor?
Comments regarding what is needed for having this compressor for continious blending?

Are there any good companies and/or places selling spare parts/accessories for upgrading/complement this compressor for better/nitrox compatible air?

So faar I have opened 2nd and 3rd stages and it looks quite good, quite much dirt, but parts looks good/not worn out.

Im thinking of complement compressor with:
* Oil pressure gauge.
* First stage pressure gauge.
* Second stage pressure gauge.
* Pressure maintaing valve.
* Intermediate separator after second stage?
* Additional filter cartrige.
Comments?

What parts are different between U1(225bar) and U1-H (300bar)?
Is there any engineering restricts from running compressor more than 1000rpm?
Temperature? Balanced at 1000rpm? Comments?

Feel free to comment this project and let me know if you have some info/manuals regarding this compressor.
If someone is interested, I have pictures from the take apart.

As Im newbee to this, Im also running a similar thread at thedecostop.com, just to squeece all possible information regarding this compressor.

//Micke
 

Attachments

  • bauer_utilus_u1.jpg
    bauer_utilus_u1.jpg
    171.6 KB · Views: 2,842
Hello again!
More work done on the compressor take apart!

First a notice.
The block of this Utilus U1 looks really heavy and almost identical to a Capitano, I think from 1978! Almost no parts are in aluminium!?
It looks like it is built for 37 more years of compressing air!? Lets see...
smile.gif


I have now taken apart all cylinder heads. It looks better and better.
Quite much dirt in 3rd stage valve, a little bit less in 2nd stage and totally clean in 1st stage.
In overall, it looks really good!
Most parts looks as if they were unused, but paint seems to be original and un-opened.
Can it be that it has only been private owned since new... I must call previous owner too hear if he knows the 37 year history...
smile.gif

See picture.

There is one exception that I have in mind...
I was looking closer to the 3rd stage floating piston and found a little strange thing. Overall it looks good, but...
One third of the floating piston has its surface polished in vertical direction.
Two thirds have surface that is polished in horizontal direction (like I expect it to be from new). So faar it looks normal like a used piston.
But the area with vertical surface (1rd of the floating piston that is closes to the cylinder head) is exactely 12mm diameter. The area (2rd) of piston that is closer to crank shaft, that looks really unused, is 20um smaller eg 11.980mm.
Why? It looks really strange to me, regarding to surface of the piston I would have expected it to be the oposit.
The part that looks unused is smaller diameter than the part that looks used.
See attached picture (The picture is not really good, it looks like bigger surface difference than it really is).
Please comment this so I can go for a good sleep without thinking of this 3rd stage piston!
smile.gif


Next is the filter setup.
All parts regarding to filter is made of steel, not aluminium.
Regarding to Swedish Bauer representative, old filter parts in steel is not out for
15years exchange time!? And parts feels small, but really heavy!
If that is correct, that means I could use it as water separators/pre filter and add another larger filter media tube after the original separator/filter, that probably is easier to find.
Volume of individual parts is less than 0.5litres (0.47 I think was typed into one of the filter bottles).
Can somebody confirm this (that those filter parts could still be used)?

Another problem I had is to open the water separator!
I could not come up to some easy way to hold the bottle while open it.
Does somebody have any good idea?
I believe heat is no good idea and place it in the wise is not a good idea eighter?
How do you hold small bottles when removing the tap?
Proposals are welcome!
See picture.

As it looks right now, I will only remove all pipes for cleaning, not bothering in braking down crank case.

Please feel free to comment!
//Micke
 

Attachments

  • floating_piston1.jpg
    floating_piston1.jpg
    14.8 KB · Views: 626
  • filter1.jpg
    filter1.jpg
    85.5 KB · Views: 638
  • piston4.jpg
    piston4.jpg
    294.8 KB · Views: 788
Hi Micke
First i can photo copy and send
Parts list&workshop manual
PM you address to me
Do you want it in english or german?
As for final seprator unit,best is to replace or get hydro test.
Then fit a new final filter housing.
Final piston looks fine in photo.
Clean piston&sleeve,Lubricate piston&insert into sleeve [piston is tapered]
must be fitted from bottom in to sleeve.
Hold vertical. Piston should glide slowly& constantly in under its own weight Into the sleeve.
You must remove the head first from the cylinder though.
 
If you get really carried away and decide to repaint, Rustoleum is now making a knock-of of Hammerite paint, which is a good match for that metallic blue (Hammerite is great paint but hard to find, the Rustoleum version is everywhere). Great stuff for making old machines look new with a minimum of prep since it can be used it over light rust, chips and pits, and it hides everything, being textured.
 
About the separator, wrap it with sheet of newspaper and CLAMP it in a vise. The Whitworth thread on the valve will come loose in 1/2 turn. Inspect for RUST. Inspect the base of the valve, especially the Venturi tube. Look for pinholes or corrosion. Don't worry so much, jeez.
 
Hello!

Now to third stage floating piston.
I have now tried a number of times, but can not decide if it is good or not.
Sometimes it goes quite fast, sometimes it stops and sometimes it goes really slow.
I think that I will keep the third stage piston as it seems to be quite ok!?
And then monitor how much oil is comming into water separator.

I have now removed everything I will remove, all but crank shaft and pistons.
Started to clean parts, but that will take time!

Unfortenately i found out that second stage head probably must be replaced as threads for output valve is a little bit damaged. Probably it will work ok, but I do not like it... ! So where to find a new second stage head? And the question is what heads (capitano, junior, utilus, and age) will fit?
Also second stage valves did not look that good (rusty).
So second stage head and valves need to be replaced! :(
Tip are welcome where to start looking.

Any good ideas of how to best clean intercooler pipes? Petrol?

Paint... Yes, probably I should give it a alittle bit of paint also!
Hammerite is really easy to find here, even the local petrol station has it in many colours! But I may go for some spray paint (I think hammerite also is availiable as spray).

Time for bed now!

//Micke
 
Ok, I just had to try one more time opening the water separator and now it was no problem.
I was just a little to much chicken first time! :)

Construction is really simple with two pipes, one shorter with a small hole = inlet and one longer = outlet pipe.

Pipes look good!
Im unsure about the bottle itself... it looks good except for the rounded top (opposite side of threaded inlet. Call it top as it is mounted upside down). There it looks strange, could be rust! Or can it be something from production?
It looks homogen and with a tip exactely in bottle center.
Can someone that has inspected such bottle, if it should look metal clean all surface?
If there should be rust, I had expected it somewhere near the threads where wather is trapped...
Please comment this.

//Micke
 
I have now checked the Capitano -78/79 at our dive club.

It has the same second stage cylinder as mine Utilus U1, so I believe that also capitano second stage head will fit my Utilus U1!?
Head does not look alike, capitano head is a little bit bigger, but I do not think that is a problem as it is plenty of space on my utilus.
So that means that at least old utilus and capitano heads will suit.
Any one that have a spare second stage head?

Also noticed that Capitano first stage is 70 mm instead of U1 utilus 60mm and third stage of capitano is 14mm instead of 12mm at my utilus.
Capitano is running 1300rpm instead of my utilus 1300rpm.

Also noticed that the capitano does have blow past return hose leading gas back to first stage. Easy and clever, probably will do that modification on my Utilus!

Any comments on running helium mixes in my old Utilus U1?
With blow past return hose, is there any disadvantages except for higher temperature (can be compensated with lower rpm)?
Does anyone know why this blow past hose is there on newer compressors?
I mean, air is no cost, so why have it returned to first stage with risk of getting more oil/odour to the air?

I have done a little bit check of my water separator.
I have almost decided that it is no rust, as it is black, soft (carbon?) and under that is metall clean tube. In centre of bottom is a tip, but i believe that must be something from the production or how it is manufactured.
If so that should mean that my water separator seems to be in good visual inspection test (except for mud in it).
Comments?

Should I use gasket glue (or what it is called in english?) between cylinders and heads as there are now gaskets on second and third stages?
Some special one needed?

//Micke
 
Cleaning interstage cooling lines. Do NOT use petrol! You can use Simple Green or there are a few other water based cleaners that work pretty good. I would start with it full strength and if they are really bad let them soak in it.
Then rinse out with clean water and dry it out with air.
 

Back
Top Bottom