

You are using an out of date browser. It may not display this or other websites correctly.
You should upgrade or use an alternative browser.
You should upgrade or use an alternative browser.
$500 Compressor Kit
- Thread starter joebob24
- Start date
Please register or login

Welcome to ScubaBoard, the world's largest scuba diving community. Registration is not required to read the forums, but we encourage you to join. Joining has its benefits and enables you to participate in the discussions.
Benefits of registering include
- Ability to post and comment on topics and discussions.
- A Free photo gallery to share your dive photos with the world.
- You can make this box go away
I don't think I have given you enough information to actually be wrong. I have intentionally been pretty vague because things will change as the design evolves. There will be some "batteries not included" kind of things that will make sense later.Please prove me and and the skeptics wrong.
I'd love to see this work out. Good luck. Please keep us updated as to your progress.I don't think I have given you enough information to actually be wrong. I have intentionally been pretty vague because things will change as the design evolves. There will be some "batteries not included" kind of things that will make sense later.
Since people asked for updates, I thought I would throw something out there. Design is around 90% complete. I sent most of the parts out for an initial quote to see if I am in the ballpark on price and have purchased most of the off the shelf components.
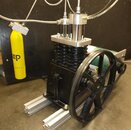
You can see the basic concept in the photoshop mashup of a 3D model and a picture. The lower half is a Harbor Freight compressor head, which provides the linear motion for the 2nd and 3rd stage cylinders on top. I plan on using a standard oil free air compressor for stage 1. (which I guess technically makes the whole thing an electric booster, not a compressor)
I can put together a parts list if anyone wants to see the breakdown, but currently I have a total of 9 off the shelf components and 5 custom machined components. (not including small things like fittings, tubing and springs)
broncobowsher
Contributor
Interesting.
Looks like there may be some cooling issues
Looks like there may be some cooling issues
I fully expect that the version you see there will have some cooling problems. I am not going to worry about it for the first prototype. To start with, I plan on just blowing 5-10 CFM of shop air through the heads and around the cylinders. Not really a great solution long term, but I am much more interested in testing out how the check valves and cylinders work right now. I am only about 50% confident at this point that the mostly off the shelf 3rd stage can handle the amount of air that I want to push through it. The entire stage only cost me $80, so I figured it was worth a try.Interesting.
Looks like there may be some cooling issues
I assembled the final stage for a quick test. With an inlet pressure of 200 psi and turning it with just a dewalt, I took it up to 3000 psi before the dewalt couldn't keep up. Next up is to make the cooling sleeve and get the motor mounted, then I can actually run it for a bit to see what happens. I have some concerns about getting enough lubrication to the piston, but so far it seems pretty promising for about $220 in parts.

The one off cost to me is around $200 and a bunch of time. I have built a few boosters over the last few years at a total cost to me of about $30 in seals. Material comes out of the scrap bin and I do all of the machining on my lunch breaks or after work if it is a complicated part. Obviously that plan doesn't scale well.
This reminds me of the good ol' days when I worked as a prototype machinist for the U.S. Air Force doing R&D work. On the weekends I would come into the shop to design (CAD/CAM) and make all kinds of things from parts for my custom chopper to a full on smoker I used for BBQ competitions. All the material came from the scrap bins which is why my smoker had a very expensive yet very light fire basket.
Cool, they let you build your own aircraft from spare parts! But, I thought choppers were more an Army & Navy thing ...This reminds me of the good ol' days when I worked as a prototype machinist for the U.S. Air Force doing R&D work. On the weekends I would come into the shop to design (CAD/CAM) and make all kinds of things from parts for my custom chopper to a full on smoker I used for BBQ competitions. All the material came from the scrap bins which is why my smoker had a very expensive yet very light fire basket.


I don't have any of the cooling parts made yet, but I ran a few short tests with both stages. It took 1.5 minutes to fill a 3 cubic foot tank to 3000psi at 600 rpm. Not a very representative test since it started from 0, but I think it shows enough promise to make the cooling sleeves and put some run time on it to see what happens. I am getting some blow-by in the final stage because of the reduced RPM, but I didn't want to crank it up due to heat generation. As some of you pointed out, heat is going to be a challenge.
Attachments
I don't have any new pictures, but I finished the temporary cooling sleeves and ran the compressor twice for about 90 minutes each time. (Filling HP100 doubles to 3800) It averaged around 2 CFM at 600 RPM. I think I might need longer interstage cooling loops and possibly a little higher cooling flow. I also need a larger drive pulley, since my VFD is maxed out, so I can't get to the design RPM of 1000.
Does anyone have any recommendations for maximum head temperature? Also, the temperature of air right before it enters the next stage would be helpful. I taped a thermocouple to the heads and got around 155F, but I want to attach them better and check again next time.
I'll take some pictures and give a quick cost breakdown later in the week.
Similar threads
- Replies
- 3
- Views
- 628
- Replies
- 5
- Views
- 891
- Replies
- 15
- Views
- 1,428
- Replies
- 1
- Views
- 432
