REVIEW: CREE MC-E Diving Light

Please register or login

Welcome to ScubaBoard, the world's largest scuba diving community. Registration is not required to read the forums, but we encourage you to join. Joining has its benefits and enables you to participate in the discussions.

Benefits of registering include

  • Ability to post and comment on topics and discussions.
  • A Free photo gallery to share your dive photos with the world.
  • You can make this box go away

Joining is quick and easy. Log in or Register now!

I don't dive very deep but after completely disassembling the light I don't see how a slightly compressed O-ring could make the bezel loose. Well, I actually mean that shouldn't be the primary cause of looseness. The threads/bezel bottoms out against the head, it should be tightened completely and loctited if loose. In fact, mine was loctited from the factory and it took a strap wrench to remove.

That said, some better o-rings would help in general and if you really care you should (carefully!) disassemble the light and reassemble with loctite and some judicious strap wrench use. At a minimum, maybe give it a good tightening twist with a strap wrench or rubber gloves to confirm tightness when new and every once in awhile during normal maintenance.

I have 3 now, and a couple more on order. I will update with any new info.

Dennis.
 
Last edited:
I received by DX P7 dive light on Wednesday. Pretty impressive.

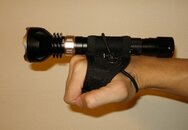
My first impression was that it was a bit bigger than I expected. It looks to be of good quality. It fits perfectly into the Oxycheq Raider III/IV handle (picture attached).

I was immediately compelled to take it apart (I mean it shows up in three pieces on the DX site). The head of the light is locktited to the body of the light but with a bit of force it came apart. Kind of glad I took it apart as one of the two o-rings at the head of the light was split (they are a tight fit). They seem to measure 2mm CS x 19mm ID x 23mm OD. Strangely, these are different from the o-rings at the base of the light (2mm CS x 21mm ID x 25mm OD), for which spares are provided. I purchased some replacements o-rings (23mm OD) at SmallParts.com. Hopefully they fit.

The magnetic switch rotates in a recessed gap between the body of the light and the head of the light. With the body not locked to the head, I can screw it down a bit tighter and lock the magnetic switch in place.

I also extraced the lens assembly (unfortunately I did not take pictures). The lens looks pretty stout. I do wish there was space for a thicker lens, but that doesn't appear possible. You need to be careful screwing the lens down, as it can rotate the LED assembly and misalign the magnetic switch.

The batter charged up in about 2 1/2 hours. Neither the charger nor the batteries got hot at all. I also got an extra set of Trustfire batteries.

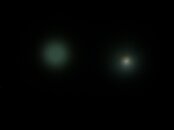
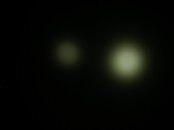
As far as performance, it's pretty darned impressive. I've attached some side-by-side shots with my Dive Rite 10W HID Sunspot. The HID definitely had a higher peak intensity in its more focussed beam, but I think the P7 is putting out more light overall. The P7 also puts out more spill. Attached are some comparison shots. The first comparison photo was taken at 1/250 sec, f4.5, ISO 50 on an Olympus SP350. (I monitored the histogram to ensure that this exposure setting was not clipping any pixels.) The second comparison photo was taken at 1/1000 sec which provides a little different comparison. It doesn't show up very well in the photos but the P7 is noticably warmer (yellower) that the very blue light of the HID.

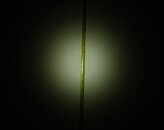
I also took one picture of a tape measure. The wall is 42inches from the light. The hot spot is about 9 inches for a spread of about 12 degrees. Could be a bit tighter, but not too bad.

I also compared the P7 to a 3W Intova light (1/250 sec). The P7 is not surprisingly much brighter. Interestingly, I discovered that the P7 decreases intensity in 50% and 20% power by pulsing the light extremely quickly. Not noticible by eye, but it showed up on the camera and so I couldn't get a good picture of the reduced output. Qualitatively, the 3W Intova is very similar to the P7 on Low (20%) power.

The light does get quite warm. I wouldn't run for extended periods at full power out of water.

Overall, I'm optimistic. I'm looking forward to diving it. While I'm not yet going to trust it in a cave, I will definitly try it out when I head down to Mexico in November.

Bob
 

Attachments

  • P7 in Oxycheq RIII Handle.JPG
    P7 in Oxycheq RIII Handle.JPG
    37.2 KB · Views: 221
  • P7 vs 10W HID (1_250, f4.5, ISO 50).JPG
    P7 vs 10W HID (1_250, f4.5, ISO 50).JPG
    18.9 KB · Views: 191
  • P7 vs 10W HID (1_1000, f4.5, ISO 50).JPG
    P7 vs 10W HID (1_1000, f4.5, ISO 50).JPG
    9.9 KB · Views: 168
  • P7 beam spread.JPG
    P7 beam spread.JPG
    43.8 KB · Views: 179
  • 3W Intova vs P7 (1_250, f4.5, ISO 50).JPG
    3W Intova vs P7 (1_250, f4.5, ISO 50).JPG
    13.8 KB · Views: 166
Thanks foglesre, I was really hoping I could get the Oxycheq light sock for this. looks good.
 
Thanks for the review. My MC-E version has shipped and should be here in a week or so. I will dive with it and a 10 W Light Cannon as soon as I get it and will post a review as well.

I'm glad to see that it fits the Raider III/IV sock so well as I ordered and have already received that.
 
i got it

a very good quality.
there is no protction in the supply batteris.
or the flashlight.
i whanted to check runtime, and forget about it.
when i reteren after 3 h the battery was less then 1v.
not good for li-ion .

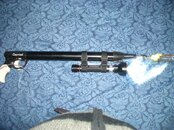
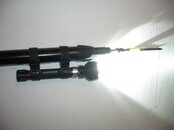
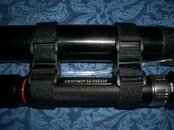
i bought Universal Nylon Mount for Flashlights and Lasers (1200dx)
work fine:D
 

Attachments

  • CIMG4765.JPG
    CIMG4765.JPG
    250.6 KB · Views: 161
  • CIMG4764.JPG
    CIMG4764.JPG
    192.2 KB · Views: 172
  • CIMG4766.JPG
    CIMG4766.JPG
    246.3 KB · Views: 154
Thanks Toro that's good to know regarding the supplied batteries not being protected. I did order another set of 18650 protected batteries however!

I guess the key with the supplied batteries is to only use for 2 hours before recharging. I guess care must be taken to not overcharge as well or is the supplied charger a "smart" charger?
 
The supplied charger cuts off charging at 4.2 Volts. I just checked my freshly charged 18650's that came with the flashlight.
 
my friend, by mistake .... unscrewed my light

She tried to turn it on and holding the body and the head twisted it and apart it came

I took it off her and screwed it up again, but I could not turn the little silver ring
then I unscrewed it a little and I could turn it on

Screwed it up again tight and the silver ring would not shift

I unscrewed the whole thing, it was all full of green gunk, which I thought was grease
I cleaned it up regreased it and close it tight, it still wouldn't turn on

So, it will only turn on if the head is not fully screwed into the body

My plan ...

on the boat, turn the light on then screw it tight
and not be able to turn it low or off under water
then unscrew it abit after the dive on the boat and then turn it off

Has anyone else come across this problem?

The light should not have unscrewed so easily. The green gunk is most likely the thread locker used to seal the upper portion of the light. Either your light was pre-disassembled, dipped in solvent for hours, seriously defective, or your friend was actually a vise and a big strap wrench.

If defective, you should seek a replacement (although very time consuming through DX). Otherwise, if you want to fix it yourself, realize that a small magnet inside the silver adjuster ring aligns with electronics inside the brass part of the LED bulb/driver to turn it on/off. Everything should just screw back together and the only issue may be that the "Standby High Med Low" markings on the outside of the light may be off.

Maybe take some pics of what you did and I can give some more advice?

Dennis.
 
I ordered both 19mm ID x 23mm OD and 20mm ID x 24mm OD Buna 70A durometer o-rings from SmallParts.com. The smaller ones fit perfectly close to the head (if you take the light apart...as noted above one of these o-rings on my light was split). The larger ones fit nicely at the base (though I think that the stock o-rings are actually 21mm ID x 25mm OD). Everything goes together nice and snug.

Just through playing around with my light at home (maybe opening the base about a dozen times), one of the original silicone o-rings at the base had already gotten nicked. They are very soft. If you keep this light for a while, I expect you're going to use all of those spare o-rings that shipped with the light and then some.

The parts from SmallParts.com seem to work well, but I won't have it on a dive until November.

Bob
 

Back
Top Bottom