Project 'Frankenstein' - My DIY Sidemount Trial

Please register or login

Welcome to ScubaBoard, the world's largest scuba diving community. Registration is not required to read the forums, but we encourage you to join. Joining has its benefits and enables you to participate in the discussions.

Benefits of registering include

  • Ability to post and comment on topics and discussions.
  • A Free photo gallery to share your dive photos with the world.
  • You can make this box go away

Joining is quick and easy. Log in or Register now!

That's what I tried first. It doesn't free quickly enough if needed rapidly and is still prone to dropping out (issues in a silt-out exit). My current way of thinking is that a bottom-routed LPI poses a big issue if it slips free, as opposed to a top-routed (traditional BP&W) LPI, which won't pose that 'dangle' risk if it comes out of the bungee.

I can manipulate a bolt-snap by feel in zero viz easily, and I can cut it free if necessary. In return, I get solid confirmation that the LPI is always going to remain exactly where I need and expect it.[


I use the bungee look instead of a bolt snap. Always liked it this way better. What I do to ensure it stays there is to run the inflator through the bungee loop, and then clip in the inflator hose on the outside of the bungee loop. It holds it in place nice and tight against me that way.

I like the way the Z-System LPI routes up along the shoulder strap under-arm. I'm thinking around solutions to ensure that mine does that (I'm short - so it doesn't). Running it through some bungees may be the answer.

View attachment 121093

Adding a triglide halfway up with a bungee loop ran through it like a dring you can ensure that the hose routes right up the strap.
 
Stupid question: When you say wrapped around, do you mean an entire loop around the neck, or just threaded under the reg hoses?

Threaded under the reg hoses, SPG hose and 'under' the handle... completely encircling the cylinder valve neck (not just the handle).

Damn... I didn't take enough pics when I was diving last week. Only had my phone as camera, as the battery packed up on my underwater camera (my intention was to take a bunch of pics in-/underwater also)

Also, do you put all deco bottles on one side? (Back to the PADI Tech SIdemount materials, they seem to assume everyone one is going with on one each side, even thought they allow for all deco on the left for BM Tech.)

I've always thought PADI didn't make strict definitions on stage carrying. My personal preference is R-Rich, L-Lean. I won't get into the DIR Gang for that reason, but that's the way I was taught, the way my muscle memory works and the way the majority of my dive buddies have used.

I wouldn't be using more than 2 stages with sidemount anyway.

I use the bungee look instead of a bolt snap. Always liked it this way better. What I do to ensure it stays there is to run the inflator through the bungee loop, and then clip in the inflator hose on the outside of the bungee loop. It holds it in place nice and tight against me that way.

Not sure I can picture this? Are you talking about 2 loops?

I tried it with a regular bungee loop - and it was a PITA. I wanted it easily detachable so I could manipulate the LPI to dump air in any orientation (vertical, head-down, upside-down etc). The bungee loop wasn't so quick or simple to detach from the LPI as a straight-forward bolt-snap connection.

Bear in mind that I'm not using a 'dedicated' rig... so getting air out of the donut wing takes a little more jiggery than it would with a Razor/UTD style bag.

Adding a triglide halfway up with a bungee loop ran through it like a dring you can ensure that the hose routes right up the strap.

That's an idea. I was thinking of just using a simple loop of bungee around the harness strap (no triglide), as it'd have the flexibility to move, if I manipulated the LPI hose. Will have to check both options on my next trip.
 
Not sure I can picture this? Are you talking about 2 loops?

I tried it with a regular bungee loop - and it was a PITA. I wanted it easily detachable so I could manipulate the LPI to dump air in any orientation (vertical, head-down, upside-down etc). The bungee loop wasn't so quick or simple to detach from the LPI as a straight-forward bolt-snap connection.

Bear in mind that I'm not using a 'dedicated' rig... so getting air out of the donut wing takes a little more jiggery than it would with a Razor/UTD style bag.


That's an idea. I was thinking of just using a simple loop of bungee around the harness strap (no triglide), as it'd have the flexibility to move, if I manipulated the LPI hose. Will have to check both options on my next trip.

I only use one loop and if I have to dump while horizontal or head down I use the lower OPV. I understand your reasoning though.


Let us know how the loop on the strap works out.
 
I only use one loop and if I have to dump while horizontal or head down I use the lower OPV. I understand your reasoning though.

I think that's the differentiating issue - using a hybrid, with converted donut wing, I only have 1 OPV and 1 LPI. The OPV/dump is now at the top of the wing and the LPI at the bottom. I need the flexibility to manipulate the LPI easily to get air out from certain positions (head down).

Dedicated SM units like the Razor and UTD have another OPV on the bag (right side).

Making a DIY unit takes things away from a 'one-size-fits-all' universal solution. They're all good points though - it's just that what works for one rig, doesn't necessarily work for another.

I wouldn't swap my $200 solution for a $1400 solution, extra bolt-snap or not :wink:
 
LOL.. All good points. I use a dedicates UTD rig, so I have that lower OPV. I forgot that you had yours up on the shoulder.

I wonder what a $1200 bolt snap would look like?
 
Put a couple of loops of bungee around my left shoulder strap - using those to route/secure the LPI corregated up from below. That works well.

Bungees shortened (again) which was an improvement. Also tried routing them from the top of the wing (there's 3 d-rings each side). Jury is still out on the top loop... it tends to bring my trim slightly head forward and seems a little 'tighter' across the shoulders when rotating tanks forward. There's a few more tweaks before a make a decision on that though.

122223d1335055359-project-frankenstein-my-diy-sidemount-trial-319851_10150683540706976_610136975_9893856_1738437033_n.jpg
 

Attachments

  • 319851_10150683540706976_610136975_9893856_1738437033_n.jpg
    319851_10150683540706976_610136975_9893856_1738437033_n.jpg
    20.1 KB · Views: 491
Last edited:
(What wreck is that where the diver dismounts the tanks and goes thru the hole?)

That's the El Capitan (USS Majaba). They enter into the forward hold... pass through some broken bulkhead (dismount tanks) into the boiler room. We did the same route, plus a few others, on my ANDI Sidemount course.
 
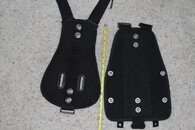
Next progression - swapping the hard backplate for a soft backplate.

The Oxycheq Ultralite finally arrived...


DSC02036 [800x600].jpg
Soft backplate seemed to answer some questions on bulk and risk of wedging in restrictions. Used this new set-up throughout duration of teaching sidemount and tec courses over the last 2 weeks - lovely!

DSC02037 [800x600].jpg
Perm attached 2x 1lb trim weights onto the webbing.

DSC02038 [800x600].jpg
Stuck with the single-piece hog harness approach

DSC02039 [800x600].jpg
How the Ultra-lite accepts hog harness (waist)

DSC02040 [800x600].jpg
Detail of how the harness routes
DSC02041 [800x600].jpg
Managed to source some low-profile D-rings. Much better... keeps the cylinders more snug against the torso (and less chance of entanglement).
DSC02042 [800x600].jpg
Trim weight attachment (front)
DSC02043 [800x600].jpg
Trim weight attachment (back)
DSC02044 [800x600].jpg
Trim weight attachment (side)
DSC02045 [800x600].JPG
Harness routing at the waist.
 
We tried the Oxy softplate and it was just two small, we made a couple with the tech plate from Zeagle and worked a lot better.
SOFTPLATE.jpg
 
https://www.shearwater.com/products/teric/

Back
Top Bottom