acteg
Contributor
I know this was AWAP's idea originally, but I did it tonight and I thought I'd pass on a few lessons learned.
1. Not many places carry a 3/8 drive 1" socket. Of the 5 Sears in town, only 2 had them in stock, and they were both 20 minutes away. Lowes / Home Depot do not carry it. Cost for a craftsman 3/8 drive 1" socket is $4 including tax in my area.
2. You can use a dremel if you want to spend an hour doing this, but your better off (IMO) using an angle grinder / cut off wheel and spending about 10 minutes. I got my angle grinder / cut off wheel from harbor freight for $10. They are so cheap I keep a spare on hand just in case.
3. I recommend attaching the socket to a long 3/8 extension and securing the extension in a vise. Put on all your PPE (eyes, ears, mask), and make sure you are wearing clothes that you don't mind messing up (lot of metal dust flying around).
4. Cut the socket to the desired length, then trim the sides to clear the yoke and bevel the top of the socket. You may or may not need to completely remove the sides as AWAP did (I did not for my Oceanic SP4/Aeris A1). I think for most regulators you don't, but YMMV.
5. Make sure you have a 3/8 extension that will fit through the hole in the yoke. Out of the 5 3/8 extensions I have, only 1 fit.
Here we go with the pics:
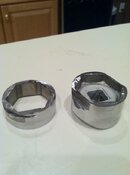
Cut it to the desired length. Remember measure twice cut once... I cut it a little deeper than I wanted but there was still enough clearance.

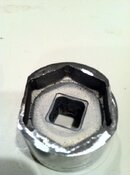
Next, trim one set of opposite sides. You do not have to cut them off completely. Just enough to give you the clearance you need.

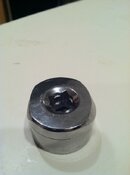
Next, bevel the top above the two opposite sides that you just trimmed. You may or may not need to do this depending on your regulator.

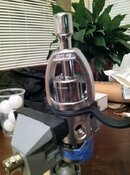
Now get to work

1. Not many places carry a 3/8 drive 1" socket. Of the 5 Sears in town, only 2 had them in stock, and they were both 20 minutes away. Lowes / Home Depot do not carry it. Cost for a craftsman 3/8 drive 1" socket is $4 including tax in my area.
2. You can use a dremel if you want to spend an hour doing this, but your better off (IMO) using an angle grinder / cut off wheel and spending about 10 minutes. I got my angle grinder / cut off wheel from harbor freight for $10. They are so cheap I keep a spare on hand just in case.
3. I recommend attaching the socket to a long 3/8 extension and securing the extension in a vise. Put on all your PPE (eyes, ears, mask), and make sure you are wearing clothes that you don't mind messing up (lot of metal dust flying around).
4. Cut the socket to the desired length, then trim the sides to clear the yoke and bevel the top of the socket. You may or may not need to completely remove the sides as AWAP did (I did not for my Oceanic SP4/Aeris A1). I think for most regulators you don't, but YMMV.
5. Make sure you have a 3/8 extension that will fit through the hole in the yoke. Out of the 5 3/8 extensions I have, only 1 fit.
Here we go with the pics:
Cut it to the desired length. Remember measure twice cut once... I cut it a little deeper than I wanted but there was still enough clearance.

Next, trim one set of opposite sides. You do not have to cut them off completely. Just enough to give you the clearance you need.

Next, bevel the top above the two opposite sides that you just trimmed. You may or may not need to do this depending on your regulator.

Now get to work


 Holding a part to work on is sometimes the different between fixing it and breaking it... I really love it when the finish is marked with vise-grips.... And I did see you use rubber covers on the jaws..