Is This a Good Buy?

Please register or login

Welcome to ScubaBoard, the world's largest scuba diving community. Registration is not required to read the forums, but we encourage you to join. Joining has its benefits and enables you to participate in the discussions.

Benefits of registering include

  • Ability to post and comment on topics and discussions.
  • A Free photo gallery to share your dive photos with the world.
  • You can make this box go away

Joining is quick and easy. Log in or Register now!

On a long (15 minutes or longer), water cooling can make a big difference. The longer the better because the air inside the tank need time to transfer heat to the metal in the cylinder.

In a quick 5 minute fill it doesn't make any difference if it is water cooled or not. The tank will not start to warm up for several minutes anyway. The tank will actually be much warmer several minutes after the fill that when it was getting the quick fill. If you let it cool down in the water and then top it off, that will aslo work, but a slow fill is better.


The real risk of wet fills is to not allow any water on the valve connection or it will be pushed into the tank. Always blow dry the tank valve and connecting whip.
 
I will be very careful not to let any water touch the valve :) Thanks. On captains water tank it should probably be obvious but is it vertical or horizontal? I would think vertical with the fill hose below the valve level might be a better choice just so any liquids anywhere would not run down into the tank.

I have not read the entire manual yet but I'm going to print it out so it will be easier to read. It sounds like the flow rate can be adjusted up to about 2 cfm so perhaps it needs a tune-up. The file I downloaded was only about 1 MB and the other file says 10 MB but when I downloaded it there was only about 1/2 of the first page. Has anyone download it and can confirm it is an entire manual? The manual I did download says it can go up to about 3200 psi before the pressure relief valve blows and can fill tanks up to 3000 psi! That's pretty darned good! Also, I cleaned it up this morning and once I cleaned the dust off the top it clearly says "Cornelius" right on the top. The model number label took some effort because it had been painted over.

In the instructions is says something about draining the filter every two fills but I'm not sure what they mean. Are they just talking about draining the condensation from the pressure tank? Or is there a need to drain the actual filter too?
 
The tank is vertical and the water enters at the bottom.
 
The 130R1500 is what I use. The gauge on mine does not bounce around at all. Does your compressor vibrate alot while running?

Make sure your filter media is fresh before pumping any more air into your cylinders. It's also a good idea to make sure the oil is also fresh, and a requirement that the oil it up to the mark on the dip stick. Make sure the oil is made for breathing-air compressors. I drain the condensation after every fill.

Hopefully your filter stack has a back pressure valve on it. A back pressure valve helps the efficency of your filter media immensely for the first part of the fill while the cylinder pressure is still low.

Just some stuff to mull over. I'll be in the boondocks for a few days without internet access, so if you ask questions and I don't respond it isn't that I'm ignoring you.
 
The gauge reading varies about 100-200 psi while it's filling but the higher reading seems to be about right. The gauge reads about 400 psi when it's actually zero and about 2900 when it's really about 2500. At least the 400 psi inaccuracy seems to be consistent.

After lots of searching I settled on Chemlube 201 synthetic oil. It was recommended specifically for this compressor on a few sites. I'm thinking perhaps a paintball store might have some. Otherwise I'll have to pay for shipping.

Apparently the pressure relief valve was reset to about 2500 psi to prevent overfilling of steel 72s etc but the instructions say 3300-3350. I may or may not reset it. I only have one aluminum 80 that needs the 3000 psi.

I have enough filter materials to change the filter several times so I'm looking for instructions now. After I print out the manual it might be easier to follow. Having the parts diagram for reference will probably help and that's not easy while using Adobe. There is something at the top of the filter which might be a back pressure valve. I'll look at the diagram and try to figure it out.

I agree that the best thing to do is change the oil and filter before filling any more tanks. I just HAD to play with it though. The instructions say "between the notches" or something similar but the notches are very far apart on my dip stick so I'm keeping it near the top notch. Does that sound right?

As for draining the condensation that seems to be the simplest way to depressurize the system for removal so it kills two birds with one stone :)
 
If I recall correctly (not at home right now to verify), I have heard recommended Anderol-500 or Chemlube-201. I forget what I'm running in mine at the moment, but I have been warned to keep the oil level at the top mark in any case. I believe the Anderol-500 was later advised against for breathing air though.

Your compressor is a 130R1500 which has been mounted on an aftermarket base, and an aftermarket secondary filter and fill whip attached.

I'm not sure what filter you are refering to in the instructions, but the filter/separater on the Cornelius should not be disassembled. All it does is separate the water and oil from the air. Yes, I drain it to release the air pressure between fills. The Cornelius manual only covers the 130R1500, not the secondary filter.

The aftermarket secondary filter most likely has media in it that needs to be changed periodically. It is not covered in the Cornelius instructions. I have a refillable Bauer cartridge in mine that I fill with activated carbon and 13X molecular sieve.

When I get back home, I can give you information on making pre-filters as they are no longer available as far as I know. Also, information on oil and filter change frequency.

-----------------------------------------------------------

In addition, upon having done a web search to refresh my memory for the name of the filter dessicant media (13X), I ran across articles mentioning it's excellent dessicant properties. Well and good, but I was told by a reputable source that the 13X only absorbs water when under pressure. Now I'm reading that it absorbs water just fine at ambient pressure. Oh, great, so my container of 13X may have long ago expired? Captain? Anyone?
 
Thanks a bunch! I got mixed up on the manual and didn't get it printed yet (have to do it in the office) but I thought the 1955 Navy manual that I got from VDH explained how to change the elements in the filter. But I guess not. The guy I bought it from described to me what was inside and how it was layered and I've seen some diagrams with cutaway views so it's a matter of putting the right amount of the right thing in the right order with a fiber disc inbetween each layer. Right? It appears to have been added to one corner of the base from which one rubber foot is now missing. I'm surprised it's an aftermarket base considering the starting capacitor etc is mounted under the unit. It sure seems rather necessary to have it on there.

The label is faded on the dessicant but what I CAN read is "SILICA/13X" followed by a few more letters that are illegible. Of course "Keep Tightly Closed" is still readable. :|

I've heard you can dry out some kinds of dessicant in an oven but I wouldn't stake my life on it.

The bottle of oil I have clearly says "Chemlube" but the number is obscured. The bottle of carbon says "AC CARBON" which I assume means activated charcoal.
 
There are different opinions on the water fills, captains is a cooling process that will not need a big holding tank, and water not just sitting while not in use, love it. Although filling AL tanks, I used to like the Idea of enough water if explosion it would sky rocket up.

The 55 gal plastic drum is what I use and similar as captains process, I lay a hose in and it fills from bottom and circulates as the hose lays 1/2 way around bottom, this will push water to overflow and change out water for the most part. Also I am not always liking to lift tank in and out, It would a bit much to make a portable locks, yet with submersible pump it would be able to achieve.

Well I have never changed my system, it took 5 mins to cut top off to tallest tank, and I use tank boots stacked for shorter tanks and bungie around neck for holding in center upright.

We use a thick pipe in underground water works, there green in color, I am sure they use in all states. I will build a captain tank cooler when I run across some of this pipe, and make a door that pulls up, run a track in a u shape, obviously the removeable door would be u shape, and cinch clamps to hold circular shape.
A row of these with a valve body Isolated for each one. after all tanks charged and cooled, release cinch clamps to drain and pull out to put on dolly to transport to storing room.

Well that was this mornings coffee thought, what do you think, this is only cause I lift these tanks to often, It needs to get less each step of my life.
 
captains idea sounds very effecient and simple to build. Naturally I gave away a bunch of big PVC pipe just last year. I probably had enough to make about a dozen water tanks. I'm just beginning to realize how important this whole cooling thing is--my tank that I thought was at 2500 psi read 2700 (it was a very hot day) and dropped to 2600 when I got into the water. If I'm not careful I'm going to be blowing shim valves.
 
O.K. Now I'm back home, and I hope this helps:

I'm surprised it's an aftermarket base considering the starting capacitor etc is mounted under the unit. It sure seems rather necessary to have it on there.

The Craigslist ad is now gone, but I remember seeing the 139R1500 mounted on a secondary base which had a secondary filter and fill whip attached. I'll try to break this all down step by step and define the terms I am using so we are on the same page.

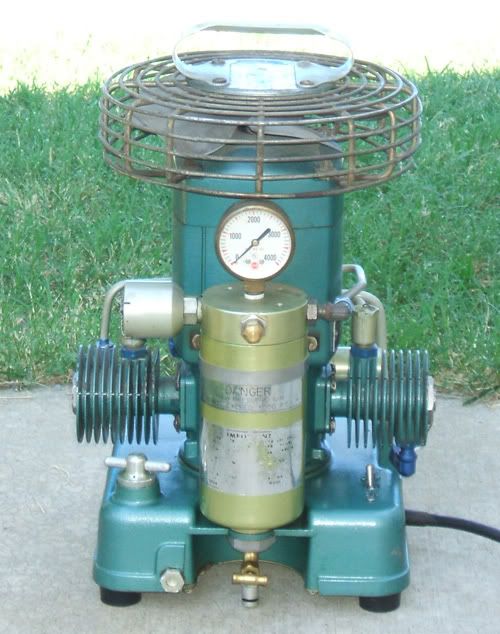
This is what a stock 130R1500 looks like. The relay and capacitor are supposed to be self-contained within the base of this unit:
DSCF7162CR500W.jpg


The canister on the front is the "filter and separator assembly" ("separator"). There should be no need to ever disassemble this as far as I know. At the bottom of this separator is a manual valve for draining condensation. I drain the separator after each fill.

The small, horizontal canister attached to the top, left of the separator is the "pressure relief valve". As you already know, the setting on that valve will determine your maximum fill pressure, not to exceed 3000 psi.

I was warned to keep the oil level to the top mark on the dip stick, and recommended to change the oil every 25 hours of use. If you don't use the compressor much, I would at least change the oil every three years or so even if the 25 hour threshold has not been met.

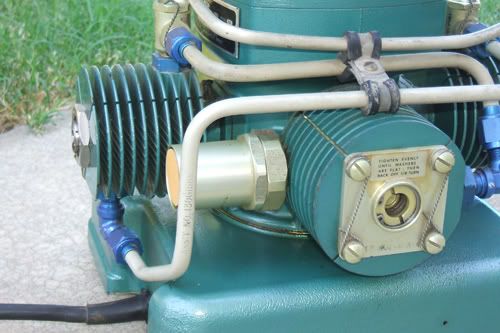
On the left, back side of the compressor unit is this air prefilter. Other than oil changes and condensation draining it is the only part on the actual 130R1500 that needs regular servicing:
DSCF7163R500W.jpg


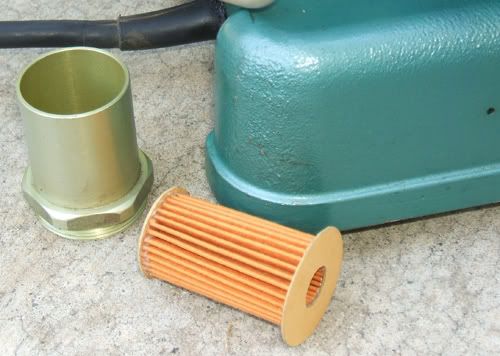
Here is the filter disassembled:
DSCF7164CR500W.jpg


As far as I know, the cartridge has been unavailable for some time. From what I deciphered from the filter that was on mine when I got it, the filter was a Purolator Products Inc., AN 6237-1, PP INC 30J82-1 (?) or 30382-1 ("0" could also be a "Q").

I only change my prefilter as needed, and make my own from a readily available (I think) WIX fuel filter. If you have to make your own, this is how I made mine (sorry, no assembly pictures yet, but the prefilter in the photo above is one of my modified fuel filters as described below):

1) Use WIX 33264 (fuel filter)
2) Use razor blade to cut straight across the filter paper where one of the metal end caps is attached. Use snips to cut the metal paper clip.
3) Cut from heavy card stock (backing on a pad of paper) a 1 1/8" disc (Use 1 1/8" template and cut inside the line).
4) Hot glue end of filter to disc.
5) Cut the other metal filter end cap off as before, and cut the paper clip as before.
6) Cut another heavy card disc at 1 3/8" (Use 1 3/8" template and cut inside the line) with a 1/2" hole in the center.
7) Hot glue the open end of the filter to the second disc.
 
Last edited:
https://www.shearwater.com/products/perdix-ai/

Back
Top Bottom