Ideas to make 3/4" hole for P-valve install?

Please register or login

Welcome to ScubaBoard, the world's largest scuba diving community. Registration is not required to read the forums, but we encourage you to join. Joining has its benefits and enables you to participate in the discussions.

Benefits of registering include

  • Ability to post and comment on topics and discussions.
  • A Free photo gallery to share your dive photos with the world.
  • You can make this box go away

Joining is quick and easy. Log in or Register now!

I would just trace your hole, and cut it out with scissors. Why punch it and have to use scissors to clear the hole? Get a good pair of Scissors, and give it a good clean cut. A punch is good, if you get it clean and thru the first time. Sometimes you do, sometimes you don't. The easiest thing is to trace your hole and cut it with Scissors. Get back to your arts and krafts roots!

As for gluing in the valves, there is no need. Take an old Latex seal and cut it to fit as a gasket. The key here is to make sure your gasket lays flat on the valve. If you cut the hole too small, and intend to stretch it to fit around the threads, it will leak. Trust me....if you need to retrim the gasket, do it...make sure it lays flat. Then just screw everything together. Plug your seals, and inflate the suit. Spray soapy water around the valve and notice no leaks ;) No need to ruin a suit with glue and such. This works on all materials, even the Waterproofs - We are their repair center :)

I will try and get a couple pics later today. I know we have a Waterproof we just installed a valve on.
 
Hmm...interesting. I guess I could make the 5/8" hole and then see how easy the threaded connector goes through. If I need to enlarge it, I can still do so with scissors after that.

Okay, I think that is now my new, current plan. Thanks for the input, Andy.
 
Peter_C, not sure about those Halcyon seals you said they sent you. My Halcyon P-valve has no seals, at least none that I can see. I think you can replace the internal check valve...is that what you meant?
Correct, there is the duckbill that allows the valve to equalize with the suit. Then there is the check valve that seals outside water from getting in. Both seals failed on my pee valve. Halcyon did warranty them, I just worry they are going to go bad again. I have a simple bolt on my CF200 and it is dead reliable. The H one flows much better though.
 
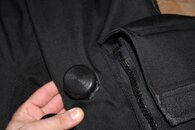
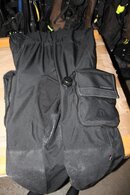
Here are a couple pics from the install on a D1 we just did
LMvalve.jpgLMvalve2.jpg
 
Wow, DRIS...that really looks like a good idea. Here's my next question:

Where do I find an "old latex seal"? Or even better, a new latex seal? I guess it does the same job as using silicone, but in a cleaner way. No adhesives, etc.

And thanks for the pictures! Those are the only ones I have seen for my suit. It has helped me to gauge approximately where my valve should go.

May I ask another question, since you are a repair center for the Waterproof suit....

How do you handle the mesh liner? After you cut the hole (with scissors) in the shell, do you mark the liner underneath with a marker and then cut the hole in it with scissors too?

I am planning on installing the P-valve during the week after Christmas, so I'm getting all the info that I can. Thanks!
 
Heat a piece of copper tubing (you decide the hole size) with a butane torch, press it down and it will cut a clean hole and seal any frays thus preventing any future tears from starting.
 
We sell new ones by the pair...way to expensive for that though. Just give me a call later and I can throw an old seal in the mail for you.

As for the liner....
- After you cut your whole, just put the liner back in (if fully removed), and put the suit on a hanger. Using a marker, center a hole thru the suit and onto the liner. Taker the liner out or be careful doing the next step with it still in the suit....and cut a small hole and burn the edges OR us a solder gun or similar and burn a hole thru it. That's it

The biggest thing when installing a p-valve is to double and triple check things. You only get one chance. So after you mark where you want it, put the suit on and make sure. Or have the suit on and have someone mark where you want it. When cutting, burning, or whatever you do to get the hole, start a little smaller as it is easier to take more off but not easy to put fabric back on (for most people).

Just take your time and everything will be good ;) If you are uncomfortable cutting into that expensive suit, we only charge $50 for the labor. BUT, as I laid it, it can be a DIY job no problem.
 

Back
Top Bottom