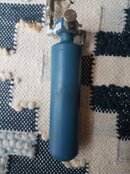
Bauer Moisture Separator Help

Please register or login

Welcome to ScubaBoard, the world's largest scuba diving community. Registration is not required to read the forums, but we encourage you to join. Joining has its benefits and enables you to participate in the discussions.

Benefits of registering include

  • Ability to post and comment on topics and discussions.
  • A Free photo gallery to share your dive photos with the world.
  • You can make this box go away

Joining is quick and easy. Log in or Register now!

mmadiver

Contributor
Messages
385
Reaction score
271
Location
D.C.
# of dives
I just don't log dives
Hi,

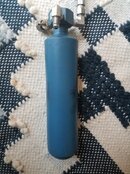
I recently purchased a Rix SA-6 compressor that came with a separate (old) Bauer Moisture separator. Manufacture date appears to be 1967.... I'm doing my due diligence on the compressor but unfortunately I don't know anything about moisture separators and can't seem to track down a manual.

What do I need to inspect to ensure the thing is in good working condition?

Thanks for the help,.

20181027_135729.jpg 20181027_135719.jpg
 
Good luck with that. I have never seen such a thing in my life, but then, I don't claim to have seen it all (yet).
 
Good...um...grief.

I have one in my steel scrap box in case I ever want to make something useful out of it. Go get a real coalescer. (I did.)
 
As I remember, there was a recall a while back. Make a lamp out of it.
 
The Bauer model those things came from must be 40 years old you need to scrap them out
But it's got some good stainless 1/4" NPT to JIC4 male elbow fittings and a retained knob bleed valve with spitcock just check the threads as the old Bauer head were machined BSP. and I suspect thos elbows are in NPT.

With your blue Bauer separator body as its made in steel, you need to look inside but they are not suitable for the SA-6 as its an oil free compressor you have no oil to protect mild steel components. The pure distilled water from the SA-6 compressor discharge will corrode the mild steel metal separator shell. Iain
 
Im guessing you have an old version of the SA-6 A or B

The SA-6B separator should look like the picture below right side.
This is the HP side working pressure 5000psig hydro test pressure 8000psig
The cap/plug has connected below a stainless mesh filter tube and a “spinner”
attached to the end to knock off the condensed water droplets into the tower below.
A manual bleed valve is connected to the base. Drain every 20 minutes,
The LP 2nd stage arrangement is very similar just different orientation of the fittings.

The electrical stop/start panel also shows a RESET button in blue, this will shut the compressor off every 25 minutes if you don’t reset it after manually draining the towers.
A mechanical drain with a friendly kill switch should you walk off and forget.
An alternative to the auto drains that are more expensive and have a habit of clogging up with ice.
You mentioned having separate separators, the second photo is the separate filter for the SA

HSMRIXParts005_zps7352825f.jpg
[/URL]

Flow in the filter photo below is shown from left to right
1. Using the same JIC 4 inlet inlet and outlet connection
2. Inlet non return valve (so you can bleed down the separators and not disrupt the chemical filter retained stable pressure )
3. Inlet inline bleed valve (so you can bleed the filter of and any water condensate carry over once a day and after each fill cycle to extend chemical filter life)
4. Filter tower including stainless re pack chemical zeolite cartridge or throw away cartridge
5. Visual indicator (indicates blue dry, pink when wet in a 10/20/30% relitive humidity band
6. Back Presure regulator (set 1500 psi) with non return valve on the discharge side (to stop full scuba clinders back filling the chemical tower at sonic speed velocities and disrupting the tamped down chemical when the compressor is off)
7. Outlet pressure gauge (also acts to indicate scuba cylinder pressure when attached before starting or filling)
8. Outlet filling whips (1 or 2) using same JIC4 connection can also be fitted directly to the compressor bypassing the filter tower for compressor performance and leak testing.


HSMFilter004.jpg
[/URL]
 
Thanks for the detailed response iain/hsm - it's that type of commentary that keeps us home-brewers up and running. It is much appreciated.

Along with the compressor and Bauer moisture separator I also acquired a 27" mako filter tower that takes PD1503 cartridges. As best I can tell, the filter tower is way overkill for my purposes (filling mostly CCR bottles and the occasional twin set for friends) but I'm happy to have it as the replacement cartridges aren't that expensive, and without doing the math, I anticipate only needing to change it annually.

Since I'll be scraping the Bauer moisture separator do I need to get a new one? I'm thinking with with SA-6's existing separators and that much x13 in the filter I should be fine. I'll be filling mostly steel bottles so moisture is a concern.

Currently the back pressure regulator is after the large filter stack and the fill whip connects directly to it. Should I add another directly at the compressor outlet to balance quickly? or is it fine there?

Pictures below of the SA-6, welcome advice on additional things to inspect, add, or replace. Thanks!


20181029_163710.jpg
20181029_163543.jpg
20181029_163408.jpg
20181029_163527.jpg
20181029_163724.jpg
 
With my Rix I just use the moisture separators that come with it in addition to a 16" filter tower. My pressure maintaining regulator is after the tower but I have a one-way valve before the tower. I also have a moisture indicator immediately after the tower.
 
Well not much progress since I was last here, jrf88 pretty much nailed it as far as the separator set up is concerned from off the compressor NRV, Bleeder, filter tower, visial indicator, BPR (with integral NRV and optional gauge) then to outlet

I suppose that 1" steel painted frame is going to take some heat if your planning on straightening it without shearing it off. Almost better to cut the bad out and wedge a couple of solid plugs into the holes before welding another tube over them and weld both tubes and the plug with a full penetrant weld all three together.

But another off topic point would be the use of that Nupro pressure relief valve as a BPR I just dont like the set up. First you dont have a safety relief valve on the final stage and that's a bad thing I would put it back to original ASAP. and you already have for free a JIC 4 to 1/4NPT male elbow on that scrap blue separator.
But badder than bad is the relief valve opening pressure setting, if its never been adjusted down to 1500psi and it been holding back 5000psi then your going to wear the compression rings faster than you need, overheat the compressor hotter than you need and use more electrical power for longer than you need.
But the baddest of the bad if such a thing exists is the shotgun release of pressure out of the Nupro relief valve into the delicate zeolite structure of the filter chemical.

Badder of the baddest bad is that green spagetti junk hose you have on the thing. That needs ditching its a mess you need to see the condensate you drain off from a Rix, your looking for particulate, wear material etc mixed in with the distilled water that is drained off. Not fling it out of a 40 foot of green hose into next doors.

Also the outlet hose looks bent at the fitting and that 2nd stage brass relief valve you need to check it's set at 1000psi (I dont think its a Rix original part) the original build spec called up a Victor part for the mil spec build. Now if its a Generant valve as it looks like from your photo just make sure the setting is engraved for 1000 psi or near about.

Oh and those Rix labels are all on back to front or upside down not sure which is which.
And I'd make at a rough guess that the serial number just might be 8293
 
https://www.shearwater.com/products/teric/

Back
Top Bottom