


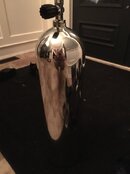
I had picked up a lightly used AL80 and it was due for a hydro. The original colour was the clear brushed aluminum, it looked nice but after seeing a post here about a polished tank I thought'd I would go for it.
Now this is just my experience, i made some mistakes and do not know the effects it may have on a tank. I figured I would post what I learned so others wouldn't have to.
So I started off with ensuring my tank was "stripped", I bought a aircraft paint remover thinking there was going to be a layer of "clear coat" on my tank....well I don't think there was and this was a total waste of time. I guess for a painted tank you would still have to do this step.
Now this is where the "safety" comes into question, I have heard don't sand tanks and others who say they do it before they paint. I decided that I was willing to not use the tank if it doesn't pass its hydro this week and it was a risk I am taking. I was also only taking the tiniest of scratches off, no way would I use a belt sander, or anything lower then 320.
My tank was a luxfer and it had an awful lot of "brushes" for the brushed look, I feel like my catlina's do not have this much scoring into the cylinders but I could be wrong. To get it off i started off with a 320 grit (wet) and although the brushes never came out It did minimize the look. I guess I could have kept going until I took off enough alloy the scoring was gone but oh well. I proceeded to wet sand going from 400, 600, 800, 1000, 2000, 2500.
I then took a delwalt variable speed polisher / grinder with a wool pad and used some cutting cream (rated to take scratches around 2000 grit out.) This is where it got messy with a black residude spreading all over the pad. Buffed it clean and it looked great! I then went to a lighter cutting compound (Meguirs Ultimate Compound), did another pass and buffed it. To finish it off by hand I used some aluminum polish (mothers brand) and that really brought out the shine. Over the process was back breaking and you don't see the results until the VERY end so it was a challenge to stay motivated!
I am interested to hear your thoughts on tank safety, I am no expert but I only took off a tiny tiny amount of "metal" and in reality the scratches it would get in daily activity would be much deeper. The tank goes for hydro tomorrow and then I will bring it to my LDS for a VIS. I am sure I will get A LOT of questions as the tank is an eye catcher!
")

