Pilot (Air 1 converted) /MK9 project

Please register or login

Welcome to ScubaBoard, the world's largest scuba diving community. Registration is not required to read the forums, but we encourage you to join. Joining has its benefits and enables you to participate in the discussions.

Benefits of registering include

  • Ability to post and comment on topics and discussions.
  • A Free photo gallery to share your dive photos with the world.
  • You can make this box go away

Joining is quick and easy. Log in or Register now!

Redbeard04

Registered
Messages
7
Reaction score
9
Location
Oahu
# of dives
2500 - 4999
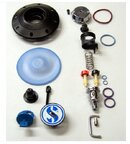
I just acquired an Air1 converted Scubapro Pilot that came with a MK9 first stage off of ebay. Today I hooked them both up and tested them, both were in need of a rebuild with the 1st stage IP at 125 @ 500 psi and over 180 at 3000 psi and the pilot free flowing on a good 1st stage set to 138 psi.

I cleaned and rebuilt both and after some tuning with shims and seats I was able to get the MK9 to stay within 135-145 @ 500 and 3000 psi. So far so good. After cleaning and reassembling the pilot I tuned it with the set screw just off of a free flow and the spring cap screwed most of the way down where it seemed happy to seal up and not free flow. Test breathing felt very light on inhalation and exhalation and the magnahelic confirmed it is cracking at about .7 inches. Checking WOB on the flow meter shows it very quickly goes from less than .5 inches resistance to -1, -2, then off the scale past -5 inches above 15 scfm.

I'm all for a low WOB, but would like to avoid excessive positive pressure forcing me air at depth. The pilot tuning instructions reference tuning the aspirator gate much like you would a D400, however the example I have doesn't have one. I wasn't able to find an Air 1 repair guide so I don't know if it follows the same procedure of not. The local SP rep said that the air 1 didn't have a means of tuning the venturi effect and is just always wide open.

So I guess what I'm asking is does the Air 1 and/or converted pilot have a means of tuning the venturi effect? Is my example missing an aspirator gate, and if so what is the best way of sourcing one? This is a regulator I'd like to dive, but I'd rather see it's air delivery a bit more civilized before taking it to depth.
 
A photo showing conversion kit parts is attached along with Air1 manual & schematic for reference.
The converted pilot will use AIR1 adjustment procedures. If you are missing parts, I have spares available.

The aspirator position is fixed in the converted pilot, not adjustable as it is on original pilot.
I find properly tuned Air1s and converted pilots to be well behaved and a pleasure to dive, so hopefully the tuning procedures in the manual will help sort it out.
 

Attachments

  • Pilot to AIR1 conversion kit.JPG
    Pilot to AIR1 conversion kit.JPG
    41.1 KB · Views: 95
  • AIR 1 Manual.pdf
    AIR 1 Manual.pdf
    4.8 MB · Views: 85
  • AIR1-1991-01.pdf
    AIR1-1991-01.pdf
    1,010.3 KB · Views: 88
Hi Redbeard
First congrats for your nice find!
I love the Pilots, whether they are AIR 1 converted or original, and I like the MK9 optically.
Concerning your tests on the Flow Meter, I must say, the way you describe it, to me that seems quite normal.
If you start the test with a Cracking Effort (CE) of 0,7 inch/h2o, I would just expect the numbers to go into negative territory, and it's not unusual that it goes deeper into minus the higher the flow.
Of course it would be nicer, if the the CE would just go slightly into negative and stays there until 15csfm (or more) flow, and with the D-Series one can adjust so in many cases, but with other models that is often not the case.
Going into negative values doesn't mean automatically that the 2nd will feed force you with air, that's at least my experience.
Point is, when you still can control the flow when conducting the test, going into negative is mostly not a problem.
A problem is, when while doing the test (increasing the flow), the cross over into negative happens within a second and very violently, so the Venturi opens the valve instantly completely and you have a full blown free flow.
Notorious for this are sometimes R190 2nds, which shoot from 1,00 inch to out of scale negative values and 15 or more scfm flow within one second ( and you can only close the tank valve to avoid massive air loss).
I cannot be sure, but I think that was not what you where describing concerning your tests.
With what you were describing, I would not hesitate to take your Pilot for even a deeper dive.
I'm quite sure practically your 2nd will not feed force you with air.
 
One of the bigger factors in Venturi boost is gas expansion at the valve. At the surface, gas goes from 9 bar to 1 bar, and expands 9-fold. This in itself generates molecule movement which augments Venturi effects.

In contrast, at 100 feet, absolute IP has risen to match the increase in ambient pressure, so absolute IP is now 12 bar. But since ambient pressure is now 4 bar, gas expansion is only 12/4, or 3‐fold. Of course, there are more molecules flowing per breath, but this has less of an effect than the decrease in gas expansion.

In short, what you have seen on your test is less of an issue at depth than you might think.
 
Thanks for the replies guys. I ended up replacing the old orange seat carrier assembly with a more modern black one and re-tuned the pilot 2nd. It now cracks at an even lighter .5 IOW and doesn't exhibit any of the positive pressure behavior I was seeing before until flow exceeds 18 SCFM. I got to take it out and put 3 hours on it yesterday on a 3 tank Westside charter and couldn't be happier with how it breaths. I set up the Pilot on a long hose and paired it with a lightly tuned D400 on a necklace, a brief switch to the D400 on the way up from 100ft to the safety stop had me switching back and staying pilot for the stop as it was a noticeably better breather. I however have some harmonics issues with the 1st and/or the long hose that were a bit annoying to sort out still. But I guess that means I get to do some more tinkering this week when I have some free time. Attached are a few photos from this weekend with the "new" rig.
 

Attachments

  • P8180063-2.jpg
    P8180063-2.jpg
    104.1 KB · Views: 75
  • P8180068.jpg
    P8180068.jpg
    68.9 KB · Views: 75
  • IMG_5798.jpg
    IMG_5798.jpg
    63.5 KB · Views: 68
Thanks for the update, very nice to hear that the pilot is working well.
A well lubed piston stem HP oring plus a thin layer of lube on the stem itself helps keep whistling gremlins out of my assorted MK5/9/10s.
 
Magnificent, hey Redbeard04 you actually have a red beard, and a quite unique hose configuration
 
With the increasing numbers of click bait postings on SB, it's these kinds if meat and potatoes posts that immediately grab my interest. Thanks, gentlemen.
 
A photo showing conversion kit parts is attached along with Air1 manual & schematic for reference.
The converted pilot will use AIR1 adjustment procedures. If you are missing parts, I have spares available.

I recently lucked out on a couple of Pilots and an Air 1 from Dan from vintagescuba, and I was hoping to convert one pilot to Air 1 and service the other Air1 (I will leave the other Pilot for now -- probably sending it to rsingler for rebuild)

of course all parts are NLA, Dan has been trying to find me some parts in his NOS stash but no luck so far

I was waondering what are the "minimum" set of parts needed for the conversion (why does the kit have 2 poppets for example); what you could spare, and what parts I can retro fit from other regs (lever/poppet from a D350/400?) or maybe even non OEM (springs/orings)?

And what parts do I need for just Air1 service? I assume the hardest parts are the set screw and the poppet, could the D series come in clutch here as donors? 🤷🏽‍♀️

I am way out of depth here anyways -- I tried crossing into the darkside but I am absloute noob with the centerbalanced regs (and these 2 regs are the "advanced" ones) (@rsingler you pulled me in 😅)

Worst case scenario they would be display pieces, they still look very aesthically pleasing

My thoughts below, keep in mind I'm an amateur who does this for fun and so don't take this as pro advice, corrections and viewpoints from others who work on these regulators is always welcome.

A handy tool for easy and damage free removal of the Pilot and AIR1 covers is an adjustable pin spanner with 4mm pins. On auction sites, they are low cost and usually sold for changing wheels on angle grinders.

Not sure why the kit in my earlier post shows 2 poppets, only one is needed. The photo is from an old auction listing for the conversion kit, maybe SP included an extra poppet or maybe the seller added an extra.
Regarding "minimum" parts. The original pilot cover and diaphragm can be used for converted pilot, otherwise all the parts shown on the right side of the picture are needed, minus the extra poppet. I also switch out the backup disc and rod shown on the left, the pilot rod is slightly longer. Might be simpler to just switch the entire diaphragm assembly rather than switching the backup disc but I don't like reinstalling the diaphragm clip and avoid it when possible.
Air1s use the same poppet as Ds. The D levers will not work, they lack the flat section needed to fit the Air1 diaphragm rod.
I can spare all the parts needed, the simplest approach for a conversion may end up being using a cheap Air1 to as parts donor.

Regarding Air1 service. Parts needed will depend on the condition, sometimes just cleaning and tuning an old Air1 without any new parts gives a good result when the poppet is in good shape.
But better is to disassemble to clean parts and replace orings as needed. Then install a new poppet before tuning. I usually reuse the set screw with no issues, but not going to recommend that approach. So parts needed can be orings, new poppet, and set screw.
The poppets can be sourced separately or use a D series repair kit to get new poppet and set screws.

Most of the time there will be no need to remove the Dive/PreDive switch on Air1s and pilots, but it does not hurt to check sealing of the switch oring by inhaling lightly with the inlet sealed. Hopefully it will be airtight, if not then it will be a personal preference if it is worth replacing the switch oring, depending on how severe the leak is. Usually the leak is minor enough to not be a real issue. That discussion is for another time, if needed.
Also, the Air1s sometimes have minor leak where the metal parts are pressed into the body, I have found air leak leaks in these locations to be more common than the switch oring. Like the switch oring replacement, leaks where the metal has been pressed into the body can be fixed but are not usually a big issue.

A good approach might be starting with a service of the Air1 before moving the the pilot conversion. The experience of getting familiar with the Air1 parts and tuning will help on the pilot project.
 

Back
Top Bottom