Phoenix HPR Royal second stage

Please register or login

Welcome to ScubaBoard, the world's largest scuba diving community. Registration is not required to read the forums, but we encourage you to join. Joining has its benefits and enables you to participate in the discussions.

Benefits of registering include

  • Ability to post and comment on topics and discussions.
  • A Free photo gallery to share your dive photos with the world.
  • You can make this box go away

Joining is quick and easy. Log in or Register now!

I'll have to agree with Pete (Gilldiver) right here regarding a patent application. Its an elegantly simple yet effective design, and you should be recognized for that effort.

You beat me to the use of the term "elegant". Almost anyone can make something new. Doing so within the confines of a vintage design to be a high performance, affordable, deployment is .... elegant. Awesome job as always Luis. It was getting time to service my PRAM, I guess it will include the new 2nd stage!

Pete
(Spectrum)
 
Then you'll have to update your "Pimp my RAM" segment to include the new HPR! :D
 
Then you'll have to update your "Pimp my RAM" segment to include the new HPR! :D

So true and catch up with the duckbill eliminator too!
 
Thanks guys.


BTW, with that rig, I technically had two hoses: the umbilical and the hose to the bailout tank. :D


---------- Post added April 23rd, 2012 at 11:04 PM ----------


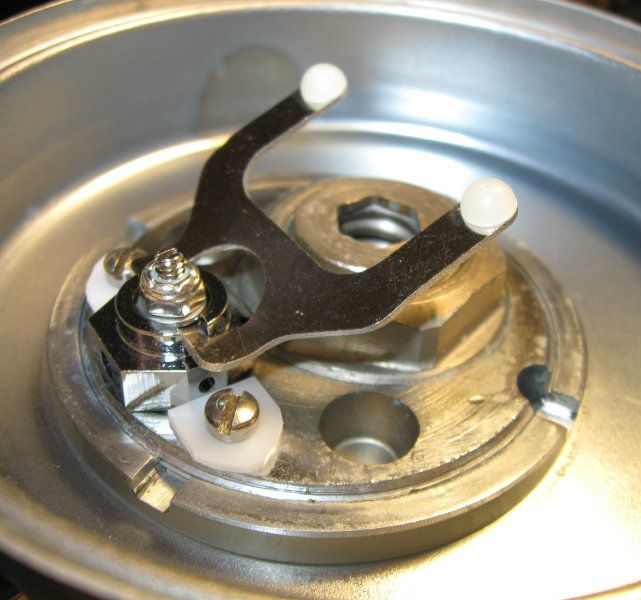
Installing the HPR second stage.

My understanding is that Bryan is shipping the second stage assembled, but without the lever in place. The lever can be installed by pushing the seat carrier in and slipping the lever between the two washers. The only issue is that you can install the lever in two positions, 180 degrees from each other.

So here is a detailed step by step procedure to determine which nozzle port should be pointing down the horn as your venturi port. It looks like a lot of steps, but once you read it, you will see that the whole process can take less than 5 minutes (before you can go diving).


1) When you receive the HPR take it completely apart noticing the direction of the two washers.

2) Screw the (empty) second stage body into the regulator until it bottoms out.

3) Back it up until the first nozzle (large hole) points down the horn. This will be your venturi port.

4) Mark that port with either a permanent marker or something you can erase (or a small piece of tape, your choice.

5) Assemble second stage (seat holder, spring, second stage body, two washers, and nut), but only screw down nut a couple of threads. Make sure rounded faces of washers are facing each other.

6) Push seat holder into second stage body (against spring) and insert lever between the washers. The lever should point away from the selected venturi port.

7) Screw nut down until the screw driver slot is completely exposed.

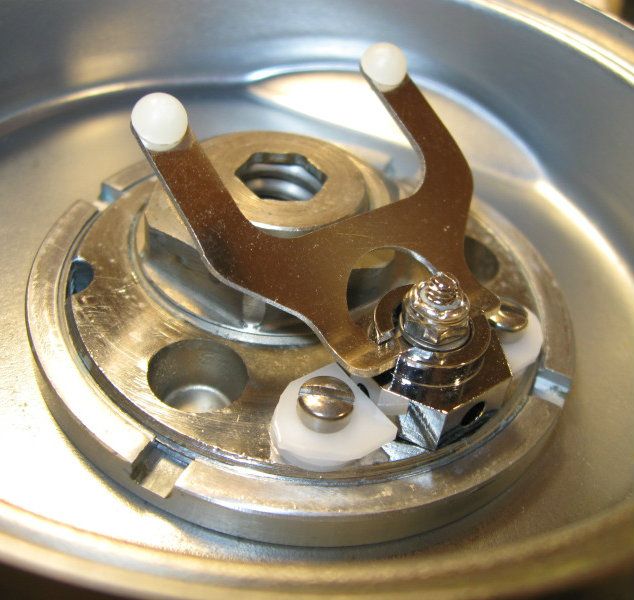
8 ) Lift lever vertically (as shown in picture above) and screw HPR into regulator.

9) Adjust lever height (as shown in pictures above).

10) Test regulator performance. Check and adjust IP if needed.

11) After testing, install the two locking screws with the washers. Note: only one locking washer and screw is needed, but it doesn’t look as finished with the empty screw hole.

12) Go diving


I hope this is clear.


Change: I changed the bullets form to numbers in order to make it easier to identify the steps. It will also make it easier if anyone has questions about a specific step.

Note: Steps 5 and 6 can be combined into a single step were you assemble the unit with the lever in place between the two washers.
I personally find it easier to slide the lever between the washers after the initial assembly (assuming the nut is has just been treaded about two or three turns). Which method you use is a personal preference.


---------- Post added April 24th, 2012 at 07:07 AM ----------


In response to a question at VDH about step 10:
The IP should not need to be changed, but it is always a good idea to check it whenever you are making changes to a regulator. That is the reason I said adjust “if needed”.

The original second stage might have required a very high IP in order to get it to perform.
In the past I have used IP of 150 psi or higher in some RAM and the original Phoenix RAM.

The new HPR second stage works well without the need of very high IP. Therefore, if you have previously adjusted the IP up around 150 psi (or even higher), you may want to bring it back to a normal range around 130 to 140 psi.
 
Last edited:
Here are some pictures of the HPR with the new square washers. The flat edge on the new washers hold the HPR main body tight.

I just cut the corners of the washers with a simple wire cutter. This is not necessary, but I didn’t want it to interfere with the body ring.

You may also notice that one of the bleed air holes is partially covered (about 50% covered). The other one totally exposed. This combination seems to provide about as aggressive of a venturi flow as I would consider. Any more venturi flow and some air would be wasted.

I used two of the original round washers under the new square washer to partially block the bleed air orifice.


There is only the modified square washer on this side:

Picture003-4.jpg


There are two of the original round washers under the square washer in this side.

Picture013-2.jpg


The adjustment I did in the second picture is not necessary for most divers. This is only recommended if you are interested on pushing the performance to the limit. Be aware that doing so will increase the chance of wasting air from venturi induced free flows.
 
Well, I now have a season on the three HPR regulators I have converted. One is a square label RAM, no Phoenix, the other two are PRAMs, one I just converted so I am only reporting on my first two. I have to tell you, despite a little bit of skepticism early on for various reasons (hey, I am getting old and ornery-er) the HPR conversion kit is great!

RAM square label, non-Phoenix, cracks at .3 (was .7 until I installed super flex diaphram), dove it mostly at SD IX and here and there. About 20 dives this year. One bleed port blocked, no shims.

Round label PRAM, used on numerous dives and Coz and all during my near month long Florida adventure, cracks at .4 inches now with the super flex diaphragm. Probably about 70 dives this year. One bleed port blocked, no shims.

Navy PRAM, no super flex diaphragm, cracks at .6 inches. Only five pool test dives. I am using the grey single stage diaphragm in it. Both bleed ports open, no shims.


I am very impressed. These HPR seconds are bullet proof and best of all, once set up, they just need no adjustment. They are not fussy at all and nobody will know to lift yer skirts--uh cans--to find it is not a plain old DA/RAM. Yes, the HPR is that good. I cannot over emphasize that it is so easy to set up and because it is so stable (the new seat material probably contributes as much as the improved design) you can adjust it down to a ridiculous .6 inches and with that new more flexible diaphragm, maybe even .3 inches. Even if you do not care for the Phoenix because you are an old vintage only coot, this HPR is worth doing. I just did not really appreciate originally what an improvement these are. Once installed, if you have all of the latest silicone goods and DBRV, you have an essentially near zero maintenance/adjustment regulator. I know we have had threads before about maintenance and since that is my field, I am all about working on stuff, well, this is the Maytag conversion. Put it in and forget about it, frustrating as all hell for me because it needs nothing, no tinkering needed.


What the hell, double hose regulators that do not need tinkering, what good is that. Oh well, guess I will just have to settle with fiddling with the weed whacker or something. Maybe I will buy a Harley instead.

N
 
Last edited:
I bought a pair of them a few weeks ago. I am impressed with the performance. One installed and adjusted with zero issues - a true piece of cake.

The second however would not adjust and on examination of the lever and "flashing" the feet, it was evident the feet were not aligned with each other. A quick bit of careful bending to re-align them and all was right with the world.
 
I got my new HPR second stage yesterday and had it installed in my PRAM and adjusted in a few minutes. I love it's simplicity. Even breathing from it on dry land I could tell a marked difference in performance. I can't wait to try it out in the water.

You've done it again, Luis!
 
Thanks for all the comments.

I have been extremely please with the results from this design and all the feedback that I have been receiving. It has been one of the most trouble free improvements that I have I designed. I have received lots of email and PM questions on my other designs (Phoenix, back-plate, mouthpiece plugs, etc.), for the HPR I have only received one question and lots of great comments and feedback. :cool2:

I have been using the HPR (including the prototypes) now for over a year and I could not be any more pleased with the performance and simplicity. I particularly like the ease of installation and eventually of servicing it (it looks like it will be a long while before they actually need service).

As I have mentioned, one of the most convenient things is that it uses a plain flat diaphragm (like the Mistral) and there is no need to align the diaphragm when closing the can. Opening and closing the can is so quick (I use thumb screws on the band clap) that I have gotten in the habit of opening it after every weekend of diving to rinse and check it. I actually end up opening it many more times when other divers ask me if they can look at it.


Now the next step has been putting it all together in the new Argonaut. The HPR in the Argonaut has the advantage of an improved volcano orifice. More details to follow. :D
 
I have been tinkering with the HPR for a long time. Yesterday I finally dropped in one of the latest and greatest diaphgrams. Man, the cracking pressure dropped about .25 IWC with no other changes (from around .75 to under .50 IWC). I may well have to increase the spring tension to get the cracking pressure up a bit, at 0.5 the reg is starting to get a bit unstable.....and Luis, it works nicely on my black reg project, same .25 IWC cracking pressure drop. :)
I am looking forward to the Argonaut, I need a new toy....my poor DA is beginning to look like a lowrider with all the stuff I have added.
 
https://www.shearwater.com/products/perdix-ai/

Back
Top Bottom