New To Me G250

Please register or login

Welcome to ScubaBoard, the world's largest scuba diving community. Registration is not required to read the forums, but we encourage you to join. Joining has its benefits and enables you to participate in the discussions.

Benefits of registering include

  • Ability to post and comment on topics and discussions.
  • A Free photo gallery to share your dive photos with the world.
  • You can make this box go away

Joining is quick and easy. Log in or Register now!

windapp

Contributor
Messages
614
Reaction score
142
Location
Windsor Ontario
# of dives
50 - 99
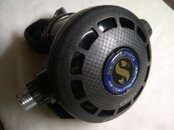
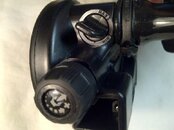
I just bought a new-to-me G250. It looks brand new in the pictures, but I know it has been shelved for 8 years. I think it was made around the turn of the century. It looks like the G250 HP except that it is a G250. I have the schematic for the 109, and the G250V. I am pretty sure that the G250 is very similar to the G250V in construction. My plan is to put it in service is this:

1. Do the standard tests. Check for water-tightness, and check that it doesn't freeflow (or hiss when not being breathed), and check the cracking pressure by submerging in the sink.
2. Take it apart, clean the parts with dish soap and water, rinse thouroughly, and put it back together, lubricating the o-rings and threads lightly with silicone greese after I have inspected the o-rings and the low pressure seat for wear and cracking.
3. Repeat the standard tests.

I was wondering if I could get some tips.

1. Is dish soap good for cleaning o-rings and regulator parts?
2. Are there parts I need to be careful about damaging (other than shredding the seat with the orifice) when i dis-assemble and re-assemble the regulator? I don't intend on removing the exhaust valve as I know these almost always have to be replaced if they are removed. Does the same thing go for the venturi knob? I also noticed that in the G250V, the retaining pin for the cover is a yearly replacement part. Will I have to replace it if I remove it or can I put it back or is there even a retaining pin in the G250?
3. How much engraving on the seat would you consider to be acceptable for another years worth of use?
 
1. Dish soap is okay. If there is corrosion on any metal parts you'll need something acidic, like vinegar cut with some water.

2. If you remove the orifice be very careful not to damage the edge. I always remove the exhaust valve because I want to clean the case thoroughly and there's often a line of salt deposit exactly where the valve seals. You can remove it and re-install it, as long as you don't damage it. The best way is to use something like forceps to work the retaining post down into the hole from the inside, then gently pull the valve out. Removing the venturi vane is a very good idea, but the o-ring that seals it seems to always be the first one to go. Honestly if you're taking everything apart and cleaning, why not just replace the o-rings and seat? Don't worry about that retaining pin on the case cover, yours probably won't have one.

3. I'd just get a new seat, if there's any engraving, when you put it back in the groove probably won't line up exactly with the orifice and it could be harder to tune. If the current orifice is plastic, the seat might have very little imprint. This is all assuming it has a current poppet that allows for a replacement seat. If you have the old poppet with the seat that's attached permanently, you need a new poppet as well.

The best deal would be to find a NOS rebuild kit that has the s-wing poppet and the balance chamber. I suspect those are getting a little tougher to find. Bryan at vintage double hose should have the poppets separately and any o-rings you'd need. Couv has an annotated schematic that lists standard o-ring sizes.
 
What you've stated are standard best pratice for used regs in general. However, the G250 is a special animal in the sense that it has the ability to survive a loooooooong time without any attention at all. I've left mine in a closet for at least 8 years while the kids grew, and it breathed like new when I took it out.

So I'd suggest a twist to the rule, since we're between us in the DIY section:
  • Test it good, with a manometer so you get a number
  • Remove the diaphragm and see if it looks good inside: shiny, no crud, etc..
  • Soak, clean as is, no further disassembly
  • Put it back, test again, adjust the orifice to see how low it can go: if it can do .8" or so, I'm pretty sure you can do another season before service

This is based on the fact that the seat doesn't get engraved much, and the critical lube inside the balance chamber is pretty well protected, especially if you have the latest s-wing poppet, and that's likely.
 
I presume you are just talking about soaking in water so as to avoid removing any lubricant. Another piece of information is that the person I bought it from claims only to have used it in fresh water. Is there somewhere in particular I can look to verify this claim. Ie somewhere that prudent rinsing. wouldn't have removed the salt.

I am basically trying to hold off to the next service when I either buy everything necessary to service the whole set myself or let my lds do it. It is still a bit of a tossup when it comes to that point. The mk-10/g250/conshelf 21 combo is very easy to service, and I suspect the tools and parts will only just exceed the cost of having someone else do it once but I do trust the owner of my lds, and he either does the service himself or supervises it closely.

Buy the way, is an inexpensive jewelry ultrasonic cleaner usually adequate for regulator parts?
 
Before you clean, snap a pic and post it here so we can have an idea of the conditions it's in.

Yes, soak in water with dish soap, clean with a tooth brush. I don't think salt/fresh water make any difference, as long as the reg is properly rinsed afterward. If there's no crud inside, if it tests good, I'm pretty confident it'll buy you enough time to get the tooling together.

Another way to do a closer examination/cleaning is to remove the hose, the slpine nut, the cover, the diaphragm, the D ring; now you press the lever and you can pull the whole barrel assembly out from the adjustment knob side. But you do that preferably with a multi-tool so you don't damage the spline ends.

And yes, I use a small ultrasonic I got on sale for $30; it's a bit shallow so I have to flip the bigger parts, no big deal.
 
If it looks clean and breaths well, I would have no problem using it as is. But you can get an insight into vintage by removing the user adjustment knob. If that o-ring is blue, then it has been a while since it has seen a service. If it is black you are probably in good shape. Then check to see if the poppet is an old design or is the current S-wing poppet. After removing the knob, keep the lever laying close to the barrel and dump out the balance chamber and the spring. Now peek down into the barrel. If all you see is a white plastic poppet, then it should be fine. If you see a blue poppet (with metal shaft) then it has been quite some time since the last service. And, if it is an off-white poppet and metal shaft, it has been even longer. One last concern is the Orifice o-ring. A black o-ring on the adjustment knob and an S-wing poppet just about insures a black o-ring on the orifice and life is good. A blue o-ring or an older poppet may mean a red o-ring on the orifice. I have found these red o-rings seem to degrade unusually quickly over time and become brittle, crack, and leak. But that is about as bad as it gets - they leak. If the reg leaks, fix it. If the reg looks clean, performs well, holds vacuum, and does not leak; enjoy a few conservative dives.
 
Good advice from the Usual Suspects. Master Awap forgot his useful bit of advice to just leave the lever in place unless you have to replace it.

Here are a few other do/don’t do items:
Do use two wrenches when removing the hose from the second stage.
Do press the purge button anytime you adjust the orifice in or out.
Don't pry on the adjustment knob retainer clip. Screw the knob in enough so there's no pressure on the clip and use the plastic handle of a screwdriver to unseat it from the barrel.

BTW; you can find some useful diagrams, instructions, and parts here:
Vintage Scuba - Vintage Scuba Gear at Vintage Double Hose -->Manuals and Catalogs-->ScubaPro schematics and parts list --> G250 vintage annotated.

Do keep us posted......good luck.
 
Sounds to me like you have an early version of the G250HP. I had a few in my hands recently and like you at first I thought that they were just late G250's. It is a very different regulator inside than the G250 or G250V. The good news is it will probably have an s-wing poppet, the bad news is it has more "O" rings and is a little more time consuming to rebuild.

IMG-20120909-00683.jpg

IMG-20120909-00695.jpg
 
The pictures clearly show a metal barrel with a retainer clip, so I am pretty sure it is a G250.

Thanks for all the tips. I will let you all know how it goes.
 
I had a hybrid one like that: textured/fabric-like cover like the HP, but the guts of a G250. I got it used, so I have no way to find out if they made it that way or if a HP cover had been retrofitted. But it looked cool for a while, until my #1 son liberated it.
 

Back
Top Bottom