Never build a boat, story of the Ho-Hum

Please register or login

Welcome to ScubaBoard, the world's largest scuba diving community. Registration is not required to read the forums, but we encourage you to join. Joining has its benefits and enables you to participate in the discussions.

Benefits of registering include

  • Ability to post and comment on topics and discussions.
  • A Free photo gallery to share your dive photos with the world.
  • You can make this box go away

Joining is quick and easy. Log in or Register now!

Aluminum prices are nuts these days.
You're not kiddin'. I'm in the graphics business and aluminum sign panels have doubled since covid hit. I had not bought any in a while but was recently pricing a job for a customer. When I looked up my cost for a 4' x 8' panel my jaw dang near hit the floor.
 
You're not kiddin'. I'm in the graphics business and aluminum sign panels have doubled since covid hit. I had not bought any in a while but was recently pricing a job for a customer. When I looked up my cost for a 4' x 8' panel my jaw dang near hit the floor.
Sickening.... my last order of propane tanks was $52,800 more than it was ~13 months ago... same order, same size tanks, from the same company... it's steel not aluminum, but it's sickening how much everything has gone up.

@Tracy my 1st thought when I saw the pictures was "God I hope he bought those materials before ~ Jan 2021". That's when we really started to see prices start to climb. I feel bad that your jammed into the spot you;re in.
 
Love the boat,,,, I have sorta wanted to the same thing, (to save money of course)
But I better finish a bunch of my other projects first :)
Hope to see more pictures eventually.
 
Once the fuel tanks were installed, it was time to finally hang the first engine and see what I created.
Considering the entire things was designed in my head, cut randomly and welded together, I was pretty happy to see the engine was level, at the right height, and the set back cleared the rail with the engine trimmed all the way up. Next came the second engine and starting to plumb the steering. The steering was an exceptional nightmare. With the engines on opposite corners of the boat, you couldn't have a mechanical tie bar, that means you need a hydraulic tie bar. Good luck bleeding this nightmare should you ever decide to install one. Also about this time, my trailer was ready. We made a quick drive out to Washington DC and picked it up. Swapped the boat over and it fit like a glove. The tri-axle trailer is for our other boat that was conveniently in the water during all of this.

1644028284814.png

1644028320049.png
1644028349282.png
1644028387033.png
1644028515378.png
 
Next step was to get some benches built and installed. Once they were in, we took it to the water to see if it would float. First sea-trial was semi-succesful. It floated, but I had the shift linkage hooked up incorrectly and it only had reverse. We pulled it back out and took the partial win.
1644028705979.png
1644028743226.png
1644028771954.png
1644028801494.png
 
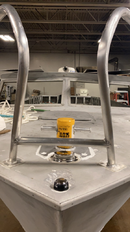
I wanted functional rails. Not the worthless 1" stainless junk that comes on recreational boats. I went with 1.5" .125" wall 6061 tubing and bent it all to fit.
The bow rail design is for when you need to pull the mooring, you can plant your shoulders in the divots and not worry about taking a header into the water.
I made the front T post from an old SCBA bottle that was laying in my scrap bin. The roof rack is a place to store duffel bags while underway, it doubles as a handrail when accessing the bow.
1644029061464.png
1644029077472.png
1644029124898.png
1644029152940.png
1644029187507.png
1644029221251-png.705293
1644029290008.png
1644029308680.png
 

Attachments

  • 1644029221251.png
    1644029221251.png
    508.2 KB · Views: 624
My father and a couple of local friends came up to help one weekend. I started building the diver gear racks while my dad started putting an elevator together in his head. The racks are wide enough to fit full size doubles or a gue boat rack with 7" tanks. The are all six independently height adjustable for whatever size diver might be on the boat. They are drilled and pinned every two inches over an 18" spread.
We cut the transom out between the engines and figured our final measurements for the elevator before cutting. We built the elevator on the ground, lifted it into place and attached it. The elevator is 4"x6" 1/4 C-channel with 4" square tubing trolley. It is lined with delrin slip plates and powered by a DC winch.
After the first few sea trials, we decided it needed a water tight stern door. On fast deceleration, it would flood the deck. The door is made from 1/4" 6061 with a 1" 6061 tube top rail.

1644029697856.png

1644029724941.png

1644029750098.png


1644029785582.png


1644029817859.png

1644029853246.png

1644029910042.png

1644029940269.png

1644029979555.png

1644030013119.png

1644030121054.png
 
WOW, that looks very nice. Why didn't you make a full platform and run a ladder between the engines?


Edit: Apparently you were posting pictures to answer my question while I was typing it.
 
WOW, that looks very nice. Why didn't you make a full platform and run a ladder between the engines?
I already have a dive boat with a ladder. When was the last time you used one with an elevator in the United States?
I designed the entire boat with the idea of making deep technical diving easier. Climbing ladders with heavy gear in rough seas after extensive cold deco always seemed like a horrible but necessary evil. I decided to try something different.
 
Back
Top Bottom