

You are using an out of date browser. It may not display this or other websites correctly.
You should upgrade or use an alternative browser.
You should upgrade or use an alternative browser.
Mako Puris
- Thread starter Robert Mundy
- Start date
Please register or login

Welcome to ScubaBoard, the world's largest scuba diving community. Registration is not required to read the forums, but we encourage you to join. Joining has its benefits and enables you to participate in the discussions.
Benefits of registering include
- Ability to post and comment on topics and discussions.
- A Free photo gallery to share your dive photos with the world.
- You can make this box go away
Wookie
Proud to be a Chaos Muppet
Staff member
ScubaBoard Business Sponsor
ScubaBoard Supporter
Scuba Instructor
What would you like to know?
OP
Robert Mundy
Registered
How many fills before carbon should be changed assuming your filling an 80fc tank..The compressor was my fathers I have always had my tanks filled at the LDS but i would like to use the compressor.
Wookie
Proud to be a Chaos Muppet
Staff member
ScubaBoard Business Sponsor
ScubaBoard Supporter
Scuba Instructor
Carbon? You have a number of chemicals in the purification chamber. Are you filling your own purification cartridges, or buying them from a dealer? Does this chamber have a inner chamber for packing?
OP
Robert Mundy
Registered
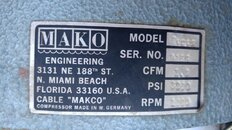
The purification chamber contains a water separator on the bottom along with a stainless chamber that has a screen plate followed by a composite pad followed by activated carbon then another thick pad and stainless plate. the inner chamber is the size of a large pill bottle.. I was considering buying a cartridge filter setup and plumbing it in and not use the oem setup since it most likely is 30+ years old although i can still buy the pads and carbon from laurance factor in florida.
Wookie
Proud to be a Chaos Muppet
Staff member
ScubaBoard Business Sponsor
ScubaBoard Supporter
Scuba Instructor
Yes, but you’ll need the hopcalite and dryer medium and carbon. The carbon is actually the least used and lasts almost forever. The hopcalite and dryer medium are what determine element life.
I would start with fresh oil and lawrence factor disposable cartridge for that filter to see if it still pumps. You may find that you need to replace the valves and do some other work to get it running. Might as well make sure its functional before investing in modern filtration.
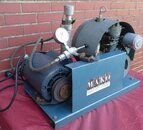
Now thats what a 30 year old workable compressor should look like.
First off forget the new filter and spending much money. Your first task is to verify its viability.
Pop the oil level indicator and check the oil level and consistency of the oil itself
rotate the pump by hand to ensure its not stuck or scratching
Pop the air intake filter can and check what’s been living inside for the last 30 years.
Depending on what you find you replace the oil with fresh (mineral $20 and the air intake filter
(Mann or Hummall $15 from memory check dims or casing marks for correct size and type
Rotate the pump by hand again with the fresh oil, also check nuts fixtures and fittings for tightness.
At this point I would disconnect the filter tower before testing further and also the old rubber hose and charging connections HP gauge etc anything that could go pop under pressure.
Simply connect the now bare outlet pipe off the compressor to a HP line bleed valve with a pressure gauge upstream
Next remove the drive belt hook up the motor to power and jog the motor only to check correct rotation.
Then run the motor again using a clamp meter to check power draw in amps at no load rotation. The pump is stationary only the motor runs at this stage.
Decided if you need to use a new drive belt now or use the old one just for this test $10
Measure the diameter of the driven pulley on the compressor and the driver pulley on the motor
and the between centre length between the two drive shafts, you will need all this to work out the drive belt length as the belt size markings have probably worn off by now. If your not sure post the 2 diameters and the between centre lengths and we can work the new belt length out for you. Check also the RPM on the motor plate and the RPM rating on the compressor, you need these to work out the ratio of each speed.
Then before you fire her up consider that a workshop engineer would have in addition pulled the heads to check both the pistons bores and liners together with the inlet and discharge valves on a long standing compressor.
Also he would have tested each relief valve pressure setting and condemed the old hose and filter shell.
You are going to take pot luck and fire her up regardless. Its all dependent on the oil level and oil condition and what you see rust wise inside the air intake filter reaching into the first stage. Risk is the valves are stuck also the relief valves too, worse is its dry rust in the piston liner top end and valves and you trash them
When running also take the amps readings as you slowly closed down the line valve and increase
pressure in the pump (don’t run it long off pressure seconds only just for starting) Always make sure the gauge shows at least 1000psi the rest you can blast away. Increase up to 3000 psi by closing down the needle valve and check amps drawn. (again an engineer would check the relief valve settings you can’t unless your brave)
Once at 3000psi close the valve and stop the compressor, check for leaks and blow back
After this we can discuss an aftermarket filter and the chemical issues, personally I would’nt use either the filter or the HP hose but for the test above you don’t need to. Just wear eye protection at the very least first off.
Last edited:
OP
Robert Mundy
Registered
The compressor is in excellent shape it was well maintained and always had the oil changed at regular intervals as well as intake filter . He had purchased the compressor new and for the past 30 years used only the 40 micron pads and carbon in the filter housing. This compressor was on block island at his summer house. Up until he passed away 4 years ago it was used twice a month to fill 3 cylinders for lobster diving. I plan on purchasing a new high pressure hose and valve. The compressor turns on and builds up pressure to 3000 no problem and has no blow back it defiantly was well maintained. as for the filer housing there contains a steel refillable cartridge if i understand correctly i should start with 1 pad followed by carbon then another pad then hopcalite then another pad then desiccate followed by a final pad correct ?
Wookie
Proud to be a Chaos Muppet
Staff member
ScubaBoard Business Sponsor
ScubaBoard Supporter
Scuba Instructor
Ian knows better than me how to pack a filter chamber. Iirc the desiccant goes in first, the carbon second and the hopcalite on top.
Similar threads
- Replies
- 3
- Views
- 1,007
- Replies
- 5
- Views
- 325
- Replies
- 5
- Views
- 427
- Replies
- 0
- Views
- 577
- Replies
- 3
- Views
- 503
