
I've got an Ultralite tray and tray extender (allows for attaching a second strobe/arm) that my company purchased from Olympus a few years ago. I recently tried to disassemble it and found that one of the 2 screws that attaches the extender is completely locked. I've tried just about everything I can think of but I can not manage to make this screw budge. So far I've tried: spraying with PB blaster and tapping with a hammer, unscrewing by drill and by hand (the screw head is now stripped), drilling through the screw head with small drill bit. Anyone have any tips on how to get this screw free?

You are using an out of date browser. It may not display this or other websites correctly.
You should upgrade or use an alternative browser.
You should upgrade or use an alternative browser.
Help with removing hardware from Ultralite camera tray
- Thread starter khr77
- Start date
Please register or login

Welcome to ScubaBoard, the world's largest scuba diving community. Registration is not required to read the forums, but we encourage you to join. Joining has its benefits and enables you to participate in the discussions.
Benefits of registering include
- Ability to post and comment on topics and discussions.
- A Free photo gallery to share your dive photos with the world.
- You can make this box go away
So, what is still attached?
What size screw
Picture?
If all else fails:
Heat. Torch or pencil torch if small enough (gas solderer), until the screw glows red. Paint will blister off BTW.
But you still need to be able to get at the screw with vice grips (file flat on first?), or a screw out or be able to twist the parts against each other (if only 1 screw and no form fit alignment...).
K
KeithG
Guest
Agreed - but think about a soak in vinegar-ish stuff before hand?So, what is still attached?
What size screw
Picture?
If all else fails:
Heat. Torch or pencil torch if small enough (gas solderer), until the screw glows red. Paint will blister off BTW.
But you still need to be able to get at the screw with vice grips (file flat on first?), or a screw out or be able to twist the parts against each other (if only 1 screw and no form fit alignment...).
Vinegar (and maybe some baking soda?) sometimes helps to dissolve some nasty stuff.
Differential heat is also effective - heat the screw and not the plate (or heat the plate and not the screw) combined with a physical bash may free the frozen part.
Worst case is drill out the screws and install oversize bolts ignoring any threads in the tray. Worst case is you have an aluminum tray (soft) and stainless steel bolts (hard). Trying to get the bolts out will destroy the tray threads.
Maybe in an ultrasonic bath even if you have access to one that the parts fit in...Agreed - but think about a soak in vinegar-ish stuff before hand?
Vinegar (and maybe some baking soda?) sometimes helps to dissolve some nasty stuff....
So, what is still attached?
What size screw
Picture?
If all else fails:
Heat. Torch or pencil torch if small enough (gas solderer), until the screw glows red. Paint will blister off BTW.
But you still need to be able to get at the screw with vice grips (file flat on first?), or a screw out or be able to twist the parts against each other (if only 1 screw and no form fit alignment...).
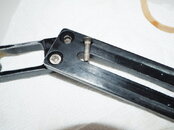
See picture. I was able to remove the other screw (pictured) without much of an issue. It's 5/8" (1.5-cm) in length. Standard phillips head. I should mention that the locked screw is not completely tightened down (the handle and extension piece have some wobble between them) but it will not loosen or tighten from where it's currently locked (if that makes any sense). I'm wondering if I could just bend it and possibly snap it but worried I might break the tray.
Attachments
bvanant
Contributor
Just drill it out and if you need to make a slightly larger hole and get it tapped.
Bill
Bill
By the looks of it, with it being a flathead screw with not much left to grip on, I'd agree.Just drill it out and if you need to make a slightly larger hole and get it tapped.
Bill
DivealotZA
Registered
is there thread in the top tray (in your picture)?
If not, then drill off the head of the screw, take the top tray off and use some pliers afterwards to screw it out the bottom tray...
If not, then drill off the head of the screw, take the top tray off and use some pliers afterwards to screw it out the bottom tray...
Here is how I would remove it.
Place the tray in a vise in a drill press, this is not a job to be done by hand. I can pretty much promise you if you try this with a hand drill you will do more harm than good...been there done that.
Using a starter drill, start a hole in the exact center of the screw head. It is important to use a starter drill, they are much stiffer than a standard drill and will not deflect like a standard drill WILL. The starter drill will clean out the damaged screwdriver slots, a standard drill will most likely start an off center hole or break.
Drill the hole completely through with a drill that is about 1/2 the diameter of the screw.
Next using a drill about 1/2 the diameter of the screw head, drill down just deep enough to remove the head, this will separate the tray parts. At this point I would heating the tray, boiling water is a good choice since it will not likely damage the finish. With a good set of pliers, grip the remaining screw and try to move it, both in and out. Most likely it will start to turn at which point you can remove it.
If it still will not move, reinstall it in the vise and drill out the screw with a drill about 2/3s to 3/4s of the diameter of the screw. You may have to come in from the back side if you crushed the screw....I would actually recommend you drill from the opposite side. Drill just enough to get almost through the tray, leaving the part of the screw you are grabbing the same thickness. Apply more heat and grab the screw with pliers again, working the screw in and out to see if it comes free. It's likely you will crush the screw at this point, no big deal.
If all that fails, return the tray to the vise, drill out the hole to the correct drill size for the screw and use a taper tap of the correct size to clean out the threads. Be very careful when starting the tap since the objective is to restart it in the original threads, not cutting new ones but rather cleaning out the old ones. A good soak in PB Blaster at this point helps loosen the threads. There are 2 sizes of drills for each tap, one size for steel (larger) and a smaller one for softer metals like aluminum. I would use the smaller size since that is most likely what was used. While you are at it, I would run the tap coated in PBB through the other hole to clean out any corrosion.
Once you have the threads cleaned, coat the screws in silicone grease before installing them. This helps keep out water and helps prevent more corrosion from forming.
Similar threads
- Replies
- 4
- Views
- 302
- Replies
- 1
- Views
- 299
- Replies
- 15
- Views
- 3,096
