DIY Bladderless Donut Wing Experiment/Project

Please register or login

Welcome to ScubaBoard, the world's largest scuba diving community. Registration is not required to read the forums, but we encourage you to join. Joining has its benefits and enables you to participate in the discussions.

Benefits of registering include

  • Ability to post and comment on topics and discussions.
  • A Free photo gallery to share your dive photos with the world.
  • You can make this box go away

Joining is quick and easy. Log in or Register now!

JYWong

Registered
Messages
13
Reaction score
24
Location
Hong Kong
# of dives
100 - 199
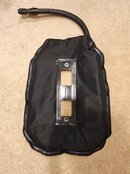
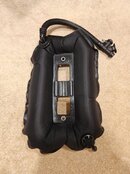
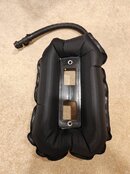
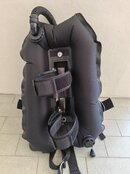
Just wanted to share my personal experience with constructing a homemade bladderless wing for a single tank setup.

I think what motivated me to embark on this experimental project is primarily the lack of options of bladderless wings in the market.

I wanted something simple to meet a combination of criteria: -

  • Having used a Zeagle Express Tech since 2010, I have come to appreciate the weight, simplicity and packability of the bladderless wing for travel purposes. Unfortunately, the dump valves finally gave way after 13 years.
  • However, after using the Zeagle Express Tech, I also realised that I prefer a donut wing compared to the Zeagle's horseshoe design for ease of dumping air when required.
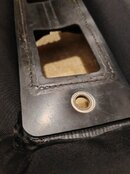
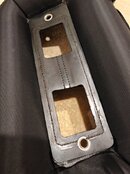
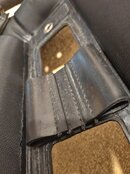
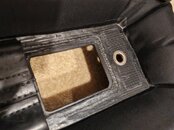
  • I came across the DSS wing design and appreciate the innovative open window where the cam-bands go through. I intend to switch regularly between a stainless steel backplate for my local diving and the Zeagle softplate for travel diving. The open window design makes the change between backplates almost instantaneous.
  • As I do not require much lift, I was also looking for a wing size which is small and compact.
  • Halcyon Pioneer and Oxycheq Razor wings would have met most of the above criteria (except for open windows), but unfortunately it seems that both are no longer produced.
So far, I’ve done 30 dives (and counting) with this wing, with zero incidents so far. I found the wing to be very comfortable and even more balanced than the Zeagle Express Tech wing that I have been using. Of course, longer term durability will only be known over many more dives, but I would not hesitate to DIY another once this gives way, with improvements.

Disclaimer: I dive almost exclusively in open water conditions, and in relatively calm tropical waters. I do not solo dive.

Credits: The style and design are obviously inspired by the DSS wings, so credits to Tobin, wherever he may be.

Credits: A big thank you also to @raftingtigger and his thread DIY wing tutorial - very picture heavy. | ScubaBoard which showed me that it was even possible at all to DIY a wing and served the principal guide for my little project.
 
Completed Wing, deflated and fully inflated.
 

Attachments

  • IMG_20240421_174952.jpg
    IMG_20240421_174952.jpg
    108.5 KB · Views: 52
  • IMG_20240421_175012.jpg
    IMG_20240421_175012.jpg
    108.7 KB · Views: 45
  • IMG_20240421_175048.jpg
    IMG_20240421_175048.jpg
    114.7 KB · Views: 47
  • IMG_20240421_175107.jpg
    IMG_20240421_175107.jpg
    109.3 KB · Views: 43
Close up of the DSS inspired window for tank cam bands, with EPDM sheet as reinforced backing hand sewn around the edges, and the hand sewn tank stabiliser pad.
 

Attachments

  • IMG_20240421_175233.jpg
    IMG_20240421_175233.jpg
    81 KB · Views: 38
  • IMG_20240421_175210.jpg
    IMG_20240421_175210.jpg
    126 KB · Views: 37
  • IMG_20240421_175150.jpg
    IMG_20240421_175150.jpg
    87.1 KB · Views: 33
  • IMG_20240421_175129.jpg
    IMG_20240421_175129.jpg
    105.6 KB · Views: 39
Some of the equipment used - heat sealer with adjustable temperature, hot knife, silicone roller, leather sewing kit and plain cardboard. The material I used for the wing is 420D TPU Coated Nylon. I would have loved to work with the 1000D TPU Coated Cordura, but unfortunately I could not find this anywhere that didn't require a larger volume than I needed.
 

Attachments

  • IMG_20240421_175748.jpg
    IMG_20240421_175748.jpg
    114.1 KB · Views: 32
  • IMG_20240421_175830 1.jpg
    IMG_20240421_175830 1.jpg
    171.3 KB · Views: 36
  • IMG_20240421_175935.jpg
    IMG_20240421_175935.jpg
    131.5 KB · Views: 33
  • IMG_20240421_180014.jpg
    IMG_20240421_180014.jpg
    113.6 KB · Views: 36
Where did you get that seam sealer? That's pretty nice, better than a hair straightener that I've used in the past.
 
Thats a pretty cool process, I can really appreciate the DIY. I use an xdeep ghost wing for travel, which has a similar "bladderless" design to cut down on bulk. They stitch some type of bias tape (likely just double folded cordura) around the outside perimeter. My guess is that is more to prevent catastrophic seam failure rather than to actually reinforce the edge welding. They probably use RF rather than heat, but same concept. Worth looking into reinforcing the edge on yours? If nothing else, might give it a more finished appearance.

1714494639586.png
 
Where did you get that seam sealer? That's pretty nice, better than a hair straightener that I've used in the past.
Amazing work!

A note for anyone else attempting diy TPU welding. There is a great resource at Home - DIY Packraft they seem to prefer 'leather irons' for the tool.
@nwbrewer @dm9876 Thanks! I got the sealer from Taobao, which is actually just Aliexpress but in Chinese. It isn't really meant for sealing fabric, it's used to seal packets of chips, hence the vertical lines. A sealer with flat surface would probably work better, and the leather iron referenced by @dm9876 would work too!
 
https://www.shearwater.com/products/peregrine/

Back
Top Bottom