Materials needed:
Tools needed:
Design your wing by either copying one you like or custom creating it. This method works for both BM donut wings and SM wings. I have not tried to make 3D patterns.
Transfer your design - full sized - to the poster board as a pattern. Decide where you want your OPV and Oral/Power inflator openings. Mark a 1" diameter hole at each spot. Cut the pattern out and cut out each 1" diameter opening. Make a second pattern for the actual inflated area. Mark and cut out the 2 1" diameter holes on this pattern also. They will act as alignment marks.

Mark 2 pieces making sure to mark the OPV and Inflation holes on only ONE piece. OPV and inflation holes may be on different pieces, but only the 2 holes total. Do this carefully, it is easy to put the holes in the wrong orientation and you must start over if you do. Mark your grommet holes also.

Cut out your pieces carefully. Cut out the OPV/inflator holes. Do not punch the grommet holes yet.

Using the inner pattern mark the seal line. Mark this on the outside of one piece. If doing the glue method then mark the inside of one piece also. Note how the holes help align the inner pattern.

Using a clothes iron set to LINEN and held at each area for a slow count of 15-20 go over the entire area shown in black above (your seal area). You may have to do touch up. Let the fabric fully cool before checking the seal. This step is inconsistent. When you get a good melt of the PVC coating the seal is great - but getting that good melt is the challenge. This is why I am playing with the PVC pipe glue method. The glue chemically melts the PVC and welds it together.
For the glue method: Put a good layer of glue on the INSIDE (coated) side of the piece you marked the seal area on the inside. Then quickly lay the other piece INSIDE to INSIDE on top and lay weights all along the seal. Ignore the project for at least 2-4 hours. You may have to work a section at a time if the glue drys too quickly. NOTE: I have not used this method yet in full scale, but it is the most promising method I have used.

Ironed seal

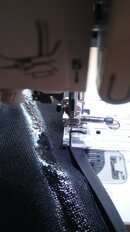
Close up of ironed (and sewn) seal
The next steps are optional if you got a very good seal all the way around. Personally I want a blown seam to leak slowly rather than massively, so I add the next sewing and sealing steps.

Sew the safety seam just outside (toward the edge) of the sealed area. Use a med-large stitch length.

Use thinned or full strength AquaSeal or full strength SeamGrip and coat the sewn seam on both sides of your wing. Let it fully dry before doing the opposite side. I like thinned for this because it penetrates deeper and cures faster. I did this seam with 3 coats of thinned AquaSeal in one sitting. SeamGrip should be the same as thinned AquaSeal according to the manufacturer. 4 parts AquaSeal, 1 part Toulune - use OUTSIDE. Next time I will use the SeamGrip since it has arrived.
Now install the Bladder flanges. They will pass through the holes, but you will have to work at it the first time. Don't forget the split gasket. One layer inside and the other layer outside. Tighten securely with the REQUIRED special tool. Now leak test your wing. If you have done all these steps carefully it should hold well the first time. If not, just find the leak and apply more sealant or re-iron or both.

Part one done. Part 2 next post.
- ½ yard of vinyl coated 600 denier fabric. Available in full yards from Coated Fabrics for $7.99 per yard
- 2 yards of 3/4” nylon double folded bias tape. Roll Goods_ for $0.60 per yard
- Outdoor quality sewing thread. Recommend Gutterman
- Size 0 solid brass grommets and setting kit. If making a BM wing use larger grommets to fit the mounting hardware. Available on eBay or most hardware stores.
- AquaSeal or SeamGrip. Invest in a $25 8 oz tube and store in the freezer. Much more economical than the ¾ oz tubes for $9-11. You probably need more than ¾ oz. Large tubes are available from www.GearAid.com
- Small can of PVC pipe cement (this is for one method that I have tried on a small scale)
- Large sheet of poster board (for the pattern)
- 2 bladder flange assemblies DGX Bladder Flange Assembly $8.95 each
- Bladder flange tool Bladder Flange Tool $4.75
- OPV and Oral inflation assemblies. Also available at divegearexpress, or steal from another wing.
Tools needed:
- Colored pencil or chalk
- Fabric scissors
- Basic home sewing machine
- Home clothes iron. Not needed if using the PVC glue method
- Hammer
- Cutting board (kitchen one OK)
Design your wing by either copying one you like or custom creating it. This method works for both BM donut wings and SM wings. I have not tried to make 3D patterns.
Transfer your design - full sized - to the poster board as a pattern. Decide where you want your OPV and Oral/Power inflator openings. Mark a 1" diameter hole at each spot. Cut the pattern out and cut out each 1" diameter opening. Make a second pattern for the actual inflated area. Mark and cut out the 2 1" diameter holes on this pattern also. They will act as alignment marks.
Mark 2 pieces making sure to mark the OPV and Inflation holes on only ONE piece. OPV and inflation holes may be on different pieces, but only the 2 holes total. Do this carefully, it is easy to put the holes in the wrong orientation and you must start over if you do. Mark your grommet holes also.
Cut out your pieces carefully. Cut out the OPV/inflator holes. Do not punch the grommet holes yet.
Using the inner pattern mark the seal line. Mark this on the outside of one piece. If doing the glue method then mark the inside of one piece also. Note how the holes help align the inner pattern.
Using a clothes iron set to LINEN and held at each area for a slow count of 15-20 go over the entire area shown in black above (your seal area). You may have to do touch up. Let the fabric fully cool before checking the seal. This step is inconsistent. When you get a good melt of the PVC coating the seal is great - but getting that good melt is the challenge. This is why I am playing with the PVC pipe glue method. The glue chemically melts the PVC and welds it together.
For the glue method: Put a good layer of glue on the INSIDE (coated) side of the piece you marked the seal area on the inside. Then quickly lay the other piece INSIDE to INSIDE on top and lay weights all along the seal. Ignore the project for at least 2-4 hours. You may have to work a section at a time if the glue drys too quickly. NOTE: I have not used this method yet in full scale, but it is the most promising method I have used.
Ironed seal
Close up of ironed (and sewn) seal
The next steps are optional if you got a very good seal all the way around. Personally I want a blown seam to leak slowly rather than massively, so I add the next sewing and sealing steps.
Sew the safety seam just outside (toward the edge) of the sealed area. Use a med-large stitch length.
Use thinned or full strength AquaSeal or full strength SeamGrip and coat the sewn seam on both sides of your wing. Let it fully dry before doing the opposite side. I like thinned for this because it penetrates deeper and cures faster. I did this seam with 3 coats of thinned AquaSeal in one sitting. SeamGrip should be the same as thinned AquaSeal according to the manufacturer. 4 parts AquaSeal, 1 part Toulune - use OUTSIDE. Next time I will use the SeamGrip since it has arrived.
Now install the Bladder flanges. They will pass through the holes, but you will have to work at it the first time. Don't forget the split gasket. One layer inside and the other layer outside. Tighten securely with the REQUIRED special tool. Now leak test your wing. If you have done all these steps carefully it should hold well the first time. If not, just find the leak and apply more sealant or re-iron or both.
Part one done. Part 2 next post.