Check Valve - Need Help Installing on Alkin W31

Please register or login

Welcome to ScubaBoard, the world's largest scuba diving community. Registration is not required to read the forums, but we encourage you to join. Joining has its benefits and enables you to participate in the discussions.

Benefits of registering include

  • Ability to post and comment on topics and discussions.
  • A Free photo gallery to share your dive photos with the world.
  • You can make this box go away

Joining is quick and easy. Log in or Register now!

realdiver7

Contributor
Messages
1,057
Reaction score
5
Location
Coastal North Carolina
# of dives
1000 - 2499
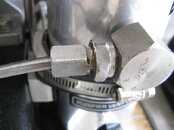
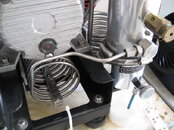
I need help figuring out how to install a check valve at the bottom input of the filtration canister on an Alkin W31 electric compressor with manual drains. If I remove the round 1/4 in. fitting and install the approx. 3 in. long (female to male airflow) check valve coming straight off of the canister, the valve sticks out so far I can't cover the compressor with the wooden cover, or more importantly, safely route the coiled tubing from the 3rd stage without overbending it. What kind of elbow fittings, creative routing, etc. do you use to make the check valve fit?

By the way, I'm installing the check valve in order to keep the filtration canister pressurized when the compressor is not being used so I can hopefully prolong filter media life.

Edited to add: I already have a backpressure regulator (priority valve) installed at the outlet on the top of the filter canister.

See pictures below of how the round 1/4 in. fitting goes straight into the filtration canister.

Thanks!
 

Attachments

  • Alkin 010.jpg
    Alkin 010.jpg
    119.5 KB · Views: 186
  • Alkin 006.jpg
    Alkin 006.jpg
    165.3 KB · Views: 178
Last edited:
Try a 1/4" NPT Street Elbow. It is male on one end and female on the other, and will make the tightest turn.

Global Manufacturing has them...

http://www.gmcscuba.com/pdf/Catalog.pdf

Page 38 of the catalog, part number 47240 (steel), 47241 (ss) or 47242 (brass)

You will probably need to cut off some of the cooling coil to make it shorter so everthing fits. Is that a faruled fitting with teflon tape in it? You'll likely need to get a new tube fitting...or at least a new farule for around the tubing... Keep in mind that faruled fittings are designed to be crushed once, if you break them and then try to re-connect them, they tend to leak (hence the teflon?)

The check valve at the outlet of the filter will not keep the canister pressurized when the system is not running, it will only prevent air from going backwards through the system. What you want is called a back pressure regulator, which will keep your filter stack pressurized...

Page 35, part #46150

The back pressure regulator will only allow pressure in excess of a certain value to pass it, thus maintaining a minimum pressure (1700 psi) in the filter canisters. This will also make the media in the filters more efficient.

Keep in mind that if you open your manual drains, you will depressurize the system, and the bleed the pressure out of your filter stack, inspite of the back pressure regulator. Putting a check valve ahead of the filter stack, will prevent you from depressurizing it, as air will not be allowed to go out the inlet to the filter stack.

The Back pressure regulator has two outlet ports, one is regulated, the other is not. Put a stop valve at the unregulated port, this will allow you to depressurize the filter stack for media replacement.

This way your filter stack will be pressurized at all time, even when the compressor is not running and the drain valves are open.
 
Last edited:
Scuba Duck....by coincidence with your suggestion, I ordered two 1/4" NPT street elbows today in order to try to route the check valve. I already have a backpressure regulator (priority valve) installed on the filter canister outlet at the top.

It is my understanding that with the priority valve on the outlet (top) and a check valve on the inlet (bottom), my filter canister should remain pressurized. I depressurize my filter canister by opening up the manual moisture drain per Alkin's instructions. If I'm thinking about this right, to repressurize, I would need to run the compressor for a minute or so after changing filter media.

If I'm wrong, I hope someone will jump in and let me know. I don't quite understand how I can leave my drain valves open without depressurizing the filter canister.

By the way, does anyone know how much the 3rd stage coiled tubing can be bent or moved without damaging it?

Thanks!
 
The desiccant is the only component which needs to be walled off from atmospheric air but, yes, it must be done. Maintaining a few psi in the filter canister will take care of it. This can be done by shutting the petcock before the last bit of air is expelled. Installing a check valve at the input would be nice but could be tricky. There may not be enough room to rotate a street elbow without striking the canister. So, the boss fitting in the canister might have to be removed temporarily. This kind of stuff, unless absolutely crucial, should be avoided. It is unlikely that humid air could travel from the compressor to the filter if all cocks are closed including the interseparator. If your filter is the hybrid kind which includes a coalescer then it will be impossible to maintain a completely dry environment inside the canister due to the presence of residual water droplets/condensate inside the device. It cannot be drained completely but even so, shutting off the outside air is not just a good idea, it is absolutely necessary. The minimum bend radius of 1/4 inch SS tubing with 0.035 wall is 3/4 inch. Only a bender should be used for such tight turns. Some less radical bending can be done by hand but is difficult due to the stiffness of even light tubing. The tubing can be cut with a high quality tubing cutter. The bender does not have to be anything special. I dislike swadgelok type fittings and I hate those Bauer ferulok things but what you got is what you have to live with. Purchase spare ferrules.
 
pescador775......I appreciate the thorough reply and have a better undersanding of what my options may or may not accomplish now. I have removed boss fittings before and agree I have to be very careful in doing so. If the job seems too risky whenever I receive the parts, I'll probably just leave it alone. If it looks like it can be done without bending coiled tubing too much, then I may give it a try.

Thanks!
 
Just out of curiosity, are the threads, tubing and fittings on that Alkin metric or inch?

Oh, and has anyone figured out whether in this application a check valve opens when pumping commences, and stays open, or cycles like an extra cylinder valve? I would think the former, since there's the HP separator to act as a buffer, but if the latter, then one might want to use a check valve that could stand rapid and continuous cycling.
 
oxyhacker....the large round boss fittings are 1/4 inch. I was told that the tubing fittings were made in Turkey (?) and are metric, but I don't know for sure. Maybe some things are made with a mixture of metric and standard parts, but it doesn't make a lot of sense to me. I also believe I was told that the check valve stays open when pumping commences.

As you can tell, I'm not up on Alkin specs, etc., but maybe others will chime in and answer these questions. My plan right now is to get the parts in the mail in a couple of days, and then try to install them and see what happens.

Thanks!
 
Don't overthink this, take it one step at a time. Once back pressure develops the air flow seen by the valve will be continuous. My old Bauer Capitano uses a mix of ASME, ANSI and metric. Some of the primary fittings like the drilled ports in the filters are 1/4 NPT which is seen in Germany, or has been. The repackager has a say also.
 
Or maybe BSPT. BSP being a Whitworth threadform that has been incorporated into the metric standard (as an old Whitworth devotee, it always amuses the hell out of me when I see BSP taps and fittings listed as metric). BSP is close enough to NP that a lot of people never realize the difference. Some people recommend running the appropriate NPT tap through before using an NPT or NGT fitting in a BSP hole. Or at the very least using a dollop of an extra-good thread sealant. Adaptors are also available, from M-C and others. that are probably the way to go if one is trying to do it right.

Oh, any thoughts on using a plain old shutoff valve instead of a check?

Some of the primary fittings like the drilled ports in the filters are 1/4 NPT which is seen in Germany, or has been.
 
Oh, just thought of another solution to your problem. Easy but maybe not cheap. Swagelok makes a very nice line of compact 6000 psi CH-series check valve which are only about 2' long, and they are available with Swagelok compression tube fittings on the ends. You could cut one of these into the straight section at the top of the coil, and completely avoid touching the fittings at the base of the tower.

Only problem, is, the Swagelok valves are not cheap. If you are patient you can find bargains on ebay, but usuallly only in inch sizes, so feasibility may depend on what size the tubing is. 1/4" ones are pretty common, and go for about $20 in SS.
 
https://www.shearwater.com/products/peregrine/

Back
Top Bottom