pescador775
Contributor
- Messages
- 2,652
- Reaction score
- 11
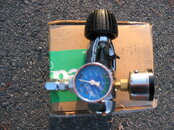
This is a work in progress, an oxygen regulator with extended capability. When finished, it will be included in a kit of two regulators and accessories. The other regulator is an oxygen clean Conshelf to be used for in-water recompression. The regulator pictured (I'll try to furnish better pics later) is a Conshelf being converted for purposes of supplying oxygen to a free flow mask and demand regulator. It is equipped with a barbed outlet (default setting, 15 lpm) and quick disconnect to hook up the aforementioned Scuba demand regulator or various air tools. It has high and low pressure gauges and a relief valve. I drilled some test holes in another regulator body and decided not to drill and tap any ports but to use adapters. Parts and adapters are catch as catch can and I'll supply a list of parts and sources if anyone needs this.
I never liked fooling with medical oxygen equipment, the funky yokes and valves, the puny aluminum tanks, the bulky regulators or diminutive regulators with primitive, unbalanced valves. So, I decided to do something about it. When finished, one will be able to hook this reg up to steel tanks with real pressure and capacity. These tanks are fitted with old time backpacks and can be used in water or on deck. Everything will be properly labeled.
I never liked fooling with medical oxygen equipment, the funky yokes and valves, the puny aluminum tanks, the bulky regulators or diminutive regulators with primitive, unbalanced valves. So, I decided to do something about it. When finished, one will be able to hook this reg up to steel tanks with real pressure and capacity. These tanks are fitted with old time backpacks and can be used in water or on deck. Everything will be properly labeled.