SlugLife
Contributor
Several months ago, I wanted a serious cutting-device capable of easily handling rope, and ended up buying some 10-inch shears. (more info in this thread)
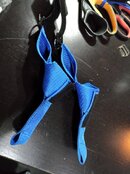
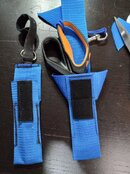
The first sheath I made ended up looking like this, and worked quite well.
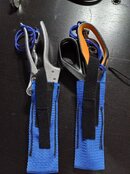
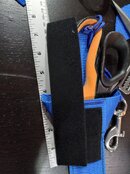
Features include a 2-inch slot for webbing in the back, a d-ring and velcro for securing. The open-bottom is also intentional to allow faster draining. My only slight annoyance after about a dozen dives, was that it was that inserting the shears back into the sheath was .... not really bad at all, but not as seamless as I'd like. Especially if I'm tackling a pile of a dozen anchor-ropes in zero-vis, I prefer to not waste time. Sometimes I'd clip to a d-ring temporarily, but dangling shears is a potential hazard.
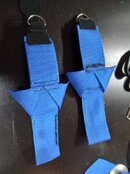
For the gun-enthusiasts in the audience, you may be familiar with "flared magwell", essentially a flared opening that makes it so the magazine can be inserted more seamlessly and quickly, even if you're not precisely accurate. I decided to borrow the general concept to create a flared-sheath.

Step 0: To start you'll need some 2-inch webbing. Preferrably webbing that's not too thick or tough, so it's easier to sew, since we'll be going through 2-3 layers. I used this webbing. (FYI, it's not great for harness material, it's too soft for that)
Before we get started, note that this is customized for large shears like the one shown, but you can change the design and dimension to suit various other objects. Also, if you do steps out-of-order, you may find you're unable to stich where you need to stich (speaking from experience).
If you want a simpler/faster/easier version, you can skip the whole "magwell" approach too, and basically do everything except that piece.
Step 1: Cut 2 lengths of webbing, one 20+ inches, and another 11+ inches. The 20-inch segment will form most of the sheath, while the 11-inch will be used for the "flare" (I cut mine a little short, because I was figuring it out)
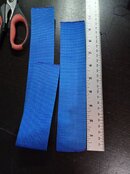
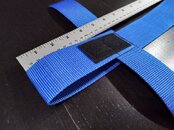
Step 2: Cut a length of Velcro, about 2-3 inches long, and sew that onto one end of the 20-inch piece. I have the "loop" side of the velcro up here.
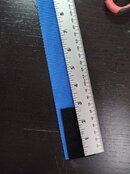
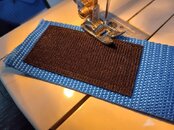
Step 3: Create a "T" shape with the two pieces of webbing on the same end as the velcro, ideally centered.
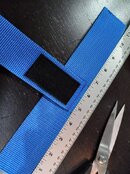
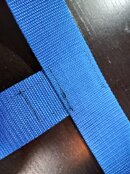
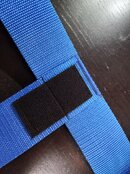
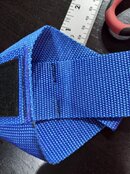
Step 4: Creating the flare. Fold the long webbing at about 6-inches (or adjust for the size of your tool). The pointy-end of the tool will end up inside this crease. Perhaps create a nice crease, or mark it with something like a pen. Sew lines on each side, however only part of the way. Leave a gap at the bottom for water to drain, and a gap at the top, so the handle fits in nicely. Now might be a good time to insert the tool, to check the fit.
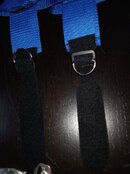
(I didn't take a picture at the right time, but you can see the stitching on the left and right-side here)
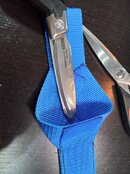
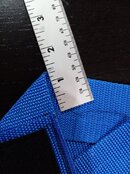
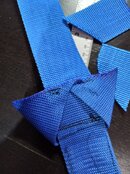
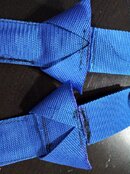
Step 5: Fold the top "T" piece to make our flare. I created a "triangle" fold, with about 1.25 inches at the top. Create a nice crease, and perhaps mark it if you need to. Fold it behind the long piece, and create a stich to secure it in place. Stich the folds in place at the top as shown, and verify the tool inserts nicely in our flared opening. Perhaps only do 1-line of stitching, in case you don't like it and want to rip the thread and try again. When it's good, cut the excess material and add more stitching to secure it.
---- continued below -----
The first sheath I made ended up looking like this, and worked quite well.

Features include a 2-inch slot for webbing in the back, a d-ring and velcro for securing. The open-bottom is also intentional to allow faster draining. My only slight annoyance after about a dozen dives, was that it was that inserting the shears back into the sheath was .... not really bad at all, but not as seamless as I'd like. Especially if I'm tackling a pile of a dozen anchor-ropes in zero-vis, I prefer to not waste time. Sometimes I'd clip to a d-ring temporarily, but dangling shears is a potential hazard.
For the gun-enthusiasts in the audience, you may be familiar with "flared magwell", essentially a flared opening that makes it so the magazine can be inserted more seamlessly and quickly, even if you're not precisely accurate. I decided to borrow the general concept to create a flared-sheath.
Step 0: To start you'll need some 2-inch webbing. Preferrably webbing that's not too thick or tough, so it's easier to sew, since we'll be going through 2-3 layers. I used this webbing. (FYI, it's not great for harness material, it's too soft for that)
Before we get started, note that this is customized for large shears like the one shown, but you can change the design and dimension to suit various other objects. Also, if you do steps out-of-order, you may find you're unable to stich where you need to stich (speaking from experience).
If you want a simpler/faster/easier version, you can skip the whole "magwell" approach too, and basically do everything except that piece.
Step 1: Cut 2 lengths of webbing, one 20+ inches, and another 11+ inches. The 20-inch segment will form most of the sheath, while the 11-inch will be used for the "flare" (I cut mine a little short, because I was figuring it out)

Step 2: Cut a length of Velcro, about 2-3 inches long, and sew that onto one end of the 20-inch piece. I have the "loop" side of the velcro up here.


Step 3: Create a "T" shape with the two pieces of webbing on the same end as the velcro, ideally centered.


Step 4: Creating the flare. Fold the long webbing at about 6-inches (or adjust for the size of your tool). The pointy-end of the tool will end up inside this crease. Perhaps create a nice crease, or mark it with something like a pen. Sew lines on each side, however only part of the way. Leave a gap at the bottom for water to drain, and a gap at the top, so the handle fits in nicely. Now might be a good time to insert the tool, to check the fit.
(I didn't take a picture at the right time, but you can see the stitching on the left and right-side here)


Step 5: Fold the top "T" piece to make our flare. I created a "triangle" fold, with about 1.25 inches at the top. Create a nice crease, and perhaps mark it if you need to. Fold it behind the long piece, and create a stich to secure it in place. Stich the folds in place at the top as shown, and verify the tool inserts nicely in our flared opening. Perhaps only do 1-line of stitching, in case you don't like it and want to rip the thread and try again. When it's good, cut the excess material and add more stitching to secure it.


---- continued below -----


