Ed Palma
Contributor
This is also cross-posted on CPF.
CONSTRUCTION:
First impressions: Seemed relatively well built - nice and solid. On removing the head, there were one or two swarfs, but otherwise it looked great. The fins on the head are not overly-done as seen on some other dive-lights out there. The removable stainless steel attack crown was the first to come off. Granted, it looks like it could do some serious damage if ever used for its intended purpose. Maybe I'll keep it on if diving in shark infested water :
:
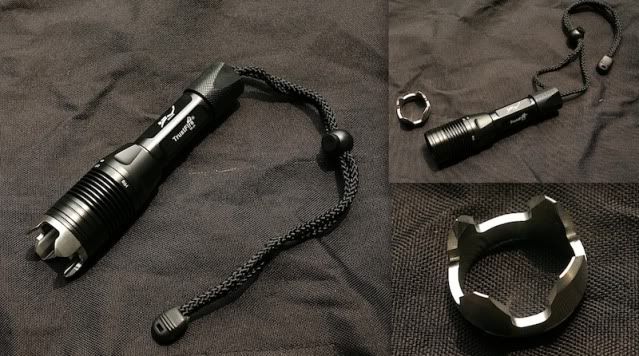
Tail cap comes with a generous hole which allows you to use different thicknesses of line for tying in a bolt snap. Being cheap, I opted to use the existing cord, and not use up my cave-line. Without a lanyard, the light can stand on its end:
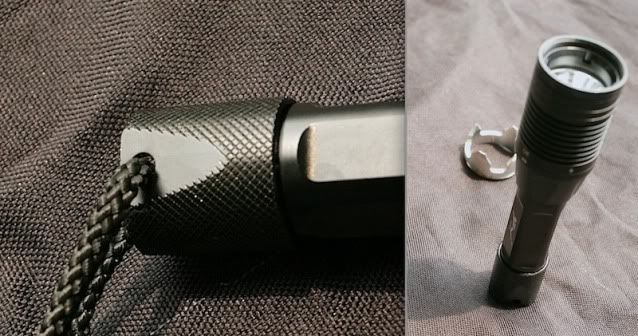
The light has 4 modes: off-flash-low-med-high. It has a bi-directional switch, so from the off position, you can go directly to the highest beam, or into flashing mode. Turning the switch is at best a two-handed affair, as there's an o-ring adding friction to prevent accidental switching. There are no detents, but after taking it apart, there's a groove with pits and a corresponding hole in the ring, so I guess you could put a bb and spring there to add the detents if you wish. Personally, since this will see salt-water use, I'd just leave it as is. Also visible is the small magnet used for switching. I may fix it in place with a bit of glue, as it might fall out and get lost when disassembling the light.
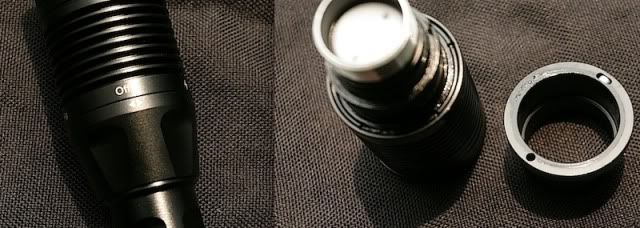
Speaking of o-rings, the tail-cap has 2 rings, while the other end has just one (the other ring is just for friction for the switch). Seeing as this part isn't unscrewed as much, I guess it'll suffice, though I guess 2 would've been better, though there is an extra groove in it. I may just add one later on:
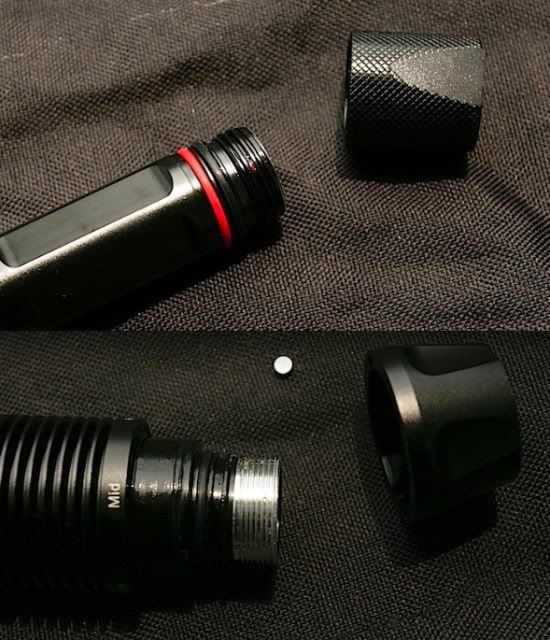
Inside the front bezel are small indentations which I initially took to be the mating points for a tool to remove the ring. I used a watch-back tool, and what I thought was an internal ring is actually just part of a solid front ring which can be unscrewed from the outside.
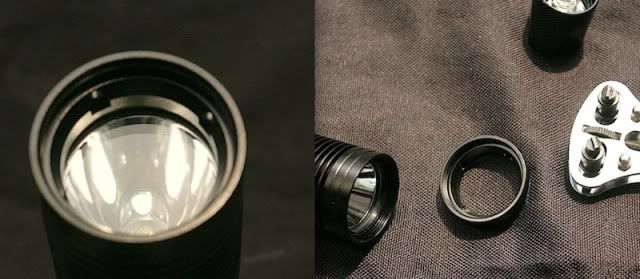
The reflector is a smooth aluminum reflector. I've been so used to having reflectors that screw into the pill, but this one just rests on it. Also seen in the inside of the head is the ledge where the lens and gasket rest.
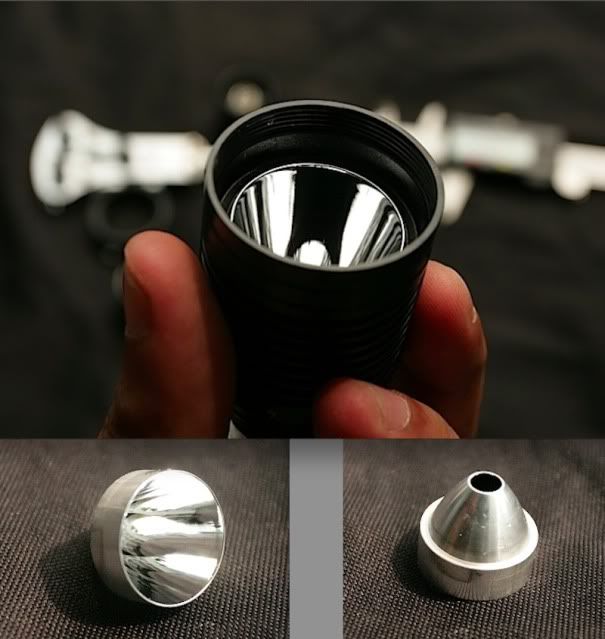
Given the dimensions of the light head, the lens (3mm x 30mm) seems adequate to do its job. The lens is surrounded by a rubber gasket which provides good sealing properties especially at greater depths due to the greater compression of the seal.

The next photo is of the LED in situ. I didn't feel comfortable disassembling further than that, so that's where I left it at.

TESTING:
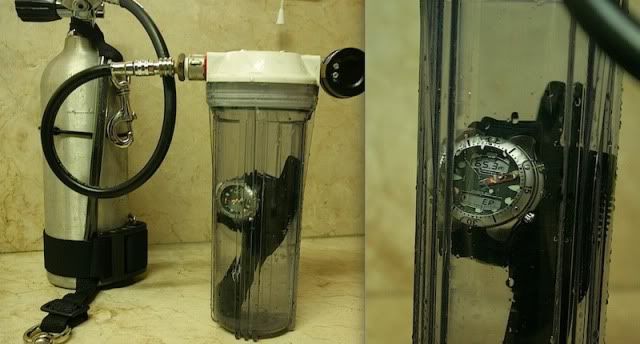
One thing to remember is that this is a dive light. As such, many eBay ads claim it to be able to go up to 100 meters. On KD though, they give a more realistic 30m figure. I decided to go half-way and test to the same depth rating for my GoPro cameras. Put it into my pot along with my watch/depth-gauge and brought it down to around 65 meters for about 15 minutes. No leaks
Since this was to be my back-up light, I decided to test it against my current back-up: a Ferei W150 XPG light. The Ferei is slightly more solid and heavier (~220 g vs the ~180g for the TR-J1). In hand, the slightly thicker tube of the Ferei and the knurling on the tube makes it easier to hold I guess, but I like the TR-J1 for its sleek outline - though knurling would have been a nice touch.

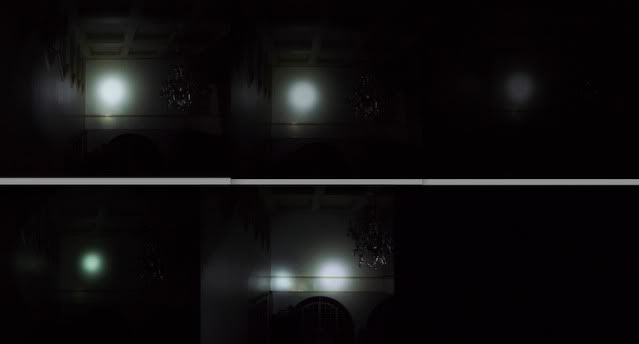
Anyway, in terms of light output, here's a few comparative shots of the TR-J1 vs the Ferei which is rated at 200 lumens. 24mm lens, 5.6 aperture, 1/30 shutter speed, ISO 400 (I didn't have a tripod so I didn't want a slower speed). Wall is around 8 meters away. Upper row: High, medium, low. Lower row: Ferei W150, W150 vs TR-J1, control shot.
Bottom line: Looks like I've got a new favorite back-up light! Since I opted for just the light, I got it for around $33. At that rate, you can't go wrong! Methinks a 2nd one is in order...
CONSTRUCTION:
First impressions: Seemed relatively well built - nice and solid. On removing the head, there were one or two swarfs, but otherwise it looked great. The fins on the head are not overly-done as seen on some other dive-lights out there. The removable stainless steel attack crown was the first to come off. Granted, it looks like it could do some serious damage if ever used for its intended purpose. Maybe I'll keep it on if diving in shark infested water

Tail cap comes with a generous hole which allows you to use different thicknesses of line for tying in a bolt snap. Being cheap, I opted to use the existing cord, and not use up my cave-line. Without a lanyard, the light can stand on its end:

The light has 4 modes: off-flash-low-med-high. It has a bi-directional switch, so from the off position, you can go directly to the highest beam, or into flashing mode. Turning the switch is at best a two-handed affair, as there's an o-ring adding friction to prevent accidental switching. There are no detents, but after taking it apart, there's a groove with pits and a corresponding hole in the ring, so I guess you could put a bb and spring there to add the detents if you wish. Personally, since this will see salt-water use, I'd just leave it as is. Also visible is the small magnet used for switching. I may fix it in place with a bit of glue, as it might fall out and get lost when disassembling the light.

Speaking of o-rings, the tail-cap has 2 rings, while the other end has just one (the other ring is just for friction for the switch). Seeing as this part isn't unscrewed as much, I guess it'll suffice, though I guess 2 would've been better, though there is an extra groove in it. I may just add one later on:

Inside the front bezel are small indentations which I initially took to be the mating points for a tool to remove the ring. I used a watch-back tool, and what I thought was an internal ring is actually just part of a solid front ring which can be unscrewed from the outside.

The reflector is a smooth aluminum reflector. I've been so used to having reflectors that screw into the pill, but this one just rests on it. Also seen in the inside of the head is the ledge where the lens and gasket rest.

Given the dimensions of the light head, the lens (3mm x 30mm) seems adequate to do its job. The lens is surrounded by a rubber gasket which provides good sealing properties especially at greater depths due to the greater compression of the seal.

The next photo is of the LED in situ. I didn't feel comfortable disassembling further than that, so that's where I left it at.

TESTING:
One thing to remember is that this is a dive light. As such, many eBay ads claim it to be able to go up to 100 meters. On KD though, they give a more realistic 30m figure. I decided to go half-way and test to the same depth rating for my GoPro cameras. Put it into my pot along with my watch/depth-gauge and brought it down to around 65 meters for about 15 minutes. No leaks

Since this was to be my back-up light, I decided to test it against my current back-up: a Ferei W150 XPG light. The Ferei is slightly more solid and heavier (~220 g vs the ~180g for the TR-J1). In hand, the slightly thicker tube of the Ferei and the knurling on the tube makes it easier to hold I guess, but I like the TR-J1 for its sleek outline - though knurling would have been a nice touch.

Anyway, in terms of light output, here's a few comparative shots of the TR-J1 vs the Ferei which is rated at 200 lumens. 24mm lens, 5.6 aperture, 1/30 shutter speed, ISO 400 (I didn't have a tripod so I didn't want a slower speed). Wall is around 8 meters away. Upper row: High, medium, low. Lower row: Ferei W150, W150 vs TR-J1, control shot.

Bottom line: Looks like I've got a new favorite back-up light! Since I opted for just the light, I got it for around $33. At that rate, you can't go wrong! Methinks a 2nd one is in order...
Last edited:


