Spring straps revisited

Please register or login

Welcome to ScubaBoard, the world's largest scuba diving community. Registration is not required to read the forums, but we encourage you to join. Joining has its benefits and enables you to participate in the discussions.

Benefits of registering include

  • Ability to post and comment on topics and discussions.
  • A Free photo gallery to share your dive photos with the world.
  • You can make this box go away

Joining is quick and easy. Log in or Register now!

I just finished my pair of spring straps and they do feel good. Only need a bit of Locktite and maybe some pull tabs on the back. Springs came from McMaster-Carr everything else from the "Depot".

View attachment 30876
 
I'D SUGGEST A 5 MINUTE EPOXY/or nail polish RATHER THAN LOCTITE.
I presume you want this to lock the screws in place.
Loctite crystalizes in the presence of water and falls apart.
It is not recommended in wet applications.

Nice job by the way.
Basic black, formal but always in style!

Mike D
 
mddolson:
I'D SUGGEST A 5 MINUTE EPOXY/or nail polish RATHER THAN LOCTITE.
I presume you want this to lock the screws in place.
Loctite crystalizes in the presence of water and falls apart.
It is not recommended in wet applications.

Nice job by the way.
Basic black, formal but always in style!

Mike D

Mike, thanks for the heads up on Locktite was not aware of this. There is a thread sealer I use in HVAC work known as NY-LOK aka "snot" that may be waterproof, I'll have to test it, always want to have the option of backing out the screw in case of a problem.
 
Where did you hear that Loctite is soluble in water? We've never had a problem, and we use it quite a bit on boats. Here's the tech data sheet. According to Loctite it retains 80% of its strength in 50/50 Water Glycol (coolant) after 5000 hours of exposure at 87 deg C. That's good enough for me, as I doubt I'll be diving in 180 degree water any time soon.

http://tds.loctite.com/tds5/docs/262-EN.pdf


mddolson:
I'D SUGGEST A 5 MINUTE EPOXY/or nail polish RATHER THAN LOCTITE.
I presume you want this to lock the screws in place.
Loctite crystalizes in the presence of water and falls apart.
It is not recommended in wet applications.

Nice job by the way.
Basic black, formal but always in style!

Mike D
 
Yes you are correct. I sould have been more specific.
It depends on which loctite product you are using.
Most people are using the "instant adhesive"(400 series) or "crazy glue" product available at the local hardware store.
These cure by giving off a small amount of moisture (H2O), and are not recommended in wet applications. They continue to crystalize and break down if immersed.

Mike D
 
mddolson:
Yes you are correct. I sould have been more specific.
It depends on which loctite product you are using.
Most people are using the "instant adhesive"(400 series) or "crazy glue" product available at the local hardware store.
These cure by giving off a small amount of moisture (H2O), and are not recommended in wet applications. They continue to crystalize and break down if immersed.

Mike D


Whew, you had me scared there for a minute. I envisioned all kinds of heavy stuff falling off into the deep blue.
 
So which Loctite product does work underwater?
 
DiveGolfSki:
So which Loctite product does work underwater?


Use Loctite "Threadlocker," either blue 242 or red 262. Either one has proven 5000 hour exposure results. Although Loctite makes all sorts of chemicals, the 242 and 262 are well known as "the" Loctite products to use. I don't know about the 400 series that was previously mentioned, but I certainly wouldn't try anything but the red or blue as a thread locking chemical.
 
Assembled my spring straps last night. I bought a pair of 11" SS springs complete with tube webbing from a friend while on holiday last week (the DIY genes just won't stop!). I purchased the shackles (5mm/~3/16") from a marine supplies store and a roll of cave line from a rigging supply shop in Cape Town. (The roll of cave line was for reels and spools, not just for the spring straps!)

Removed the existing strap assemblies from both fins. I then filed down the plastic lugs below the posts with a set of pin files, so that the posts were as near to round as possible. This was probably the most time-consuming part of the process.

I measured the spring from post to post, and it looked like the 11" spring would be perfect as-is (size 10 shoe (UK)/XL bootie). Cut the cave line long enough to give me 13 to 14" plus ends for the knots. This seemed to be about right for the maximum extension for the spring in "normal" use. Tied a double fisherman's knot in the one end of the line. I then fed the other end of the line through the spring and attached the shackle through the loop and the spring. Tied off the other end with another double fisherman's knot. Cut and sealed the line ends with lighter. I then attached the second shackle through the cave line loop and the spring. Then I pulled the loops on each of the cave line taut and stretched the spring a few times to get the excess length of the cave line "seated" inside the spring.

I then repeated the above process with the other spring.

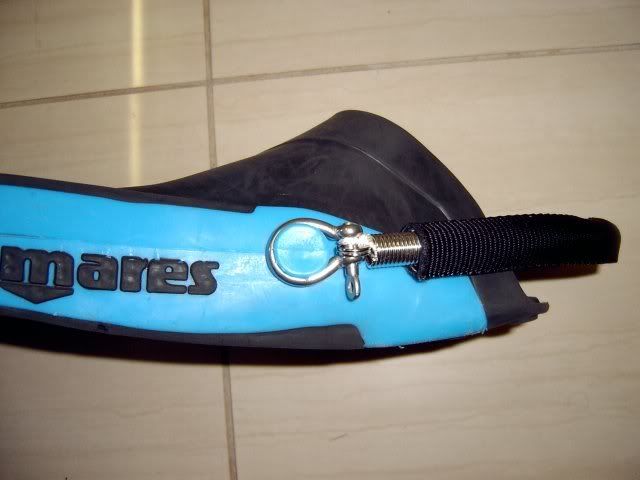
I attached the shackles onto the posts, which were then quite loose. They sprang (sprung?) off a few times, so I had to take care that I did not end up losing an eye(!). I used a vice to bend the shackles tighter onto the posts. It was quite tricky holding the fin to guide the shackle into the right position. I made small adjustments each time, so that I did not end up over-tightening the shackles. In the end, it feels like I have about 1mm clearance between the ID of the shackle and the OD of the post.

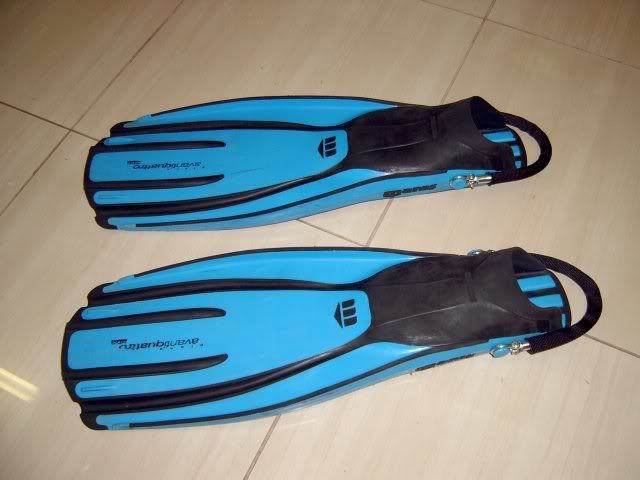
I tried out the first fin - it fitted perfectly! Very comfortable, easy to don and doff - and rock solid!

I repeated the vice procedure with the second fin and I was done.

SpringStraps1.jpg

All done!

SpringStraps2.jpg

Top View

As you can see, I have the same problem as the OP with the protruding screws on the shackles, so I will be purchasing some stainless screws to replace these posts when I get a chance. I really tightened the screws using a shifting spanner, so they should not be going anywhere in the meantime. I also noticed on the web yesterday that 4mm shackles are available. They may fit even better than the 5mm shackles I purchased. They will have to be opened up a bit to clear the "mushroom" on the post and recrimped on the post, but they should work. They should also not have the problem of the protruding screw. If anyone tries them out, post your results.

SpringStraps3.jpg

Side view (note the protruding screws)

My only regret now is that I didn't buy a few extra sets of springs while I was in Cape Town. I am pretty sure that other guys will be wanting a pair too, once they see mine. Although the OEM straps do their job, they really are fiddly. It doesn't get simpler than this.

This was really an enjoyable, easy DIY project. I recommend it if you want to get started in DIYing your own gear. Very satisfying.

Cheers,

Andrew
 
One thing that I failed to mention is the actual source of my springs. If anyone from South Africa is interested in making spring straps, you will probably run into the problem of getting hold of the right springs. Importing the complete spring straps at around $50 at an exchange rate of ZAR7.5/$ (and climbing) plus shipping is also prohibitive. To give you an idea, these straps cost me approximately $16 and some elbow grease.

I got mine from Monty Guest, the Chairman of the False Bay Underwater Club in Cape Town. You can contact him at info at scubaculture dot co dot za.

Cheers,

Andrew
 
https://www.shearwater.com/products/peregrine/

Back
Top Bottom