Regulator Service Technician Training - Unrestricted

Please register or login

Welcome to ScubaBoard, the world's largest scuba diving community. Registration is not required to read the forums, but we encourage you to join. Joining has its benefits and enables you to participate in the discussions.

Benefits of registering include

  • Ability to post and comment on topics and discussions.
  • A Free photo gallery to share your dive photos with the world.
  • You can make this box go away

Joining is quick and easy. Log in or Register now!

Status
Not open for further replies.

rsingler

Scuba Instructor, Tinkerer in Brass
Staff member
ScubaBoard Sponsor
Messages
8,268
Reaction score
12,286
Location
Napa, California
# of dives
500 - 999
As so many threads have demonstrated, there is no small interest in Do It Yourself regulator service.
My position has consistently been, "It ain't rocket science, but it is precise." Dive Shops (despite your $200 repair bill) are not paid what they deserve for properly performed reg service, and errors do occur, because they can't stay in business by comprehensively servicing your gear for $30/stage.
At seminar after seminar conducted at DEMA (the Dive Equipment Manufacturer's Association convention), one third to one half of participants (no matter which manfacturer) raise their hand to indicate that "No. They've never opened up a regulator before this seminar." After which, in 2-6 hours, they graduate certified to service your gear. I don't find this reassuring.

Unfortunately, the same errors exist in the DIY community. It ain't rocket science, but "one doesn't know what one doesn't know." As I expanded my training by buying and servicing the cheapest eBay "deals" for practice, the spectrum of gear which was sold "ready to dive" with profound problems was truly horrifying.

Hence, this course. While in person, hands-on training would potentially be better, both COVID and cost make that prohibitive for me to offer. Travel, lodging, freight cost and potential loss of regs and tools all add up.

But if you are willing to, in advance,
- arrange for a computer with a camera and learn how to Zoom
- buy some basic tools (I'm working with Bruce at ScubaTools.com right now for starter and advanced kits)
- get an eBay regulator set (or your own) to potentially make a critical mistake on when servicing
- perhaps get a service kit, and
- set aside a lonnnng weekend
then we can learn how to service regs together via Zoom, with a bit of two-way video and conversation, lots of Q&A, and plenty of examples of problem solving.

Our tentative first date is May 22-23, 2021, starting at 7:00am on the West Coast and 10:00am on the East Coast (also "very late" to "very early" in Europe, and perhaps the opposite for the Pacific Basin). The good news for the West Coast folks is that we'll be done with the first day at 4:30pm (instead of 7:30pm for the East Coast). We'll have breaks and lunch time off during both days.

See the next few posts for the current tentative outline, and how to get signed up.
Read my ScubaBoard profile if you want to know a bit more about me.
 
Below is the current outline for the two-day Zoom course. This will doubtlessly shift in the weeks to come based upon your input.
I've decided to try to avoid a didactic "lecture" format, and instead get you right into servicing as quickly as possible. But what I want most to start with, is how to avoid having you find yourself with a new brass doorstop, because you didn't know the consequences of certain tool handling techniques. We'll start by learning what tools get you into trouble, and where regulators are most sensitive to damage.
We'll move quickly into parts replacement (like a manufacturer's seminar), and then spend the end of the first day and the entire second (plus optional evening seminars for those interested) on the tips and tricks.

Here's the outline:
Regulator Service Technician Zoom Seminar

Day 1 AM (10:00AM to 1:00PM EDT) (7:00AM to 10:00AM PDT)

Basic Service Topics
Tool and Parts Handling

o Pressure Safety
o Workbench Setup – tips for not losing tools and tiny parts
o Parts Placement – how to not end up with leftover parts
o Critical Common Tools
• Picks – steel vs brass vs plastic
• Open End wrenches – standard vs thin
• Padded wrenches?
• Hook spanners
• Pin wrenches
• Coaxial screwdriver/socket wrench
• Orifice tool
• Wooden dowels​
o O-rings
• How o-rings work
- Material and Duro (Shore)
- Lands
- Flash​
• Removal
• Lubrication
• Replacement/Insertion
• O-ring Substitution - Resources​
o Torque
o Hex Key Fit
o Special Tools and Spalling

REVISION: Valve Basics
o Upstream vs. Downstream
o Forces and Vectors
o Valve materials
o Thread pitch and precision
o "Seat Set" (HP & LP)
o Intro to balancing

“Service” a Piston First (Parts Change)
o Disassembly challenges
• Galling
• Verdigris corrosion​
o HP o-ring removal and replacement
o Using a double hook pick
o Assembly

 20 Minute Break

“Service” a Diaphragm First (Parts Change)

o Disassembly challenges
o Orifice and seat issues
o Assembly: HP or diaphragm side first? Concentricity

“Service” an Unbalanced Second (Parts Change)
o Disassembly
o Disassembly Challenges
• Special “No Tools” cases (Aqualung, Cressi et al)
• Frozen downstream valves​
o Lever height vs. spring tension
o Having enough hands – the coaxial screwdriver/hex

 Lunch Break

Day 1 PM (2:00PM to 5:00PM EDT) (11AM to 2:00PM PDT)

Balanced Regulator Theory

o First Stage
• Piston
Standard design
“Floating” 1st stage seat/orifice
• Sherwood piston​
• Diaphragm
“Floating” 1st stage seat
• Poseidon XStream​
o Second Stage
• Poppet design
• Lever drop
• “Floating Seat Saver” second stages​

“Service” a Balanced Second (Parts Change)
o Components
o Balance chamber check
o LP seat set
o Leaks

Day 1 Evening (5:15PM to 6:30PM EDT max) (2:15PM to 3:30PM PDT max)
Open Question & Answer Session


* * * * * * * * * * * * * *

Day 2 AM (10:00AM to 1:00PM EDT) (7:00AM to 10:00AM PDT)

Seat Sealing

Revisiting Reg Service

o 1st Stage – what true service means
o 2nd Stage – what true service means

Tuning a First Stage, with participant video exchange of work underway
o Intermediate Pressure
o Piston
o Diaphragm
o Student by student exchange and critique, as required

Tuning a Second Stage, with participant video exchange of work underway
o LP seat “set”
o Cracking Effort
o Venturi effects and lever action
o Student by student exchange and critique, as required

Manufacturer-Specific Hints
o Demos on a range of brands

Day 2 PM (2:00PM to 5:00PM max EDT) (11:00AM to 2:00PM max PDT)

Leftovers from prior sessions

Hoses

PUTTING IT ALL TOGETHER: Diagnosing and Curing Problems

o IP Drift vs Creep
o Leaks
• HP oring leak vs. Piston Head leak
• HP seat carrier (Piston)
• ADDED: 2nd Stage leak that's not the seat​

Special Situations
o SPG and Computer “service”
o Dry Bleed Valves
o Environmental Seal Overbalancing

Day 2 (5:00PM EDT) (2:00PM PDT)
** Graduation!/Certificates **

* * * * * * * * * *

Day 2 Evening (OPTIONAL) - (5:30PM-8:30PM EDT) (2:30PM-5:30PM PDT)

Open Discussion; Question & Answer Session


Oxygen Cleaning

MOVED: Polishing seats/knife edges

ADDED: Aqualung ACD valve service


Building a home shop on the cheap
o Other tools
o Gauges
o Copper and High Pressure Tubing handling
o Nitrox and Oxygen safety
o Cracking effort pump
o Building a Pressure Pot

Dynamic Flow Testing
o Theory (Pete Wolfinger – Regulator Savvy)
o Building a dynamic flow bench
o Advanced Theory: Interpreting Dynamic Flow Test Results
• Venturi Crossover
• Optimum Dynamic Effort​
 
The natural next questions are
1) "What does it cost?", and
2) "What does it get me?"
Answering the second question first, it doesn't get you anything! Other than a simply beautiful multicolor certificate :D (which might get you a job as an entry level tech at your LDS, if you're really lucky), there are no manufacturer certifications, no access to manufacturer parts; really nothing but the satisfaction of having more understanding of regulator theory and service than 75% of the shop technicians out there, and some good practice to boot. And of course, you'll now feel (and be) ready to start taking care of your own gear, with your new tools and kits from eBay or other ScubaBoarders.

The cost of the seminar is $300 $350. What you aren't getting is in-person hands-on assistance with a reg problem or learning hurdle. What you aren't paying for, is transportation to a town maybe not near you, nor meals and lodging for the weekend. I'm hoping that's a wash.
By way of comparison, a half- to one-day lecture format manufacturer's course is $250-$400, depending upon manufacturer. You have pre-loosened, clean regs to work on while the instructor is demo'ing, but little one-to-one assistance, unless the student next to you has a lot of experience. If you're certifying on Aqualung, your courses are $40-$150 per regulator model, provided online with no Zoom exchange or instructor present at all. In any case, certification has to be renewed every two to three years, depending upon manufacturer. You can't get your foot in the door without being a dive shop employee, with the exception of Poseidon, Deep6 and HOG. The closest I've seen to what I'm offering if you're starting from ground zero is Deep6 and perhaps some HOG instructors. With those courses you are now able to buy their service kits, but are certified only on their regs, with minimal time spent on theory.

In any case, the fee is likely not your only cost for this seminar. While you can survey this course with no regs or tools, the expectation is that you will have reviewed some introductory material and bought some tools, if not also a practice regulator set. Tools can cost from $50 to $2000 or more, depending upon how much you want to be able to do, and how many brands you want to be able to service. I am arranging for some discounted tools at both basic and intermediate levels through my business accounts at Trident and A-Plus. The best specialty tools on the market are available now from Scubatools, with more info on that to follow. Buying and reading Regulator Savvy from Scubatools will put you way ahead, but it's a tough book to read without a reg in pieces in front of you. You will get from this course only as much as you put into it at your end. The panelist Zoom format I have purchased for this course will allow for LOTS of student participation and shared computer screens, which isn't part of free Zoom.

To sign up for the course, contact me by sending an email to napascuba@gmail.com and we'll arrange things.
To ask questions, post a reply in this thread or send me a message.
The plan is to limit each course to ten students, to maximize the effectiveness of Zoom as a collaborative learning platform. I look forward to hearing from you! Based upon the response and the outcome of our first course, we'll add sessions as needed in the weeks and months that follow.

Soon, I'll be posting a list of recommended tools and the sets available from Scubatools.
A small amount of required reading material will be sent by mail before the seminar.
 
Bruce and Joan at scubatools.com really came through for us!
Scubatools.com now has a special page devoted to the tools that I recommend for getting started.
With the bewildering array of specialty tools available, it's hard to know where to start. Although acquiring common tools like open end wrenches and a ratchet handle are covered in our initial e-mail discussions, ordering the right specialty tool can be problematic when you don't know what to choose. Joan has done yeoman's work in setting this up for us after my discussions with them.

To try to save you a few dollars with this initial tool outlay, a few tools available through Scubatools which are cheaper through me, are NOT on the NapaScuba Kit page:
Packet of 3 sharp brass picks (10-126-400), my charge $13
Plastic Pick (free with swag bag)

Other items that are not carried by Scubatools for which I've obtained discounted prices are also not on the list:
Divers Thin Wrench Set SAE
Park Tool Thin Wrench Set Metric
Brass Cleaning Brush

Luxury items like their lever-action vise or the dial torque wrench still have to be ordered individually on their website.

But if you are starting from scratch, for the things you'll really need, ordering is now much simpler:
a) either go straight to this link: Scuba Tools - NapaScuba Regulator Tool Kit
or
b) from the ScubaTools Home Page:
- Click the Menu icon
- Click Shop All
- Click Kits
- Click Technical Seminar
- Click the NapaScuba Tool Kit link

You now have a pick list from which you can EASILY order your add-ons, instead of the cumbersome system that ScubaTools uses for everything else. Note: buying the Basic Tool kit is required to access the quick pick items below it. If you don't need the Basic Kit, you'll need to use their regular ordering system to pick tools one at a time.

The Basic Kit includes:
  • 16-075-500 Small Face Spanner
  • 10-102-100 Brass Parker Spade and Pick
  • 10-125-400 Steel Pick Set
  • 15-708-111 Christolube MCG-111 0.8oz syringe
  • 20-611-200 Brut Orifice Tool
  • 12-100-500 Schrader Valve Tool
  • 20-300-400 BCD hose o-ring tool
As you'll see, there are additional add-on parts for those that service diaphragm firsts and piston firsts, and of course, a quick way to order our bible: "Regulator Savvy".

I hope this makes starting from scratch just a little easier!
 
I decided to paste in an e-mail that just went out to one group of upcoming seminar attendees:

I'm hearing from folks about the scary total cost of specialty tools.
You can do this for much less than perusing ScubaTools website might lead you to believe!
Here's one example below. If you're in a bind over any particular tool, e-mail me and I'll suggest a workaround.

Workbenches, Vises, first stage handles and torque wrenches
You could easily spend over $100 on those last three items alone.
Assuming you bought a ratchet wrench/socket set, and have already sprung for a hex key set, here's a workaround for $20 - the cost of a cheap Amazon digital luggage scale, two clamps and a scrap of 3/4" plywood.

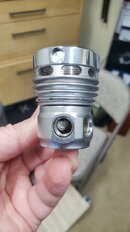
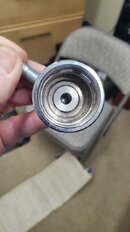
Okay, on top of the above, you also don't want to spend $20 just for that one 3/8" drive hex key that fits in your Mk25 turret.
The torque for that connector (70 inch pounds) is important because the bolt is not very strong; there's not much stress on it, and if it loosens you're losing gas in a hurry!
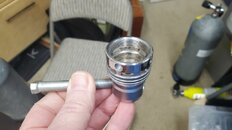
20210407_152430.jpg 20210407_152433.jpg
What do you do?

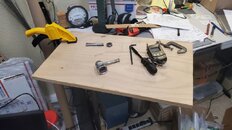
Here's a workbench made out of a piece of plywood clamped to my table.
20210407_154353.jpg
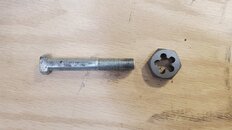
Here's a 40 cent 3/8" fine thread bolt. I took it to a local machinist, and he cleaned up the threads with that die for 3/8" -24. Nice and shiny at the end! It took 30 seconds, and he didn't charge me. Without the cleanup, the rough threads of that hardware store bolt would damage the soft brass in my turret. Now, it screws in smoothly and easily.
20210407_154357.jpg
I screwed my 3/8"-24 bolt into one of the ports in the turret.
20210407_152444.jpg
I've taken my little C-clamp and and clamped the turret to the end of the "workbench". In this case, I clamped it to the bottom, so the edge of the plywood would serve as a place to pull against.

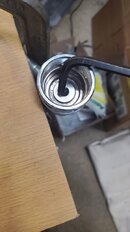
Here's a 7/32" hex key, but oops! the short end won't fit all the way into the connector deep inside the turret!
20210407_152230.jpg
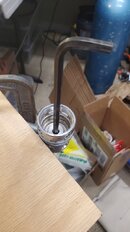
If I put the long end in, how do I tighten it to 70 in-lb?
20210407_152237.jpg
Your ratchet wrench set could be 1/4" drive or 3/8" drive; doesn't matter. Pull out a long small socket that's about the size of your hex key. In this case, it's 1/4". You don't need the 7/32" one. Maybe your set doesn't have a 7/32" one (or a 6mm one, if you're Apeks). As long as it's close.
Then take an extension rod from your set, or a drive handle, and click on the long socket. Stick the short stub of the hex key in the socket. Since your long socket isn't exactly right, the fit will be sloppy. Doesn't matter.
20210407_151835.jpg
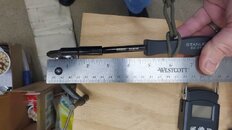
Placing a ruler with zero at the center of the turret, measure out the distance to a loop of string you've tied to the handle/extension. In this case, it's 6".

Now it's time for math using your cellphone calculator function.
We want 70 inch pounds. We've measured our lever arm at 6 inches.
70/6 = 11.67 pounds.

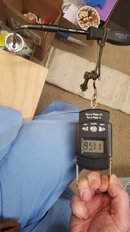
Attach the luggage scale to your loop of string, and pull! When you hit 11.6 pounds, youre done! 70-inch pounds for $20.
20210407_152402.jpg
The only trick is pulling at an exact right angle to the line from the center of the turret to the point where your string attaches. If you pull at a different angle, the torque will be more or less.
If you have to do some big pulling (like for your yoke bolt or DIN connection) you may need 20 FOOT pounds (or 240 inch pounds). For that, you need more leverage. To get more leverage, you just need a longer lever. Maybe a 15" 'breaker bar' from Amazon for $11. Then, same process. A piece of string at the 12" mark. Pull 20 pounds. 20x12 = 240 in-lb.
 
This looks great.

I haven't fully finished my coffee, so I'm not at 100%, but I'm not understanding the times. Are the time zones flip-flopped?
 
Oops! Fixed that. Good catch. Thanks!
 
A few thoughts:

Are you going to have a camera operator? Focus is going to be crucial to making the hands on part of this work. Even in focus, Zoom video can be pretty crude/low resolution. It might be better to pre-tape critical sections and put them up on YouTube (you can make them private if you want) so everyone can view them in high resolution at the appropriate points.

You should also have a pre-class check in session a week or two before to make sure everyone has a good enough Zoom setup for the two-way aspects to work.

For future versions, please consider a set of evening sessions. Or 4 half-day weekends. One of the advantages of doing this online is your aren't constrained to a single format.

Consider recording the whole thing. Give a copy to the participants and make it available for sale to everyone else. I'd probably pay $100 for a good recording of this. I'd definitely pay $50. You might want to wait for the second run to do this though since there are bound to be technical issues the first time.
 
All excellent points, thanks! Having just done my Poseidon factory recert by Zoom, I have a feel for the camera definition issues. While the transmitted definition is not as good as YouTube, using the mag function on my HD platform camera seems to be more than adequate. But a set of private videos is a great thought. The platform camera is autofocus and works quite well.
As I look back on the hurdles of the D420 videos, providing a multi-hour YouTube class will be an editing challenge. But I'll certainly keep the videos of the classes we hold, and perhaps with some deft splicing and special camera sessions, I can eventually make that available. Of course, for the newcomer, that's just one more step away from live hands-on training. Nonetheless, it's still a great thought.
Once the wrinkles are worked out, I'm sure an occasional four half day format can be offered. The cost will probably be triple because of the jewelry I'll have to buy my wife to have her give up two weekends instead of one. :D
But multiple evenings might work!

Thanks for your suggestions!
 
Rob, what a great idea!!

I am sure lot's of people will benefit.

For several reasons I can't attend the "live" section but I would love to be able to watch a recorded version of it like @lowwall suggested above. Please consider making it available.

All the best
 
Status
Not open for further replies.

Back
Top Bottom