R109 lever height

Please register or login

Welcome to ScubaBoard, the world's largest scuba diving community. Registration is not required to read the forums, but we encourage you to join. Joining has its benefits and enables you to participate in the discussions.

Benefits of registering include

  • Ability to post and comment on topics and discussions.
  • A Free photo gallery to share your dive photos with the world.
  • You can make this box go away

Joining is quick and easy. Log in or Register now!

Being near sighted, I don't have a lot of troubles reading the water line.

I do have issues adding the right amount of water to align the water line with some major makings of the ruler so I don't have to do any heavy duty mental calculus to compute the value.

Any suggestions?
 
I do have issues adding the right amount of water to align the water line with some major makings of the ruler so I don't have to do any heavy duty mental calculus to compute the value.

Any suggestions?

When I built my manometer, I used a stainless steel center-finding ruler:

McMaster-Carr

I trimmed the length a bit off of both ends, and mounted the ruler on the manometer so I can move it up and down. That way I only need to get close with the water level, and then move the ruler so the "Zero" is at water level. And whatever reading I get, and side doesn't matter, I just double it and have my measurement.

Hope that made sense. I can snap a couple of pictures tonight if needed.

Henrik
 
Henrik, you're a genius!

I actually though about sliding either the ruler or the tube to align the marks, and of course forgot all about it. Is this what you guys call Alzheimer?:(
 
... Is this what you guys call Alzheimer?:(

Sorry, what were we talking about ...??? :confused: :D

Henrik
 
Here it is:


I used small screws with nylon washer to hold the ruler in place. Left the screws just tight enough to hold the ruler, but still allowing me to move it.

As it turned out the white paint "sticks" to the ruler a bit, so it needs a bit of a wiggle to move at first.

Henrik
 
... So I hacked together a quick & dirty manometer, and guess what: 18mm/.71". Accuracy is now a lot better, and, because it's a differential mesurement, it's self compensating for the altitude of Geneva:D...

Sorry, my bad, forgot it's the DIFFERENCE between the 2 water columns, or 2 times a single column. My school days are really far behind me.

So the real cracking pressure is 36 mm /1.4 inch, in line with all that has been said above.
 
Ok, since this thread has so much good info about 109's, I decided to keep using it instead of starting a new one.

Last night I was taking apart my 109's. In doing so, I found a couple of interesting tidbits that I wanted to share with everyone.

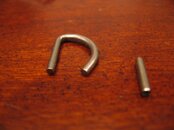
First off, I found 2 of mine that I had not yet had time to rebuild had a unique retaining clip in use. It appears to be a spare pin from a scubapro multi-tool. I included a normal retaining clip on the left for comparison.
IMG_9806a.jpg

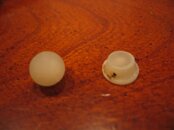
The next interesting thing I found was the spring pad in one of these. It is an older 109 (it only has a 6 digit serial number, as opposed to a 7 digit serial number on most of mine). It's a ball, not a pad. Very strange! I included a pad on the right for comparison.
IMG_9812a.jpg

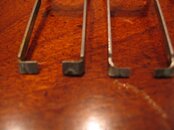
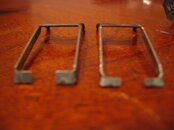
The next item from the same, older 109 was the lever. It looks like I've found one of the older levers. The macro focus point is not great, but you should be able to see the difference between the older lever (left in both photos) and the newer lever (right in both photos).
IMG_9808a.jpg

IMG_9811a.jpg

Next, the poppet assembly is also a bit different (again, this was in use with the older lever). The one in question is on the left. I have included a "normal" poppet assembly on the right, and what I'm guessing is the iteration between the two in the middle. Interestingly, the other 109 I was taking apart had the middle one in it.
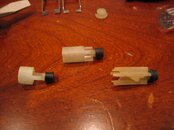
IMG_9813a.jpg

Finally, the orifice had a much thinner groove for the screwdriver head (I had to go hunting for a thin bladed screwdriver in order to remove it). Again, sorry for the bad macro focusing, but you should be able to see that one is much thinner (left) than the other (right).
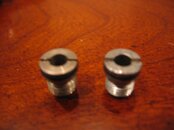
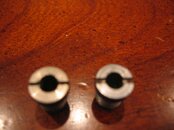
IMG_9814a.jpg

IMG_9820a.jpg

Finally, I noticed an odd phenomenon on a different subset of 109's. It appears that all of the 109's having a serial number in the 63xxxxx to at least the 66xxxxx all have a groove that holds the retaining clip in place. The ones with serial numbers above and below this subset do not have the groove, but all of mine in this subset do.
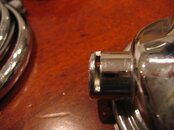
IMG_9803a.jpg
 
Oh yes, I also had 2 different 109's that I had resisted taking apart because they had endured some significant heat damage prior to my acquiring them (as evidenced by the exhaust tee on one and the pitiful state of the rubber face on the other.

One thing to remember when taking these apart (heat damaged ones) is that the o-rings will tend to swell. As such, I'm either going to have to re-surface the tip of the orifice from one of these, or replace it since I had to use an o-ring tool to get in behind the orifice and pull it out using some pretty substantial force.

I didn't get a picture of the damaged ones, but I can do that tonight if anyone is interested.

I have had some that have stubbornly resisted disassembly. I suspect sometime it is because someone used a -010 rather than the -902 on the metal orifice. I have had good success with unscrewing it until you feel the threads click and then use a wooden or plastic dowel to push the orifice out. I have applied quite a bit of force with no apparent damage to the knife edge.
 
https://www.shearwater.com/products/swift/

Back
Top Bottom