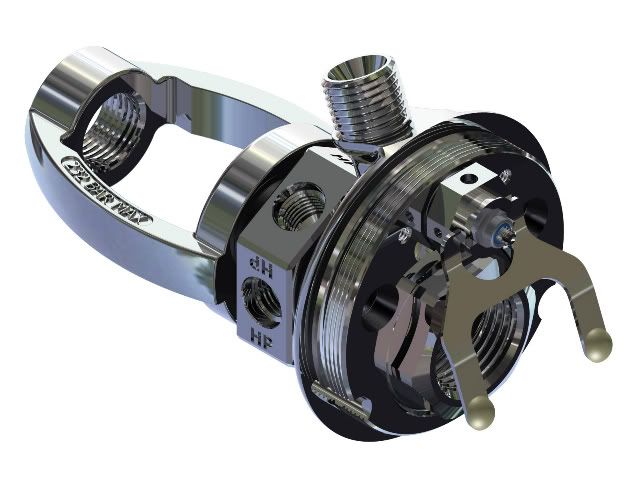
Phoenix HPR Royal second stage
Talking to Bryan he mentioned that the new Phoenix HPR (High Performance Regulator) will be available very soon. The parts have been ordered and he will have it available long before Sand Dog.
Therefore, he suggested that it is time to explain and show the new second stage.
The reason for not showing more from the beginning is because the design looks very simple and very similar to many other basic demand valve second stages. A poor reproduction can be easily copied, but the performance is in the details.
At first glance some may say that it looks a lot like a Trieste second stage or maybe the second stage on some single hose regulator. The answer is that the details are very different from a Trieste, but it does take many refinements used on some of the better designed (but simple) single hose second stages.
I have considered many times how to make a balanced second stage for a DH, but with the mechanical advantage of the large diaphragm I have concluded that there is no need for it. The trick is in keeping friction down in the right places, take advantage of good mechanical lever, and have good control of venturi effect.
________________________________________________________________________
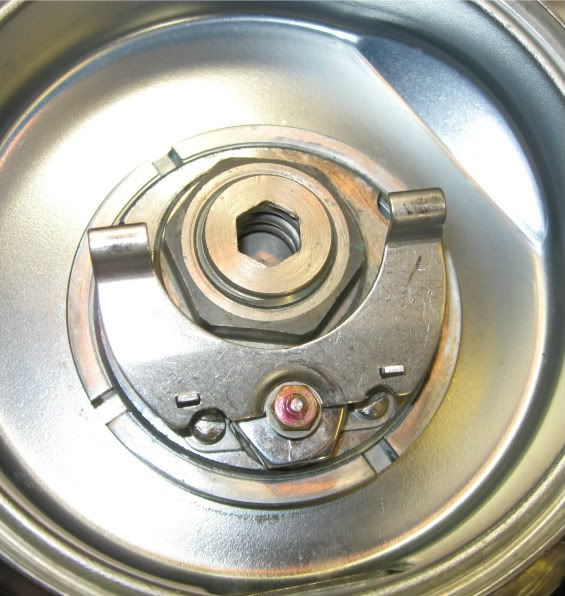
But before I talk about the Phoenix HPR Royal, I want to start by going over the original RAM second stage as shown in the picture below.
Through the years we have all made some modifications to the original second stage to make more user-friendly and improve performance: we don’t bend the top of the horseshoe support hinges anymore, we don’t stake the nut to lock it anymore, we may file the edges of the hinges to smooth out all the contact point, etc. You can even see that I file notches on the horseshoe to allow better access to the hinge support screws.
In addition we spend some time aligning the horseshoe hinge supports with the horseshoe and the seat carrier in order to reduce any binding or friction. We then adjust the lever height and when we are happy with it we lock the nut with glue or nail polish or similar. And we hope that we don’t need to change the adjustment.
Then when we place the diaphragm we need to carefully align it so that the high spot on the curved tabs are just over the contact point on the horseshoe. But, that is not perfect, because the horseshoe is not perfectly lined with the center… but it is close.
Anyway you get the point.
When we are done some of them perform extremely well, but not all… and we go back and tinker with it some more.
The hinge supports just have too many contact points with the horseshoe that have to play together well to reduce friction and avoid any binding. The forces are hard to feel because that are very low, but that is the magnitude of the forces we are dealing with.
________________________________________________________________________
So now about the new second stage, what makes it high performance and very used friendly.
The unit is first of all simple. It is a module that can be preassemble and then installed. The lever height is easily adjusted after installation, and it may never need to be adjustment again.
Instead of several parts that need to be aligned, the lever is captured, but with plenty of play to avoid binding and minimize friction. The contact points of the lever are carefully controlled and the module is self contained. The lever has very good mechanical advantage with a very simple prying action on to specifically selected contact/ fulcrum points.
The second stage uses the same basic diaphragm used with single stage regulators. The need for special contact tabs is eliminated. There is no need to align any special points on the diaphragm with the lever. The friction is extremely low with the use of low friction plastic contact points at the tip of the lever. I have more information on this later.
The cracking effort of the regulator (not including the hose loop, which should be low) I have measure it to be consistently around 0.5 inWC. The best part is not how well it performs, but how consistently it performs well.
The venturi flow effect is very powerful and easily adjustable. I have been experimenting a lot with venturi effect on single stage and two stage regulators and have determine a good compromise between too much and too little venturi. But I still designed it to be adjustable so those who like to tinker can play with ultimate performance.
The venturi adjustment is based on the amount of bleed air allowed into the can to reduce the amount of vacuum generated by the high speed flow down the horn.
If too much bleed air is blocked, the venturi effect is so strong that the harder you inhale the more air is delivered and therefore it is wasted out the exhaust.
So not only not only does it has superb performance, but it is very simple, which makes it extremely reliable and consistent, and it is very easy to service.
The use of a diaphragm without tabs makes it very easy and quick to open and close the case (with a band clamp) for easy cleaning and service.
______________________________________________________________________
To make or adjust a regulator to breathe easier that this, it becomes basically impractical. Anything that would have a lower cracking effort (less than 0.5 inWC) will tend to free flow in any position where the exhaust is just above the diaphragm. I can adjust it to even lower cracking effort, but it is not recommended.
At the same time adjusting the venturi too high will also have a tendency to deliver more air than needed (and bypassing out the exhaust) when inhaling hard or at depth when air density increases. Again, this second stage can be easily adjusted to perform like that, but it is not practical.
I do not have a work-of-breathing test machine, but based on the instrumentation I have and 40 years of tuning regulators I find this to be the best DH regulator I have worked with.
As with any double hose, in order to get the best performance, it is imperative to place it in the correct location. That is were the VDH back plate comes in.
IMHO, the combination of the Phoenix HPR Royal and the VDH back plate will deliver the over all best performance possible for any open circuit Scuba system. Some performance criteria’s may be subjective, but I do feel that this combination will outperform even the best breathing regulator that is available.
See this link:
http://www.scubaboard.com/forums/vi...mprove-double-hose-regulator-performance.html
____________________________________________________________________
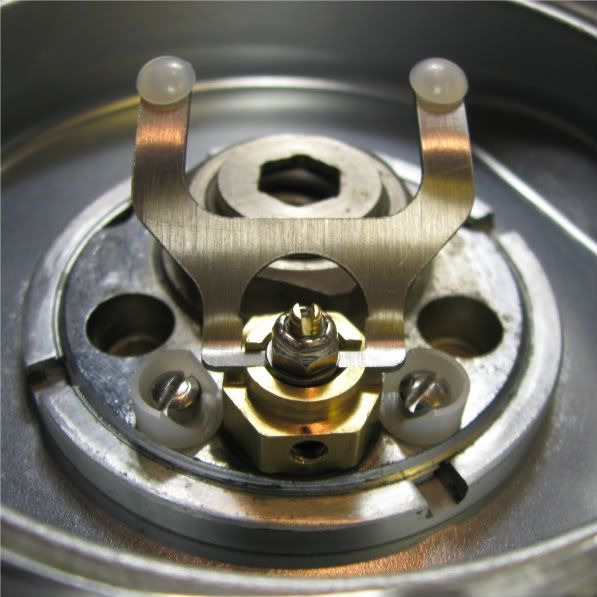
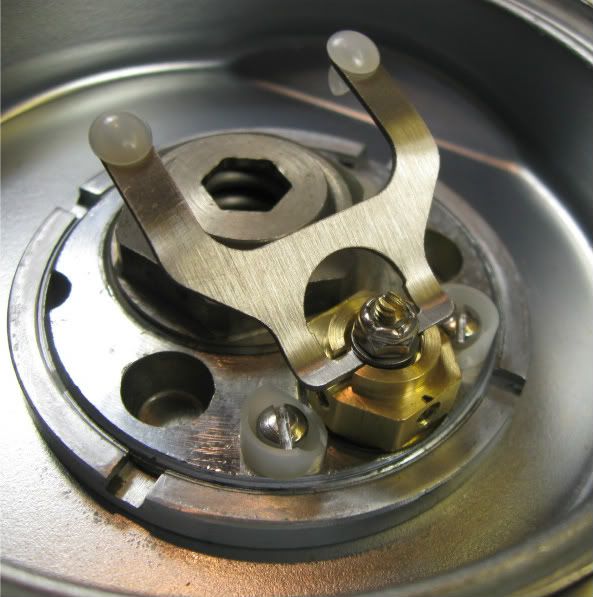
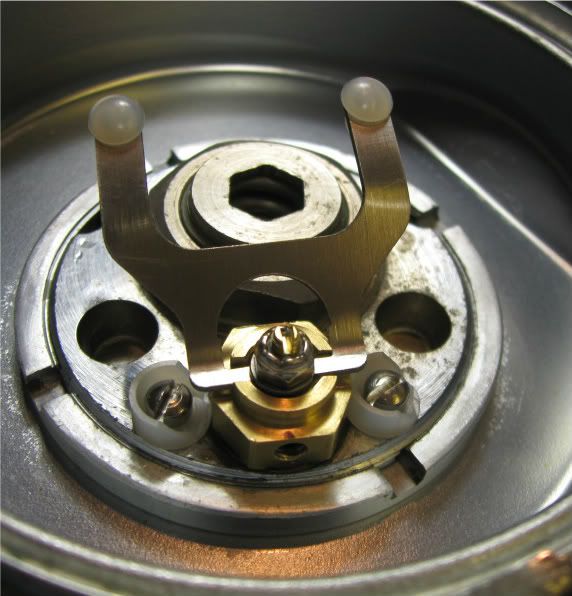
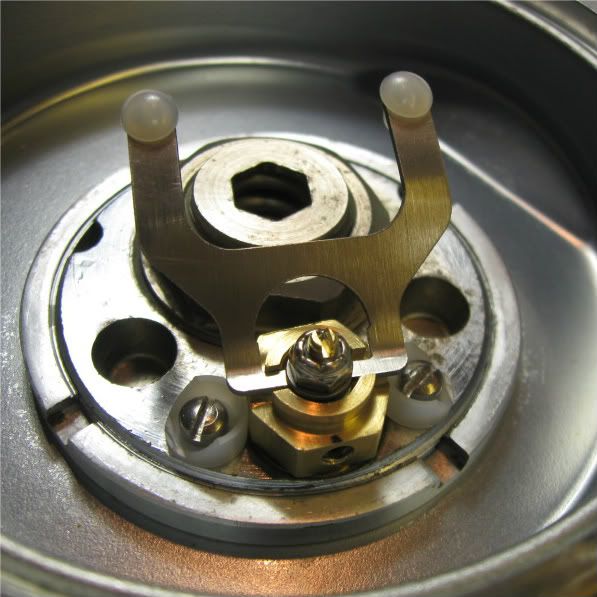
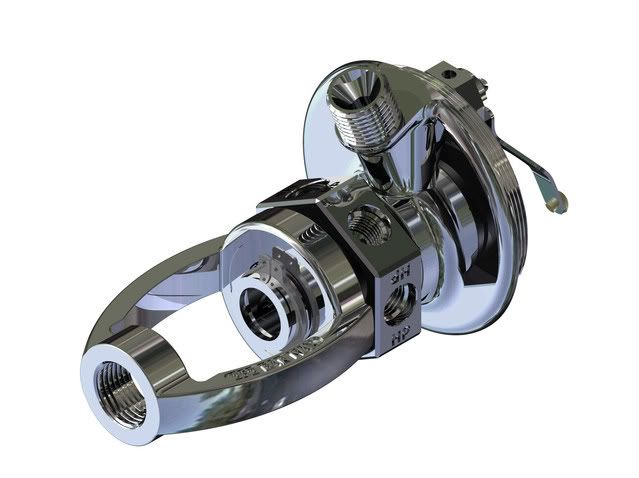
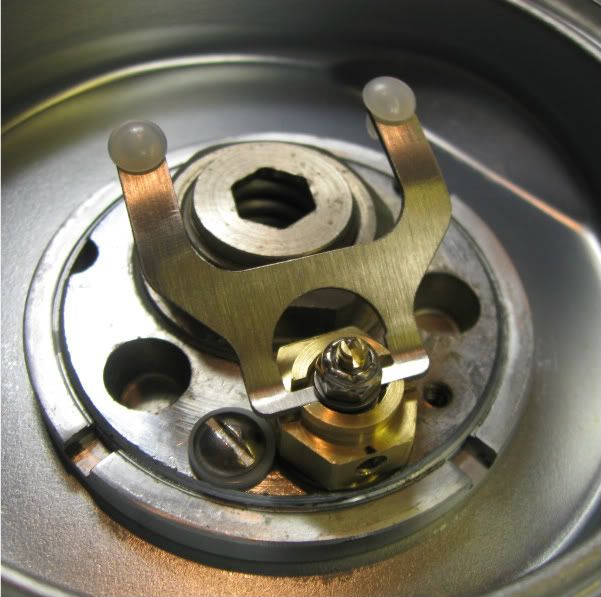
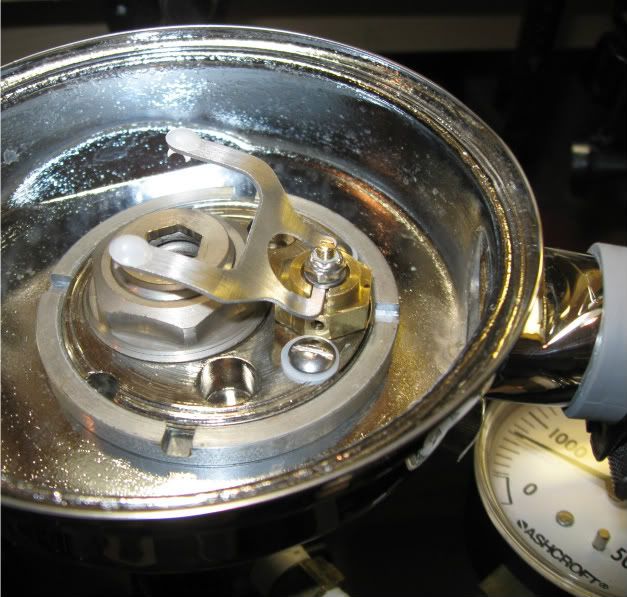
Here are some pictures. These are just prototype units so they are a bit rough.
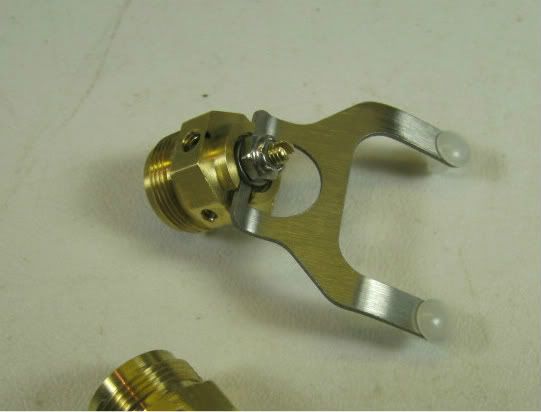
The plastic rivets in the prototype have the correct top shape, but the back is not the finished product.
The screws that you see on the side are basically just to keep the assembly from unscrewing. The spring tension can be adjusted by unscrewing the assembly every 180 degrees, but with the mechanical advantage and low friction of this lever, I have not seen a need.
Only one screw is needed, but I think it looks better with both:
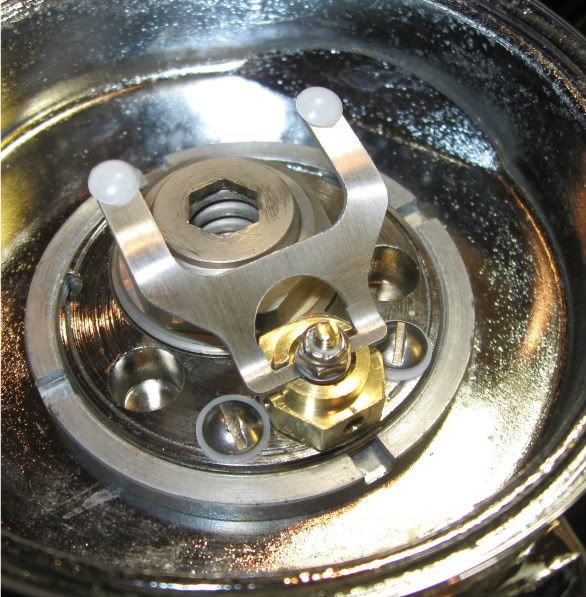
Here is a picture of the second stage module pre-assembled before installation.
I will be showing more pictures on the best way to install it and adjust it later.
Talking to Bryan he mentioned that the new Phoenix HPR (High Performance Regulator) will be available very soon. The parts have been ordered and he will have it available long before Sand Dog.
Therefore, he suggested that it is time to explain and show the new second stage.
The reason for not showing more from the beginning is because the design looks very simple and very similar to many other basic demand valve second stages. A poor reproduction can be easily copied, but the performance is in the details.
At first glance some may say that it looks a lot like a Trieste second stage or maybe the second stage on some single hose regulator. The answer is that the details are very different from a Trieste, but it does take many refinements used on some of the better designed (but simple) single hose second stages.
I have considered many times how to make a balanced second stage for a DH, but with the mechanical advantage of the large diaphragm I have concluded that there is no need for it. The trick is in keeping friction down in the right places, take advantage of good mechanical lever, and have good control of venturi effect.
________________________________________________________________________
But before I talk about the Phoenix HPR Royal, I want to start by going over the original RAM second stage as shown in the picture below.
Through the years we have all made some modifications to the original second stage to make more user-friendly and improve performance: we don’t bend the top of the horseshoe support hinges anymore, we don’t stake the nut to lock it anymore, we may file the edges of the hinges to smooth out all the contact point, etc. You can even see that I file notches on the horseshoe to allow better access to the hinge support screws.
In addition we spend some time aligning the horseshoe hinge supports with the horseshoe and the seat carrier in order to reduce any binding or friction. We then adjust the lever height and when we are happy with it we lock the nut with glue or nail polish or similar. And we hope that we don’t need to change the adjustment.
Then when we place the diaphragm we need to carefully align it so that the high spot on the curved tabs are just over the contact point on the horseshoe. But, that is not perfect, because the horseshoe is not perfectly lined with the center… but it is close.
Anyway you get the point.
When we are done some of them perform extremely well, but not all… and we go back and tinker with it some more.
The hinge supports just have too many contact points with the horseshoe that have to play together well to reduce friction and avoid any binding. The forces are hard to feel because that are very low, but that is the magnitude of the forces we are dealing with.

________________________________________________________________________
So now about the new second stage, what makes it high performance and very used friendly.
The unit is first of all simple. It is a module that can be preassemble and then installed. The lever height is easily adjusted after installation, and it may never need to be adjustment again.
Instead of several parts that need to be aligned, the lever is captured, but with plenty of play to avoid binding and minimize friction. The contact points of the lever are carefully controlled and the module is self contained. The lever has very good mechanical advantage with a very simple prying action on to specifically selected contact/ fulcrum points.
The second stage uses the same basic diaphragm used with single stage regulators. The need for special contact tabs is eliminated. There is no need to align any special points on the diaphragm with the lever. The friction is extremely low with the use of low friction plastic contact points at the tip of the lever. I have more information on this later.
The cracking effort of the regulator (not including the hose loop, which should be low) I have measure it to be consistently around 0.5 inWC. The best part is not how well it performs, but how consistently it performs well.
The venturi flow effect is very powerful and easily adjustable. I have been experimenting a lot with venturi effect on single stage and two stage regulators and have determine a good compromise between too much and too little venturi. But I still designed it to be adjustable so those who like to tinker can play with ultimate performance.
The venturi adjustment is based on the amount of bleed air allowed into the can to reduce the amount of vacuum generated by the high speed flow down the horn.
If too much bleed air is blocked, the venturi effect is so strong that the harder you inhale the more air is delivered and therefore it is wasted out the exhaust.
So not only not only does it has superb performance, but it is very simple, which makes it extremely reliable and consistent, and it is very easy to service.
The use of a diaphragm without tabs makes it very easy and quick to open and close the case (with a band clamp) for easy cleaning and service.
______________________________________________________________________
To make or adjust a regulator to breathe easier that this, it becomes basically impractical. Anything that would have a lower cracking effort (less than 0.5 inWC) will tend to free flow in any position where the exhaust is just above the diaphragm. I can adjust it to even lower cracking effort, but it is not recommended.
At the same time adjusting the venturi too high will also have a tendency to deliver more air than needed (and bypassing out the exhaust) when inhaling hard or at depth when air density increases. Again, this second stage can be easily adjusted to perform like that, but it is not practical.
I do not have a work-of-breathing test machine, but based on the instrumentation I have and 40 years of tuning regulators I find this to be the best DH regulator I have worked with.
As with any double hose, in order to get the best performance, it is imperative to place it in the correct location. That is were the VDH back plate comes in.
IMHO, the combination of the Phoenix HPR Royal and the VDH back plate will deliver the over all best performance possible for any open circuit Scuba system. Some performance criteria’s may be subjective, but I do feel that this combination will outperform even the best breathing regulator that is available.
See this link:
http://www.scubaboard.com/forums/vi...mprove-double-hose-regulator-performance.html
____________________________________________________________________
Here are some pictures. These are just prototype units so they are a bit rough.
The plastic rivets in the prototype have the correct top shape, but the back is not the finished product.
The screws that you see on the side are basically just to keep the assembly from unscrewing. The spring tension can be adjusted by unscrewing the assembly every 180 degrees, but with the mechanical advantage and low friction of this lever, I have not seen a need.
Only one screw is needed, but I think it looks better with both:


Here is a picture of the second stage module pre-assembled before installation.
I will be showing more pictures on the best way to install it and adjust it later.


