CCR manual valve project
This is a small project since there's not much to do recently, waiting for COVID to end so we can travel again...
I serviced my CCR manual valves (MV) and found that it had leaked water inside. After further investigation, the leak was due to low tolerances, wrong shape O-ring cavities, and some machining and design errors. Saltwater has gotten to the inside valve and already caused damages. I lost my interest in installing parts together and decided to make a new valve.
SF2 valve system is copied from inflation valve so most likely there are the same parts in use. The idea is good, but like all SF2 parts, tolerances are very low which leads to leaks all the time.
I redesigned the SF2 MV so that the outside shape (which I like very much) is similar to before, but with all other parts being new. I also increased the O2 flow a little because I feel that the original is too little. I also dream that my CCR is traveling weight <20kg (with tanks), which is why I took out weight wherever possible.
In the first version, all parts were titanium and I used previous valves from a number of dives until my friend from Germany asked me "are you stupid? You use titanium with pure oxygen…". After further study, maybe it was a bad idea after all, but even some brands use titanium for the 1st stage (O2 limit 40%) I thought. Since I couldn't see any visual changes in the parts after use, I decided that safety comes first so I changed the materials to aluminum and stainless steel. This was also a good chance to test hard oxidation for AI parts for future projects. The one negative being that black is the only color that you can use. All of the tolerances and O-rings are designed to support a temperature from -20 to +40°C.
After machining, I spent a few hours polishing parts before coating. The final result was better than what I had expected! I also designed and made a few assembly tools to make assembly super easy (takes just a few minutes to get ready).
Changes I made:
- Both piston ends are supported, which prevents horizontal movement
- Tolerances and new design prevent water from entering the valve
- Bigger flow to oxygen valve
- Ports O-ring cavities design is fixed (based on ISO standard and standard O-rings)
- Added holes where water can come out from the knop and makes saltwater possible to wash out
- Longer thread to cylinder part. The original was only a ~3 rounds-thread
- Materials AI 6001-T6, AISI 304 and Ti Gr4
Summary:
The easiest solution is to order a new MV from the internet, but that's too easy for some of us. I don't use manual valves too often and this was a good lesson to learn that they also need service. Due to the quality of parts, the functionality of the valve is now super smooth and soft. I've used the new valves for only 25 hours, but it still works as well as any new valve. Let's see if there is any need to service it before a hundred hours of diving!
Photos:
Br:
Arto
This is a small project since there's not much to do recently, waiting for COVID to end so we can travel again...
I serviced my CCR manual valves (MV) and found that it had leaked water inside. After further investigation, the leak was due to low tolerances, wrong shape O-ring cavities, and some machining and design errors. Saltwater has gotten to the inside valve and already caused damages. I lost my interest in installing parts together and decided to make a new valve.
SF2 valve system is copied from inflation valve so most likely there are the same parts in use. The idea is good, but like all SF2 parts, tolerances are very low which leads to leaks all the time.
I redesigned the SF2 MV so that the outside shape (which I like very much) is similar to before, but with all other parts being new. I also increased the O2 flow a little because I feel that the original is too little. I also dream that my CCR is traveling weight <20kg (with tanks), which is why I took out weight wherever possible.
In the first version, all parts were titanium and I used previous valves from a number of dives until my friend from Germany asked me "are you stupid? You use titanium with pure oxygen…". After further study, maybe it was a bad idea after all, but even some brands use titanium for the 1st stage (O2 limit 40%) I thought. Since I couldn't see any visual changes in the parts after use, I decided that safety comes first so I changed the materials to aluminum and stainless steel. This was also a good chance to test hard oxidation for AI parts for future projects. The one negative being that black is the only color that you can use. All of the tolerances and O-rings are designed to support a temperature from -20 to +40°C.
After machining, I spent a few hours polishing parts before coating. The final result was better than what I had expected! I also designed and made a few assembly tools to make assembly super easy (takes just a few minutes to get ready).
Changes I made:
- Both piston ends are supported, which prevents horizontal movement
- Tolerances and new design prevent water from entering the valve
- Bigger flow to oxygen valve
- Ports O-ring cavities design is fixed (based on ISO standard and standard O-rings)
- Added holes where water can come out from the knop and makes saltwater possible to wash out
- Longer thread to cylinder part. The original was only a ~3 rounds-thread
- Materials AI 6001-T6, AISI 304 and Ti Gr4
Summary:
The easiest solution is to order a new MV from the internet, but that's too easy for some of us. I don't use manual valves too often and this was a good lesson to learn that they also need service. Due to the quality of parts, the functionality of the valve is now super smooth and soft. I've used the new valves for only 25 hours, but it still works as well as any new valve. Let's see if there is any need to service it before a hundred hours of diving!
Photos:
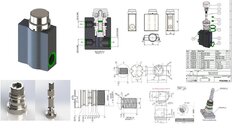
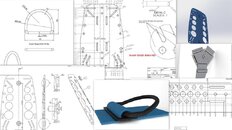
- Some design pictures
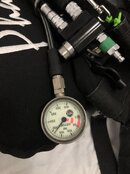
- New valve
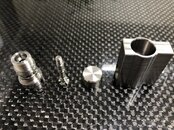
- Parts (first Ti version)
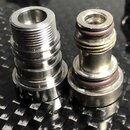
- Old (right) and New (left) cylinder parts. Some idea about original valve quality and note this was first service and opening!!.
- Water test (Underwater Grate Wall, Beijing)
Br:
Arto


