MR11 HID conversion to LED

Please register or login

Welcome to ScubaBoard, the world's largest scuba diving community. Registration is not required to read the forums, but we encourage you to join. Joining has its benefits and enables you to participate in the discussions.

Benefits of registering include

  • Ability to post and comment on topics and discussions.
  • A Free photo gallery to share your dive photos with the world.
  • You can make this box go away

Joining is quick and easy. Log in or Register now!

mddolson

Contributor
Scuba Instructor
Messages
1,468
Reaction score
110
Location
Belleville,Ontario, Canada
# of dives
1000 - 2499
I'm looking for assistance selecting the components to replace the WA MR11 HID Ballast & lamp in my cannister light. I'm mechanically adapt, but an electronics duff-ass
My power source is a 3.3AH 12V LI battery.
I know a need a buck regulator , suitable LED, heat sink & reflector or optic to fit in my lamp housing.
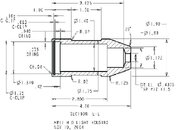
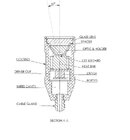
(Lamp housing section included).
Would like about 800 lumens & 2 hours run time. Simple 1 mode on/off
LED: XML-T6 ?
Looking at this refector: 35mm*35mm Aluminum Textured/OP Reflector for Cree LED Emitters (2-Pack)
I have lots of room in the battery canister.

any help will be appreciated

Mike D
 

Attachments

  • HID_mr11_hsg.jpg
    HID_mr11_hsg.jpg
    47.2 KB · Views: 522
I was able to locate a couple of single mode flash light drivers. More suited to my needs.
After doing some bench top tests mounted on a large aluminum block, I've dumped the glass lens & reflector.
I've decide on a TIR optic & holder from Carclo.
Optic 10048 Led Cree XLamp XM-L2 White | Carclo Optics
Visually I cannot detect any difference in brightness, between the 2.5 A & 2.8 amp driver.
Next step is to machine the heat sink from a 1.5" dia aluminum bar.
 
Last edited:
I've done about 10 of these conversions. They are very easy. I use the same Carclo lens listed in the last post. Make sure the heat sink is reasonable tight fitting in the light head so that it transfers the heat out. I also use arctic silver adhesive to attach the star to the heat sink (not too much) - heat is your enemy.

Also if you bench test which I always do, have a heat sink or you'll burn the led out, do not light the led while looking at it (sounds obvious, but ....huh???...I've seen a white spot for a while myself).

Watch the polarity of your wiring back to the canister, LED's only work in one direction.

After that its about matching the Driver output to the LED current (These are current devices with a voltage drop), and the battery voltage to the driver.

The amp-hrs of our battery need to be ratio'd to the current and voltage of the led to calculate the burn time. Also know that depending on the driver, most set-up will cut out not really dim.

O-Rings, glass lens can be had at McMaster carr easily enough. Clean up the cable glands real well and I usually replace the cable unless its a wet-connect cable. Go get thrive light book for a lot of other details on the refurb process, it has a lot of little tip and tricks for all dive lights (not long on LEDs) but after the emitter and driver, its all the same.
 
Thanks for the input Topcat.
I was able to find single mode (on-off) drivers.
On the bench I'm using a 2" x 4" x 1/2" bar of aluminum. & yes I put a dab of heat transfer paste on the star when I screwed the LED star down to the plate. Will use arctic silver for final assembly, but it cures hard, not so good for temporary testing.
I'm all set for o-rings, glass, cable glands etc because I'm using my existing lamp head & cannister.
My bench test ran just a little under 3 hours, which is fine.
I'm now machining the cylindrical heat sink & driver cup.
I considered making it one piece with counter bore at the back end for the driver, which would be potted.
But I decided to make them 2 parts, so changing driver or LED would be easier.
Good note about the white spot LOL, me too. I made a cardboard shield, so I could get my meter across the LED contacts to check the voltage drop.

Mike D
 
Last edited:
Here's the layout section view of my LED lamp head
 

Attachments

  • Led_Lamp_Head.JPG
    Led_Lamp_Head.JPG
    50.8 KB · Views: 512
Here my bench test model next step machine the heat sink to slide fit into my lamp head.
 

Attachments

  • IMG_3370r.jpg
    IMG_3370r.jpg
    71.6 KB · Views: 487
  • IMG_3372r.jpg
    IMG_3372r.jpg
    66.5 KB · Views: 481
I picked up a 6" x 1.5" dia 6061-T6 aluminum rod last week. Hope to start turning the heat sink & driver cup this weekend.
 
I haven't been able to work on the heat sink due to other priorities. Hopefully I'll get at it over the holiday.
 

Back
Top Bottom