Moisture munchers

Please register or login

Welcome to ScubaBoard, the world's largest scuba diving community. Registration is not required to read the forums, but we encourage you to join. Joining has its benefits and enables you to participate in the discussions.

Benefits of registering include

  • Ability to post and comment on topics and discussions.
  • A Free photo gallery to share your dive photos with the world.
  • You can make this box go away

Joining is quick and easy. Log in or Register now!

Thanx to you guys at Scuba board! This is my first post however I've been reading the posts on this board for some time now and have learned alot. This peticular post I read some months ago and thought I'ld give it a try with a twist. I couldn't find the damprid at the home depot however I did find it at Walmart. I cut a sponge about 1 inch thick and stuck it in the bottom of a mason jar and then poured the damprid on top.( the pouch will yeild two jars ) Next I buried the moisture munchers in the damprid and left some on top. Within a couple of days they were a deep blue almost purple, beautiful!!! The mason jar seals the air from getting in allowing the damprid to do a faster job and fits nicely with my dive gear to take with me to the dive site, something you can't do with the oven. lol. Also with all that water around the container is safe from water getting in and wrecking all your hard work!!!
Well, two cautions....
.
1: Someone mentioned earlier in this thread that the color indicators may change faster in dehydration than the actual silica gel so you get a false indicator at first in that stage. Best to leave them for a week - more of an after-trip exercise, altho I haven't worried about it. I have kept them all together and used them without care in that regard, but probly best to keep the dehydrating ones seperate.

2: No way do I want to travel with a glass jar, especially on a boat. I might use a plastic jar that formerly contained a food product. Sometimes the Mason lids fit.​
Nice to see you posting. :thumb:

This $1/each trick is not that big of a deal, but why not eh? I kinda feel like this is my home thread. :eyebrow:
 
Hi all,

FYI:

I've read this entire thread and concluded IF I bake the moisture munchers I should try 175 in the oven first. I did that for 2 hours and saw very little change. I bumped it up to 200 for another 2 hours and saw almost no change.

At that point I quit. I think I'll try the dehydration method next.

Wally
It takes 6-8 hours in the oven. If the temperature goes over 200, the chance of melting increases. It takes 5-7 days with the dehydration method.
 
I saw the same thing you did when I first tried this. I don't recall exactly where the capsules started to distort, but it was around 240F or so (on my uncalibrated thermometer). I'd say start where you are and try bumping the temp up by 10 degrees or so at a time. It won't take long to see if it's too high. The capsules start to swell and distort, slightly at first, prior to any permanent melting, so it's possible to dial in the heat that will dehydrate them without damage. It can be done. If you get around 225F and the capsules look OK, leave them there for an hour or more. The color change will be obvious and striking - they turn quite a brilliant blue when hot, much bluer than they were when you bought them. At around 250F I think it was, I ballooned a couple of capsules permanently, but as I recall, the color was decently blue as low as 200F, so you have some room to get it right there. Our two thermometers may not be in agreement regarding nominal temperature, but you must have been close to the sweet spot. I don't recall how long I left them in, but I don't think it took more than an hour or two to get most of the benefit.

Having said all that, unless you need the MMs right now, the Damp Rid seems like the preferable method, and one carton should last forever since you can regenerate the chemical at much higher temperatures.
 
Having said all that, unless you need the MMs right now, the Damp Rid seems like the preferable method, and one carton should last forever since you can regenerate the chemical at much higher temperatures.
I wondered what would happen to the Damp Rid in time? It'll just stop working until rejuvenated...?

I bought the 42 oz size in July, gave a cup to my dive bud, a cup to my LDS, and still using my first cup, but I've had a slow dive period since. Maybe I should replace mine before I go to Coz this week.

With my cheap, one power microwave, I don't want to nuke any more...

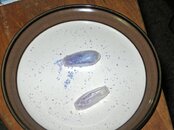
Click for full size: MM.jpg
 
Ha ha those capsules look familiar... Microwave heating is efficient, but not readily controlled, as you see!

I googled a bit and calcium chloride (Damp Rid) is deliquescent/water soluble, so don't let it get too wet before regenerating or you'll have a mess. If you're using a cup or two in an airtight container I would think it would take a long, long time before it gets very wet - it absorbs a lot of water per weight. Recommended regeneration temperature is 480F.

Here's a comparison of dessicants:

Desiccant Selection Guide

and a product description by Dow. Apparently it's used a lot in prepared foods, and for all kinds of other stuff (check Calcium chloride - Wikipedia, the free encyclopedia)
 

Attachments

I guess it's useful to point out it's a halide salt, like sodium chloride, and so it mildly irritating to us, and corrosive to metals, so don't dust the inside of your camera housings with it, or stuff it up your nose when you have a cold!
 
A craftsman needs to have more than one tool in his tool box. Have always been satisfied with results of the oven, but when I do stumble across DampRid I will be trying it too. Be fun to try both methods and leave one capsul from each drying method out and watch to see how quicly each goes pink again.

All that really concerns me is that I can dive with blue caps in the camera case.
Darn, you scooped me with the comparative experiment!

The oven is the only way to regenerate them when you're in a hurry. But you have to do it carefully. Otherwise just tossing them into the Damp Rid when done, and having them ready to go when next needed seems nice and simple.
 
I guess it's useful to point out it's a halide salt, like sodium chloride, and so it mildly irritating to us, and corrosive to metals, so don't dust the inside of your camera housings with it, or stuff it up your nose when you have a cold!

Oh darn! Was just now thinking of rolling up a dollar bill for just that purpose.:D:rofl3:


I still have yet to get or try the Damp Rid, but I have used the oven regularly for several years now. Have gotten different results than many others have posted, but never threw an oven thermometer in there to see what the real temp is. Just tossed the caps onto a cookie sheet when the oven was already heated from baking, set it on @175 to 200 and walked away. Shut down the oven an hour or two later when I saw they were turning back, and just let the caps sit till they cooled in the oven. Just as blue as the new ones I purchased.
 
Again, while rejuvenating the used the used ones is cool, I was more irritated by the new ones that lost blue while still in the original bag. The DR prevents that from happening, too.
 

Back
Top Bottom