Mk19 - why so complex?

Please register or login

Welcome to ScubaBoard, the world's largest scuba diving community. Registration is not required to read the forums, but we encourage you to join. Joining has its benefits and enables you to participate in the discussions.

Benefits of registering include

  • Ability to post and comment on topics and discussions.
  • A Free photo gallery to share your dive photos with the world.
  • You can make this box go away

Joining is quick and easy. Log in or Register now!

I service my own gear, and most of it so far is Apeks and Poseidon, with the exception of a couple of G250s. Now I'm blessed with a couple of Mk19/G260 sets, and were looking at the innards of the Mk19 specifically. It strikes me that comparing to an Apeks equivalent first stage (balanced diaphragm with turret), that's a lot of moving parts in there. For example, the Apeks MTX: excluding the port plugs and DIN/yoke assembly (and the decorative bumper that gets removed), I count 22 parts in the actual regulator mechanism, and I understand what each of them does:

View attachment 907423

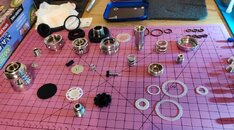
Now, the Mk19 has 36 parts in the same path, 60% more than the MTX, and a lot of them are a bit of a mystery to me:

View attachment 907424

What are the advantages here? One is obvious even to me -- two extra parts constitute the removable orifice, which the Apeks lacks. What about all the other small washers, extra springs, cups, sleeves, discs, etc? Does it make it a better regulator, or just more complex to service?
The only first stage (well two first stages) I have serviced is the MK17 (i.e. MK19 without the swivel), so I can’t compare my experience with it to anything else. But I will say the process was smoother than anticipated and the number of parts was not a concern. I doubt adding the swivel changes much there.
The only thing that did confuse me was which way around part no. 42 in your MK19 diagram goes. In the end I found This screenshot shows the orientation where the assembly diagram isn’t clear.
 

Attachments

  • MK17 3D video youtube balance chamber assembly.jpeg
    MK17 3D video youtube balance chamber assembly.jpeg
    56.5 KB · Views: 61
The only thing that did confuse me was which way around part no. 42 in your MK19 diagram goes. In the end I found
Speaking of the HP seat assembly, I have a side-rant: it boggles my head why Scubapro represents the seat as its exploded parts and not just as the one part (40) on the schematics; they always ship it already pre-assembled in the service kit

If they shipped in the kit instead only part 37 where the actual seat materials is and the orifice impression occurs it would have made more sense; I’d actually prefer that because probably the service kit price would go down 🤷🏽‍♀️
 
I recently landed with 3 second hand mk19s. One has IP creep and one was straight up free flowing. I serviced the free flowing mk19 yesterday and it was really nice to deal with. The extra parts, like parts 42 to 46 really made it easy to deal with, as there's no insanely tight spaces to poke around. It's now IP stable and ready to go!

My only annoyance is that the manuals are just a couple of pages of text. No diagrams or photos of the process. I like diagrams and pictures.

The balance chamber tool and the chamber retainer tool are a bit weird, but I got lucky to find them second hand too at a great price, and they're easy to work with.
 

Attachments

  • IMG_20250712_220012934~2.jpg
    IMG_20250712_220012934~2.jpg
    92.8 KB · Views: 44
  • IMG_20250713_181528328.jpg
    IMG_20250713_181528328.jpg
    73.3 KB · Views: 45
This is another reason why I feel the Mk11 is underrated. All the benefits of a diaphragm regulator, the dealer support of ScubaPro, and a really reasonable parts count. Nothing is as elegant as the Poseidon Xstreams, but the Mk11 is close.
 
Back
Top Bottom