How to restore a Scubapro Mark VII Honker

Please register or login

Welcome to ScubaBoard, the world's largest scuba diving community. Registration is not required to read the forums, but we encourage you to join. Joining has its benefits and enables you to participate in the discussions.

Benefits of registering include

  • Ability to post and comment on topics and discussions.
  • A Free photo gallery to share your dive photos with the world.
  • You can make this box go away

Joining is quick and easy. Log in or Register now!

4B7349B1-23AC-4F8D-A7A4-18F326F7D6D1.jpeg Thank you, rsingler for the outstanding tutorial. I’m out of my lane when it comes to Scubapro as I exclusively tinker in vintage US Divers regulators. But, after receiving inspiration from experts such as couv and Herman, I purchased a cheap “for parts Only” MK5 and MK7 on eBay. Happily, both were rebuildable.

Rsingler, you’re spot on regarding the EPDM 117 o ring on the MK7 oscillator. The old one had the gray stripe and I could not get a honking noise. I tried a nitrile 70 and only got a weak sound. But with the EPDM 70, I got the irritatingly loud honk we all know and love. And with a 135 IP, I’m ready to take on some nasty boat bottom cleaning with it. A tip of the hat to rsingler, thanks again.


These MK7’s are becoming an addiction. Last week I bought another one on eBay. It was covered spar varnish, but I was able to remove it with Bartenders Friend. I did a complete rebuild and when I tested it, the first stage whistled like tea kettle on every breath. It had nothing to do with the the oscillator as the tank was at 2000psi. I remembered that Scubapro noted that one time that sometimes the piston whistles due to harmonic vibration. Something about too little or too much silicone lube.

So, I take it apart and replace the piston shaft o-ring again as well as flipping the spring around on the piston. I also made sure there was sufficient, but not too much lube on the piston shaft. The piston was reinstalled and regulator buttoned up. The second test came out much better with no whistle.

Again, a big thank you to rslingler for this post as well as his post on the double hook pick. Pulling out a 90 duro o-ring in the land is a challenge to say the least. His detailed instructions made using a steel pick less scary and very easy to take out that o-ring.
 

Attachments

  • DC4AA935-F213-41FC-A07F-2D321BF0E9CD.jpeg
    DC4AA935-F213-41FC-A07F-2D321BF0E9CD.jpeg
    76.9 KB · Views: 116
  • CB61B2FE-878A-4D5F-A8F0-23F65462687C.jpeg
    CB61B2FE-878A-4D5F-A8F0-23F65462687C.jpeg
    85 KB · Views: 121
Holy cow…what a phenomenal asset you are to SB, @rsingler.

I’ll never pursue ownership of a Honker let alone servicing one but I value your focus, attention to detail, work ethic and selfless support to this forum. Your posts make the annual Sponsor fee worthwhile.
 
Wow, a very informative thread! It looks like I have to now have to acquire a MK 7 to restore and compliment my MK 5 and 10. Thank you. The illustrations and manual are great and give me the confidence and knowledge to work on these. I've kind of steered away from the Mk 7 because of its unusual shape, and thought the complexities of the honking mechanism would require special tools, or skills. Great resource and thank you.
 
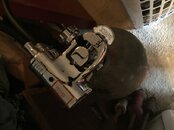
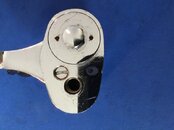
I just can’t seem to help myself from finding cheap MK7’s on eBay. My latest one was just $15 plus shipping. The seller, who I’ve bought from before, accurately described it as “for parts only.” In the past, though, I’ve been able to bring his offerings back to life.

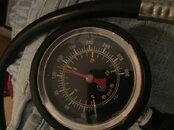
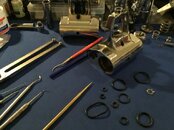
This one was a challenge. It was covered in vertigris and had an ip of 150psi. I took it apart and was pleased that the inner chambers were relatively absent of corrosion. The o-rings were in pretty bad shape with a couple of them breaking as I was removing them. The real hard part, however, was with the hp piston shaft o-ring.

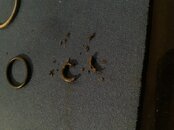
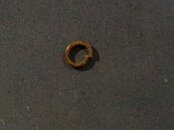
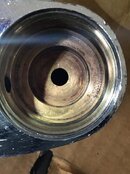
I started with a typical brass pick, trying to get behind it to pull it out. After about an hour unsuccessfully working on it, I realized this was going to be a problem. The o-ring was more like plastic than rubber and fused on all sides of the land. A brass pick just wasn’t going to do the job. So,I grabbed my steel double hook pick, knowing it would make short work of the nasty ring. Nope, trying to get the pick around it wasn’t working and I almost bent the pick before giving up. I was convinced that this is the original o-ring and at least 45 years old. I now realized I would have to do the unimaginable. I pulled out my wife’s stainless steel dental pick and carefully proceeded to break up the o-ring piece by piece. I realized that I’d probably destroy the land, but nevertheless felt I had no other options.

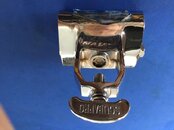
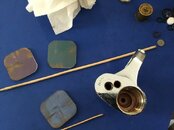
Finally, after another hour I got it all out. Because the land is deep in regulator, I wasn’t sure if if I had scratched it and rendered the regulator useless. I cleaned all the parts and put everything back together. I added two shims. When tested, the regulator psi was still at 150, but holding. Arrh, I have to disassemble it to remove the shims. Putting it back together, even with a piston bullet, I cut the new hp o-ring. Now I have to start over and go into the hp land, something I really didn’t want to do. I put in a 90 duro from VDH this time and it goes in easily, (thanks Bryan). I put the regulator back together.

Testing this time gives me a solid 138. I’m encouraged that maybe I didn’t destroy this regulator and might actually get to use it. Sits overnight and still at 138. But, I had to do a wet test to see if leak bubbles were going into the ambient chamber. One hour in the bathtub and no bubbles! Success and this MK7 is back from the dead, ready to dive again.
 

Attachments

  • 728B583A-98A1-41C2-8E67-9B025291623F.jpeg
    728B583A-98A1-41C2-8E67-9B025291623F.jpeg
    107.9 KB · Views: 107
  • 716B3860-A286-439C-80AD-283D3979C4C5.jpeg
    716B3860-A286-439C-80AD-283D3979C4C5.jpeg
    95.8 KB · Views: 111
  • 46CDF7CA-0F84-489D-B2E0-E6DAD3C70BC3.jpeg
    46CDF7CA-0F84-489D-B2E0-E6DAD3C70BC3.jpeg
    84.4 KB · Views: 109
Question for all you Scubapro historians and gurus. Unlike my other MK7’s, the one I just serviced does not have the word “audio” above the low pressure port for the second stage. I’m aware that it is an early version, but is it a very early version or did Scubapro just use different equipment during the manufacturing process? Thanks for all your help and expertise.
 

Attachments

  • 4FFAE8DE-488F-4CF6-84B6-7B4AAFC24863.jpeg
    4FFAE8DE-488F-4CF6-84B6-7B4AAFC24863.jpeg
    76.5 KB · Views: 118
Found another basket case MK7 on the cheap. Hopefully, I can bring it back to its former glory. It’s a first generation MK7 and has some challenges. The piston shaft o-ring is really crusty and I had to resort to the SS dental tools again. A lot easier to remove than the previous one though. The ambient chamber is covered with verdigris. I’ll use rsingler’s micro mesh cleaning technique after a vinegar water bath. To be continued…..
 

Attachments

  • 0B0C4F98-0723-47AB-8171-00F098E62FBA.jpeg
    0B0C4F98-0723-47AB-8171-00F098E62FBA.jpeg
    91.2 KB · Views: 92
  • 79F3770B-43E9-45C8-9C76-888DD5FDF72F.jpeg
    79F3770B-43E9-45C8-9C76-888DD5FDF72F.jpeg
    62.1 KB · Views: 93
  • BDB80651-D738-42F4-802F-410B49597420.jpeg
    BDB80651-D738-42F4-802F-410B49597420.jpeg
    109.3 KB · Views: 94
As you all know, most of the time spent restoring an old regulator is in cleaning parts. For my MK7, after a long immersion in vinegar water, I cleaned the regulator lands to remove the left over verdigris with 4000 then 6000 and finally 8000 micro mesh. Very smooth now. Also, wood picks are helpful in removing residue in corners and crevices. On to reassemble the regulator.
 

Attachments

  • EED18694-EF15-4138-B7F6-5FC6B079043E.jpeg
    EED18694-EF15-4138-B7F6-5FC6B079043E.jpeg
    69.7 KB · Views: 86
  • EC7A865B-9FA0-4470-8D65-6BC45C7A2147.jpeg
    EC7A865B-9FA0-4470-8D65-6BC45C7A2147.jpeg
    94.7 KB · Views: 87
  • AA1A51DD-1C10-4CA5-BAFE-D77215688F64.jpeg
    AA1A51DD-1C10-4CA5-BAFE-D77215688F64.jpeg
    69.7 KB · Views: 86
  • 5ED0D487-FC0E-4120-B8A6-C21515FEF6A2.jpeg
    5ED0D487-FC0E-4120-B8A6-C21515FEF6A2.jpeg
    95 KB · Views: 94
https://www.shearwater.com/products/teric/

Back
Top Bottom