OP
tmassey
Contributor
Thank you everyone for your comments. Mentally, I feel like I'm in a tough spot. Now that I've started this process, I kinda want to see it through. Plus, like I said, I've kinda gotten set on my vintage doubles with the original Healthways stickers (but with a modern manifold: I dive DIN and I want redundancy, not just capacity). But it turns out @Tracy's hydro place will hydro, sandblast and repaint both cylinders for less than $45 more total than I would pay for just the hydros.
So now I'm battling between cheap, lazy and hipster. I probably wouldn't put $45 into these if I do it myself, but it'll be a fair fraction of it, and $45 extra isn't exactly a lot of money in the first place. And it's nearly pushbutton. But I'll lose the stickers, and now I've become kinda emotionally invested in both them and the process.
I can't believe I've become this attached to a pair of stupid chunks of rusty iron with some vinly glued to it that I've owned for all of a few months. I gotta get out more...
In the end, I bought these to be used and abused in a local river, not to be a showpiece or somehow prove my credibility. So I'm going to go with the sandblast and repaint. (Besides, stickers are bad for the tank, right? Right?)
But in the end, I've just traded one tedious task for another: getting 50-year-old stickers off. Ugh.
Here's what I did for that: I grabbed a plastic scraper and scraped. It did nothing. Well, I don't care about the finish... so I grabbed a 1" putty knife and went at it, with reasonable care. It mostly came off, but there were still strips and spots of leftover adhesive. Next, I applied some Goo Gone and between a little more scraping, a small wire brush and some paper towels I was left with a sticker-free and adhesive-free tank.
For the second tank I tried some heat to see if it would help. Nope: made things a fair bit harder. The vinyl portion of the stickers was a bit easier to get off, but it turned the adhesive into chewing gum which smeared all over the place... More Goo Gone, more wire brushing, more paper towels, but it eventually came clean. (For the record, we're talking a relatively small amout of heat: not enough to heat the tank metal beyond noticeably warm. Tanks can be damaged by too much heat, but this level of heat was well below the heat they get when you fill them at 600 PSI/min, which is the recommended maximum rate, or what they would get in the back of a car in the summer.)
Goo Gone is quite oily. I don't know if the sandblasting will remove all of residue but I *do* know that oil and paint don't mix. So next step: degreasing. I diluted some Blue Bear degreaser in my stock tank / SCUBA gear wash tank. It's the most powerful degreaser I've come across, and my go-to when I need more than Dawn and I don't need O2-compatible (that's what Crystal Simple Green is for). They get a good soak and scrub, then a good long rinse. Hopefully that'll leave them nicely paintable.
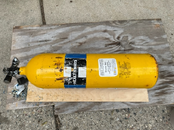
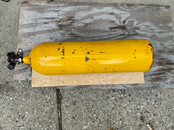
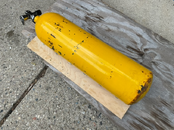
Some photos to show the progress. These are of the other, less corroded tank. They're kinda boring: stickers, no stickers, and a little bit better view of the boot corrosion on this one, which I won't bother to touch.
Looking at these photos, with all the stickers removed, this really is a no-brainer. The paint is a mess, and because they're not galvanized, the tanks are rusty everywhere the paint is damaged. Of *course* these should be sandblasted and repainted -- and when it's like $21 extra per tank, of *course* you let someone else do it. But those vintage stickers, yo...
I can't help myself: I've reproduced the Healthways stickers so I can print them up and reapply faux stickers when it's done... After taking a couple of hours to scrape and clean stickers *off* the tanks, you think I'd be reluctant to put more *on*. What can I say: I'm grooving on the retro. As simple as the design is, it's still a bit tricky. That font: it's clearly Franklin Gothic, but it's not 2020's Franklin Gothic: the 1 is condensed, the kerning is different, the weight is halfway between demi and heavy... No doubt the original was done by hand, so I could only get so close. Plus trying to figure out the exact shade of blue on a 50-year-old sticker... I'm going Reflex Blue, but who really knows?")
The part of my personality that makes me a detail-oriented (and hopefully safe) technical diver doesn't just turn off when I'm not diving...
That's enough for today. I've got two bare and clean tanks (on the outside, anyway: I still haven't touched the inside), ready to head off for hydro, and a design to re-sticker the tanks if I maintain my temporary insanity. Sometimes I think drinking might be a more reasonable hobby...
ETA: You can see the tank is sitting on a board. That's my wheelie board from the first post. *Really* handy, if I do say so myself. And I used it today when I was disassembling a set of doubles: I used it when I needed to unscrew a tank from the manifold, rather than taking apart the crossbar and then taking the valves off. It'll be even more useful when it comes to putting the tanks back on, rather than fighting with installing the crossbar after the valves are on. So far, it's been more useful than I thought. Essential? No: you could do a similar thing just by putting something soft and smooth under the tank (like a towel) and rotating it on that. But seeing as I now have it, it does have benefits.
So now I'm battling between cheap, lazy and hipster. I probably wouldn't put $45 into these if I do it myself, but it'll be a fair fraction of it, and $45 extra isn't exactly a lot of money in the first place. And it's nearly pushbutton. But I'll lose the stickers, and now I've become kinda emotionally invested in both them and the process.
I can't believe I've become this attached to a pair of stupid chunks of rusty iron with some vinly glued to it that I've owned for all of a few months. I gotta get out more...
In the end, I bought these to be used and abused in a local river, not to be a showpiece or somehow prove my credibility. So I'm going to go with the sandblast and repaint. (Besides, stickers are bad for the tank, right? Right?)
But in the end, I've just traded one tedious task for another: getting 50-year-old stickers off. Ugh.
Here's what I did for that: I grabbed a plastic scraper and scraped. It did nothing. Well, I don't care about the finish... so I grabbed a 1" putty knife and went at it, with reasonable care. It mostly came off, but there were still strips and spots of leftover adhesive. Next, I applied some Goo Gone and between a little more scraping, a small wire brush and some paper towels I was left with a sticker-free and adhesive-free tank.
For the second tank I tried some heat to see if it would help. Nope: made things a fair bit harder. The vinyl portion of the stickers was a bit easier to get off, but it turned the adhesive into chewing gum which smeared all over the place... More Goo Gone, more wire brushing, more paper towels, but it eventually came clean. (For the record, we're talking a relatively small amout of heat: not enough to heat the tank metal beyond noticeably warm. Tanks can be damaged by too much heat, but this level of heat was well below the heat they get when you fill them at 600 PSI/min, which is the recommended maximum rate, or what they would get in the back of a car in the summer.)
Goo Gone is quite oily. I don't know if the sandblasting will remove all of residue but I *do* know that oil and paint don't mix. So next step: degreasing. I diluted some Blue Bear degreaser in my stock tank / SCUBA gear wash tank. It's the most powerful degreaser I've come across, and my go-to when I need more than Dawn and I don't need O2-compatible (that's what Crystal Simple Green is for). They get a good soak and scrub, then a good long rinse. Hopefully that'll leave them nicely paintable.
Some photos to show the progress. These are of the other, less corroded tank. They're kinda boring: stickers, no stickers, and a little bit better view of the boot corrosion on this one, which I won't bother to touch.
Looking at these photos, with all the stickers removed, this really is a no-brainer. The paint is a mess, and because they're not galvanized, the tanks are rusty everywhere the paint is damaged. Of *course* these should be sandblasted and repainted -- and when it's like $21 extra per tank, of *course* you let someone else do it. But those vintage stickers, yo...
I can't help myself: I've reproduced the Healthways stickers so I can print them up and reapply faux stickers when it's done... After taking a couple of hours to scrape and clean stickers *off* the tanks, you think I'd be reluctant to put more *on*. What can I say: I'm grooving on the retro. As simple as the design is, it's still a bit tricky. That font: it's clearly Franklin Gothic, but it's not 2020's Franklin Gothic: the 1 is condensed, the kerning is different, the weight is halfway between demi and heavy... No doubt the original was done by hand, so I could only get so close. Plus trying to figure out the exact shade of blue on a 50-year-old sticker... I'm going Reflex Blue, but who really knows?
The part of my personality that makes me a detail-oriented (and hopefully safe) technical diver doesn't just turn off when I'm not diving...
That's enough for today. I've got two bare and clean tanks (on the outside, anyway: I still haven't touched the inside), ready to head off for hydro, and a design to re-sticker the tanks if I maintain my temporary insanity. Sometimes I think drinking might be a more reasonable hobby...
ETA: You can see the tank is sitting on a board. That's my wheelie board from the first post. *Really* handy, if I do say so myself. And I used it today when I was disassembling a set of doubles: I used it when I needed to unscrew a tank from the manifold, rather than taking apart the crossbar and then taking the valves off. It'll be even more useful when it comes to putting the tanks back on, rather than fighting with installing the crossbar after the valves are on. So far, it's been more useful than I thought. Essential? No: you could do a similar thing just by putting something soft and smooth under the tank (like a towel) and rotating it on that. But seeing as I now have it, it does have benefits.