realdiver7
Contributor
OK, now that I have your attention...what kind of rack did you think I was talking about anyway? A scuba gear drying rack, of course! 
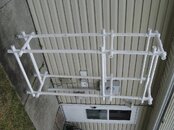
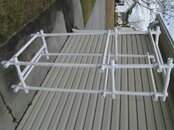
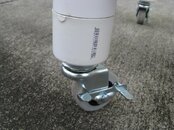
I finally got tired of my old rusty metal gear racks and wooden rack with rusty nails, so I decided to take on this project while I wasn't diving this week. Pictured below is my new homemade scuba gear drying rack that I wanted to show off. It's made of about 56 ft. of 1 1/4 in. PVC pipe, is 7 ft. tall, 3 ft. long, 17 in. wide, and was purposely built to barely fit under my garage door. I drilled four caps for the locking wheel casters, and left them where I can slide them off if I ever need to replace them.
I used a single round piece of PVC as a spacer to insert into one of the caster caps to make the rack sit level. I also used caps to plug all of the end holes because they are cheaper than plugs, create extra protrusions for hanging things, and allow access to the inside of the pipes in the event I need to drain water.
This thing is very heavy duty, and probably a little overkill, but I built it to support multiple sets of gear, including my long, heavy neoprene dry suit so it would not touch the ground when drying. It's surprisingly lightweight and easy to move around, especially with the swivel casters. Even though it's not water tight, it is sealed at strategic points to make it water resistant. It's not perfectly symmetrical and not a perfect cube, but it sits level and does the job.
It took four evenings after work to complete using simple hand tools. If I would've had an electric saw for cutting PVC, it would've been much more precise, easier and faster than the hacksaw and two blades I used. I do not suggest building this from scratch with a hacksaw, especially when having to use flood lights to see! I also suggest buying all parts from the same hardware store. I came up short a couple of parts, went to the most convenient store I could find, spent more money for each part, and got parts that were not machined exactly to match the parts I got from the first store. Not really a big surprise once I thought about it.
What's so unique about this design is that it's so stable it's reversible. I can put casters on the top of the rack, turn it upside-down, and use it that way too! If I did it again, I'd probably install casters that were a little larger in diameter, but what I have works fine.
Overall it was a worthwhile project! Any comments and questions are welcomed.
Thanks!