Double Diver
Contributor
Well I better late than never. I was probably the first to dive my MB MK3 in January. I was in Nassau for 10 days on business and made sure to work in some dive time, I ended up getting 6 dives in. I was able to bring all of my own gear because I had sent a 20 container over with TV broadcast gear in it, and whats another 500lbs of dive gear anyhow. So needless to say I was loaded for bear.
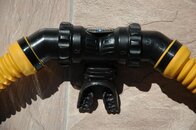
I dive with an Aqualung Black Diamond BC and DIN on HP 100s so tank height can be a problem if the can sits to far from the valve as on the PRAM. Not the case with the MK 3, even with a Conshelf DIN kit I can easily get the tank lower than it needs to be and hose routing is no problem since Mossback did his home work on the positions needed for 1 HP and 4 LP. I shoot stills and video on every dive that Im not looking for lobster, so double hose has always been for me. I have been using a DA and a new Mistral (I know, but mine is setup pretty well) but I have been looking for the next step and the Mossback sounded right. In addition to the DIN kit I have added what I consider the best double hose mouth piece ever and it comes from my new Mistral, big valves the ability to rotate the hose position in the water and a removable mouth piece . You combine it with a Seacure that you can mold to your bite and double hose mouth fatigue is gone.
Whats in it?
Of course the Mossback MK3 with the Patent pending air chamber (I understand what this is supposed to do and I think it works), Titan 1st stage kit and from Vintage Double hose a new LP seat & spring, silicon diaphragm, silicon Duckbill and can clamp.
Now since this was my first use of a new design I thought it prudent to bring a 19cf bailout as my daughter was with me and I didnt want her to have to deal with saving Dad from his antique gear. So here we go.
Dive 1: was a wall with a max depth of 65 I was shooting video (I like to task load) and it worked very well, easy breathing in any position and able to deliver all the air I needed even well pushing a large professional video housing.
I was very pleased with my choice.
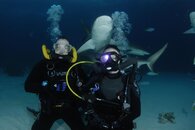
Dive 2: was the Shark dive with Stuart Coves, lots-o-fun and a great photo op with out bubbles. We sat on the bottom at 40 for over 30 min with no free flow issues.
Dive 3: Was a wall dive in to the current at 95 with a still camera in tow so this was a great test of the ability for the MK3 to deliver air, and it did, I had no starvation at all and after down loading the data, my SAC rate was up to 1.2, not bad,. In fact this is the best breathing DH I have ever used. After that dive I ditched the Bailout and spent the next 3 dives enjoying my new toy.
Some thoughts:
I spent a lot of time sitting on the bottom of the pool before going to Nassau; I wanted to know what I was getting in to. So I strapped on 20lb and held the tank in front of me and I found that it almost doesnt matter what position the can is relative to the mouth down to mid sternum (equivalent to a mid shoulder position) because it breathes very easy in all positions. Maybe thats the air chamber effect?
Some tweaks I have made since coming home.
The unit did dribble a little air when in the vertical position. I attributed it to the new LP seat but it didnt go away so I did a little work on the LP seat and added some spring tension. I spent some time talking to Dan at Vintage scuba and I decided to open up the nozzle port that aims down the hose tube to increase the venturi effect. These mods have worked and I now only pull a .4-5 on the Magnehelic, pretty incredible!
I had it out last weekend and it is even better.
Can't wait for the MK4 with adjustable LP seat.
Thank you Old Mossback!!!
Last edited:


