the great 109 to 156 (using the new S-wing) and "lever" issues threads (continued)

Please register or login

Welcome to ScubaBoard, the world's largest scuba diving community. Registration is not required to read the forums, but we encourage you to join. Joining has its benefits and enables you to participate in the discussions.

Benefits of registering include

  • Ability to post and comment on topics and discussions.
  • A Free photo gallery to share your dive photos with the world.
  • You can make this box go away

Joining is quick and easy. Log in or Register now!

I can imagine a short piece of tubing stuck between the metal cover and the rubber cover, across the front.

What I don't know is the long term effect on the rubber cover of the 109/156. If it's remotely negative, I'd rather sacrifice a 2.5 cents awap seat. awap, I think you've been doing this for some times; have you notice if the rubber is taking a set?
 
can't quite visualize this, got a picture?

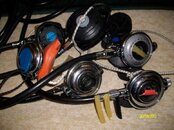
An array of purge depressors: Apr12 155.jpg

The two blue ones are original SP. Note the one on the 108 at the left below the orange exhaust tee is just an old tank neck o-ring. Color is good but they will hiss to remind you when you forget to remove them. Most are just hoses of some kind cut in half (or thirds) lengthwise as they don't need to depress much. I have used old LP hoses cut up. The surgical tubing works well because it has a contrasting color and is very soft - slip in half lengthwise is good. The R190 is a bottle cap with a couple grooves to engage the bungee loop. I put bungee loops like that around my wrists to clip lights while in use. That original Scubapro depressor is in the "S" logo on a S550 cover installed on an R295(?). The original cover had a dive/pre-dive switch that was supposed to do the job but did not work worth a damn. I tried bungee thru the holes in the hard rubber cover but that was a PITA.
 
I can imagine a short piece of tubing stuck between the metal cover and the rubber cover, across the front.

What I don't know is the long term effect on the rubber cover of the 109/156. If it's remotely negative, I'd rather sacrifice a 2.5 cents awap seat. awap, I think you've been doing this for some times; have you notice if the rubber is taking a set?

Nothing that lasts more than a couple minutes. Most of the 109 covers recover completely immediately. I have one that seems to be a bit harder material (newer version) and it may take a minute or two to fully recover when the depressor is removed. I tried fashioning something like couv's clip pictured for my R295 but that cover is fairly hard and held the set for more than just a couple minutes - like maybe 10 minutes to recover. That is why I went looking for another solution for that one and ended up with the S550 cover.
 
I think it's well worth converting the 109 to balanced. The rivet seats for balanced 2nds are readily available and not very expensive. Does it really matter if you spend $2 or 2 cents every few years to replace a seat?

Getting back to the original cracking effort issue, the first thing to look at is the edge of the orifice with a 16X or better magnifier. Sometimes the chrome plating comes off or gets nicked and that's all it takes. Once the orifice is replaced or determined to have a good edge, look at the spring. Those old unbalanced springs can be pretty iffy IME, and while I don't claim to know why, swapping the spring has had surprisingly good results in some cases on my regs. The problem is finding a NOS 109 spring. This is where it starts to become more cost effective to get the s-wing poppet and G250 spring, which is readily available and around $5. The balance chamber is either about the same cost or available as part of a NOS rebuild kit, that will have the poppet as well, and there are plenty on ebay.

I do notice a difference between the 109 and b/a. Not so much in cracking effort, but consistency and long-term performance with a variety of 1st stages (I swap mine around periodically) I think it's better.
 
I'm thinking it is "age" related to the 109 - it was serviced, and then sat, unused, for a year. The soak may do it some good to "loosen it up", as well as a lube.

As to the 156, it will be taken apart, and take a bath in the ultrasonic, then lubed and re-assembled....

Thinking either dish soap or simple green.... I have a heat option (65 Celsius), should I use it or stay away?

Thoughts?
 
Got my Duro Poppet toady and installed it in my r109 and it seams to work great. Does anyone who where there is a good thread that talks about the procedure of adjusting the cracking pressure?

What are you guys using to turn the orifice that will not damage it?
 
Last edited:
Got my Duro Poppet toady and installed it in my r109 and it seams to work great. Does anyone who where there is a good thread that talks about the procedure of adjusting the cracking pressure?

What are you guys using to turn the orifice that will not damage it?

It's not worthy of a thread, it's so simple. Start with the reg assembled, but no diaphragm or case cover in place.
1. Set the adjustment knob all the way out.
2. Set the orifice (use a thin blade screwdriver and depress the lever while turning) so that it just barely makes the lever move; this means when you release the lever after turning the orifice in, it doesn't quite return to full height.
3. Attach a hose and pressurize. Freeflow? Remove the hose, screw in the orifice 1/8 turn or so, repeat until there's no flow. If there's no freeflow, screw out the orifice 1/8 turn until it starts to flow, then back in 1/8 turn. This is where using an inline adjusting tool adds some convenience, but there's no problem just removing and attaching the hose each time, you just need it finger tight. Besides, what's your rush?
4. Put the diaphragm in and case cover on. If that makes it flow, adjust the orifice in another 1/8 turn or less.

If you want to check the cracking effort in water, you can just use a sink or big bowl (don't use the toilet, that's a little disgusting....) and slowly submerge the reg mouthpiece up. You'll hear it flow and you can easily get a reasonably close indication of the cracking effort. If you really need a number, buy a magnehelic and use it.
 
+1: tuning the 109/156/G250 is something very basic.

Nevertheless, it's possible to get fancy:
  • I use an inline adjuster from Scubatools. Like halocline said, it's perfectly OK to do without, but the adjuster lets me tune the reg under pressure, so finding the exact spot where freeflow stops is quick and easy. Luis H has published a detailed analysis of why you can get away doing this.
  • I also use a $2 manometer because it's cheap, accurate, self calibrating, and, most of all, I don't spill water all over the place. And don't forget to put some food coloring in the water, because herman will require you to :).

Just don't over do it: set the cracking pressure to 1" - 1.1" of water. If the reg is in good shape, it's possible to tune it to .8" - .9", but the 109/156 will free flow (lightly) in a face down position because of the case geometry.
 
the adjuster lets me tune the reg under pressure, so finding the exact spot where freeflow stops is quick and easy.

Just don't over do it: set the cracking pressure to 1" - 1.1" of water. If the reg is in good shape, it's possible to tune it to .8" - .9", but the 109/156 will free flow (lightly) in a face down position because of the case geometry.

After a dive or two (or even a few weeks of sitting around), that exact spot has moved....to me it's just not worth it. I'm too cheap. If you do several regs on a regular basis, I'm sure it's convenient.

The case geometry comment is important; these regs will flow when face down if they're tuned too lightly. (Any conventional 2nd stage will) A couple of turns on the adjusting knob will stop it.
 
Back
Top Bottom