SiTech exhaust valve installation

Please register or login

Welcome to ScubaBoard, the world's largest scuba diving community. Registration is not required to read the forums, but we encourage you to join. Joining has its benefits and enables you to participate in the discussions.

Benefits of registering include

  • Ability to post and comment on topics and discussions.
  • A Free photo gallery to share your dive photos with the world.
  • You can make this box go away

Joining is quick and easy. Log in or Register now!

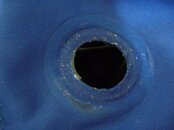
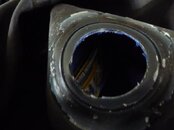
#4 does not have any recesses channel (only raised flange (similar to #2)). And #1 has that recessed channel for raised flange of #2.
The suit's material is pressed by raised flange of #4 to the anti friction washer.

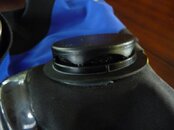
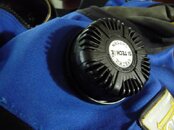
That is differed from the scetch above. But the valve on my picture is also little different.

Does the raised flange of #4 fit fairly closely into or around the raised flange of #2?

Doing so would create a spacer for thin trilaminate material and achieve at least one bend of the suit material to anchor and help seal it. (See the SI TECH detailed view in the schematic above.)

Doesn't it makes the most sense to have the anti friction washer next to #1 since #1 is the only part intended to move when tightening? :D

Anyway, you've got it all right in front of you, so you may be seeing something I can't visualize. :)

Dave C
 
I am reading this post...a few years later and I have a question about installing the si-tech exhaust valve on my DUI suit. I have all the new 4 components as shown in this post and need to know if the Internal valve port SI-60852 (part #2) needs to be used to make the hole in the suit fit the new si-tech valve? If it does...does it have to be glued onto the suit?...or can these items simply be tightened onto the suit? If it has to be glued on what type of glue ? or aquaseal? I have scraped off all the silicone (or possibly aquaseal)on the front of the suit...but there is a heavy build up of smooth sealant on the back...could this work as a good seal if I simply tighten up all the 4 components on the suit?...oh by the way ...anyone that is trying to remove an apeks valve ...take a butter knife(not sharp) and break the silicone seal loose on the front and back of the valve...be careful!!! Then heat up the valve with a HAIRDRYER. Use a pair of waterpump pliers to unscrew the backing. you must depress the front and hold it tight while unscrewing the backplate. This will work without damaging the valve.
 

Attachments

  • drysuit exhast valve photos 001.jpg
    drysuit exhast valve photos 001.jpg
    34.2 KB · Views: 121
  • drysuit exhast valve photos 002.jpg
    drysuit exhast valve photos 002.jpg
    20.9 KB · Views: 117
  • drysuit exhast valve photos 006.jpg
    drysuit exhast valve photos 006.jpg
    21.4 KB · Views: 114
  • drysuit exhast valve photos 005.jpg
    drysuit exhast valve photos 005.jpg
    36.6 KB · Views: 113
  • drysuit exhast valve photos 003.jpg
    drysuit exhast valve photos 003.jpg
    24.3 KB · Views: 124
Last edited:

Back
Top Bottom