SiTech exhaust valve installation

Please register or login

Welcome to ScubaBoard, the world's largest scuba diving community. Registration is not required to read the forums, but we encourage you to join. Joining has its benefits and enables you to participate in the discussions.

Benefits of registering include

  • Ability to post and comment on topics and discussions.
  • A Free photo gallery to share your dive photos with the world.
  • You can make this box go away

Joining is quick and easy. Log in or Register now!

vioch

Contributor
Messages
335
Reaction score
101
Location
St.Petersburg Russia, Vladimir Ioch
# of dives
500 - 999
Want to replace my leaking Apeks exhaust valve with a SiTech one and have a question:

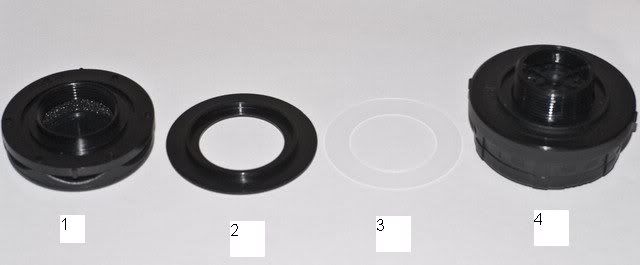
Valve consists from 4 parts: inner, two in the middle and outer

pict4320jr1.jpg


On what suit sleeve side (inner\outer) should be two middle parts installed?
 
I have the older SI TECH high profile dump valve on my CF200. The newer DUI Apeks valve is too big for the hole in my suit.

Will this valve fit in the same hole as the older SI TECH high profile valve fits??
 
pict4320jr1.jpg


In this picture:
Part# 2 goes on the inside of the suit under part#1

Part# 3 goes on the outside of the suit and fits against the drysuit material with part# 4 on top of it.

Is that correct???
 
You're correct that #1, #2, and #3 are inside the suit. #4 is on the outside.

The order of the components is: (inside) #1 + #3 + #2 + suit material + #4 (outside).

I've never used the "attachment tool" described in the Si-tech instruction manual. It's still pretty easy to tighten the assembly down.

I have a Si-tech exhaust valve on my Bare drysuit. I've disassembled/re-assembled the valve several times. As long as the opening in your drysuit is the proper size, installation should be a piece of cake.

Happy diving...
 
I have my valve assembled in the following order: (inside) #1 + #2 + #3 + suit material + #4 (outside). The upper skirting of the #2 is set towards the groove of the #1.
 
I have my valve assembled in the following order: (inside) #1 + #2 + #3 + suit material + #4 (outside). The upper skirting of the #2 is set towards the groove of the #1.

I believe you would be better off having the raised flange of #2 pressing the suit material into the recessed channel of #4 as outlined by Bubbletrubble. That seals it quite well with the suit.

Does SI TECH recommend silicone caulk at all?

The anti-friction washer needs to be in contact with #1 from the looks of things.

You're correct that #1, #2, and #3 are inside the suit. #4 is on the outside.

The order of the components is: (inside) #1 + #3 + #2 + suit material + #4 (outside).

I've never used the "attachment tool" described in the Si-tech instruction manual. It's still pretty easy to tighten the assembly down.

I have a Si-tech exhaust valve on my Bare drysuit. I've disassembled/re-assembled the valve several times. As long as the opening in your drysuit is the proper size, installation should be a piece of cake.

Happy diving...

Sounds right to me. Similar to my Apeks exhaust valves. Thanks.

Dave C
 
Last edited:
Were you the one that beat me out on that ebay auction? lol. I just got one as well, paid $25 shipped.
 
I believe you would be better off having the raised flange of #2 pressing the suit material into the recessed channel of #4 as outlined by Bubbletrubble. That seals it quite well with the suit.


#4 does not have any recesses channel (only raised flange (similar to #2)). And #1 has that recessed channel for raised flange of #2.
The suit's material is pressed by raised flange of #4 to the anti friction washer.

That is differed from the scetch above. But the valve on my picture is also little different.
 
https://www.shearwater.com/products/peregrine/

Back
Top Bottom