Sherwood Magnum Blizzard (second stage) overhaul

Please register or login

Welcome to ScubaBoard, the world's largest scuba diving community. Registration is not required to read the forums, but we encourage you to join. Joining has its benefits and enables you to participate in the discussions.

Benefits of registering include

  • Ability to post and comment on topics and discussions.
  • A Free photo gallery to share your dive photos with the world.
  • You can make this box go away

Joining is quick and easy. Log in or Register now!

Seems like the hardest part to find is the diaphragm as I'm not sure of other ones that would work.

The ring piece keeps slipping off and it seems that someone had glued it on to the housing at some point.

I'm concerned about that little pin in the front not having a spring. That could cause an incident if it prevented the purge button from closing all the way.

Because it's going to cost at least $70 to fix this reg I think I should just get another one. In the meantime can I use the octo on my primary rig on the pony instead, so in case I do need to help someone I could just give them my pony rather than have them attached to my tank?
Scrap it! To many red flags on this unit. This stage is from the early 80s so it has done its time...

I have never had to replace a diaphragm and just discovered as indicated above that they ARE available on eBay. You do need to be careful and buy the correct one. I think the newest regs use a bigger one. All of the old oval regs use the same diaphragm.

The plastic diaphragm retaining ring not staying on is an issue. Regs work best with the diaphragm in place.

None of my pins have a working spring anymore. I have never had an issue. Actually one of my friendly LDS removed the pins from one of my sets as the LDS claimed they were "dangerous". I no longer use that LDS.
 
The plastic diaphragm retaining ring not staying on is an issue. Regs work best with the diaphragm in place.
.

I could be wrong but after my second reading it sounded like the plastic housing was in tact but the metal ring that goes around the diaphragm cover was falling off. The only purpose I see for it is appearance.

I agree that the hole in the diaphragm is a strong indicator--I have regs from the 60s that still have their original diaphragm and also have never needed to replace one.

When it comes right down to it OP can probably get a good, used second stage from One More Chance Scuba or another source for $25-30. Maybe $40.
From the pic this one does not have a metal ring. It has an early version of the plastic screw on retainer.
 
I'm concerned about that little pin in the front not having a spring.

you could either find a small stainless spring to replace the missing one or leave the pin off.

The ring piece keeps slipping off and it seems that someone had glued it on to the housing at some point.

If it is the Bezel ring, that holds the cover on to the body, check to see if has broken and been repaired. The ring may now be larger and not screw down properly, or the threads themselves may be compromised. The only way to really check it is with another bezel ring. Without a boneyard fixing old regs can be a pita.

I'd suggest looking for a more operational older and similar Sherwood as the are usually easy to fix and for a couple of decades or more the parts are mostly interchangeable, and imho, they are a good and reliable second.


Bob
 
Just finished putting the regulator back together with all the metal parts soaked in vinegar overnight. The only o-ring I replaced was on the demand valve where it screws into the housing. The o-ring on the orifice looked ok so left it as is.

At first the regulator freeflowed but that was because the orifice wasn't adjusted. Now that it's fixed I have just one more problem. I have to press the purge button in all the way to hear even a slight amount of air being released. Also any slight movement of the lever releases a little air from the demand valve. Moving the lever a little fixes the issue. Could this just mean that the lever needs to be adjusted?

I found a diaphragm in Ebay for $8 but the shipping is $20 (to Canada).

https://m.ebay.ca/itm/Diaphragm-Sec...ut-Regulator-SHV7008-/302555391635?nav=SEARCH

Here is the plastic ring that keeps popping off:

25u6xw9.jpg


I could just scrap the regulator of course but then that would just mean more money plus the kit to service it.
 
Last edited:
All of the diaphragm covers on my Sherwoods are one-piece and do not have that plastic ring so I didn't understand what you meant. That looks like a very flimsy design.

Page 16 of this manual explains the adjustment procedure:

https://www.divestock.com/downloads/dl/file/id/282/sherwood_srb3200_srb3300_srb3400_srb3400.pdf

I don't remember the exact thickness of the adjustment tool but it's somewhere between 1/16" to 1/8". We need to find that out. I'll look in my other manuals and get back. I made my tool from some flat steel and it is 3/32" thick so I'll take a huge chance here and say that's close enough. Other's may disagree. What the manual doesn't tell you is that you have to remove the hose, turn the orifice, and screw the hose back on (finger tight should be OK), turn the air back on, and check it. Always depress the purge button when adjusting the orifice to avoid damaging the valve seat. Think twice before bending the lever. And then think twice again. If you have a leaking valve seat you might end up adjusting it too far to try and compensate so I suggest installing a new valve seat or flipping it over before fine tuning the second stage.

Here's a thread on the subject:

Sherwood 2nd Stage Orifice Adj Tool

Also, I suggest doing the adjustments before spending any money and see if it looks like it would be worthwhile buying a new diaphragm. I suspect it will be if you can overcome the broken plastic retaining ring problem.
 
Seems like a small leak in the HP seat. For the price of one of those I could buy a complete kit for two stages even though I only have one.

How do I adjust the purge lever?

The diaphragm doesn't seem to be an issue, though I haven't tested it myself underwater yet.

For both the Aqualung Conshelf Supreme and Sherwood Kits + diaphram + shipping I'm looking at about $90. Worth it?
 
How do I adjust the purge lever?
You bend it.

This is fully covered in the manual. I find that a quick review of the manual each time I go to work on my gear ensures that I do not miss any steps in the overhual process. The manual also provides complete instructions on the details of each step. Like lever adjustment. It also illustrates the type of tool to be used.

The manual lists a specialized tool however which I've not been able to find. Which conventional tool can do the same thing? I used a flat head screwdriver to adjust the orifice, but apparently that also needs a specialized tool? I think I'm just going to use a flat screwdriver and a pair of pliers.
 
The manual lists a specialized tool however which I've not been able to find. Which conventional tool can do the same thing? I used a flat head screwdriver to adjust the orifice, but apparently that also needs a specialized tool? I think I'm just going to use a flat screwdriver and a pair of pliers.

What are the pliers for? If you mean to use them the bend the lever then it might be awkward. If you can find a flat piece of steel and make a cut into it from the side about 2/3 of the way with a hack saw that should work. The steel should be about 5/8" to 3/4" wide and four or so inches long.

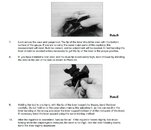
I've attached the pictures of the Lever Adjusting Tool from one of the Sherwood manuals.

Before you do any bending make sure the orifice is adjusted to optimum and has no leaks. The manuals refer to a "Inline Adjusting Tool" for this purpose but I've never seen one and it's no big deal to remove the hose, turn the screw, and replace the hose. The only real complication is that you have to turn off the scuba tank and turn it back on each time. The diagram in the picture and in the manual that I gave you the link to shows how to use the thickness of the Lever Adjusting Tool to determine the proper height of the lever. 3/32" works just fine. I/8" may work too. You will know if it is a little too high when you reattach the diaphragm and there is a slight hiss. At this point you can try adjusting the orifice a very small amount (1/16 to 1/8 turn clockwise) or bend the lever a tiny bit more. If you are going to use this for you pony bottle you will probably want to give it an extra 1/8 or so turn so it will not freeflow easily when you jump into the water, but still breathe easily. When you think you have it all right you connect the scuba tank, turn it on, and slowly lower the second stage into a bucket of water with the diaphram cover facing down and the mouthpiece facing straight up. Air should start to flow about when it gets about to the bottom of the mouthpiece. At this point, in a body of water, it should freeflow if you entered the water with the second stage mouthpiece pointing up. This is easily remedied by turning the mouthpiece downward. If it still freeflows then you have it adjusted to be too sensitive.

Whatever happens it is recommended that you do not bend the lever any more than necessary. Once is good, twice to get it just right....
 

Attachments

  • Lever Adjusting Tool.jpg
    Lever Adjusting Tool.jpg
    75.4 KB · Views: 127
Last edited:

Back
Top Bottom