SCUBA Support and Offroad Adventure Bugout Trailer

Please register or login

Welcome to ScubaBoard, the world's largest scuba diving community. Registration is not required to read the forums, but we encourage you to join. Joining has its benefits and enables you to participate in the discussions.

Benefits of registering include

  • Ability to post and comment on topics and discussions.
  • A Free photo gallery to share your dive photos with the world.
  • You can make this box go away

Joining is quick and easy. Log in or Register now!

Nice project and great job.
Looks like you have thought of everything
Have you had any thoughts of installing a power inverter as a cheaper alternative until you add a generator later down the road?
 
Nice project and great job.
Thanks :)

Looks like you have thought of everything
I appreciate the thought - but I'm not THAT good. I even would have done a lot of things differently, given the chance. But this has been one of those "live and learn" projects.

Have you had any thoughts of installing a power inverter as a cheaper alternative until you add a generator later down the road?
Yes. Actually, my original idea was to have a huge ass battery bank and massive inverter. However, because inverters are so inefficiency, and huge ass battery banks are so expensive ($1200 for the one I would LIKE to have), that idea was not really practical.

However, I'm going to have a smallish inverter ANY - even once I have the generator - just because sometimes it's nice to just get electric, without having to fool around with a generator. You can get a decent one, for the purposes I plan, for about $100. I'm going to permanetly mounted it in the forward compartment (battery bay), along with all the other electrical gear.

I still plan a huge ass battery bank, but I'll have to accumulate it one battery at a time. It may take me 2-3 years before I have them all :)

Thanks!
ND
 
I'd say even if you put a generator on there and you have the battery banks that a small invertor is still nice to have.

That way you can plug up a battery charger (that might be 110v) for your dive camera for example and let is charge for a few hours, or use it to charge the laptop batter, etc. (without having to get 12v adapters for any of these devices.)

or to power a TV to "tailgate" during football season.

that way you can save the generator for later use of powering higher wattage devices and not have to bother turning it on evertime you need 'power' for just a little while
 
Nice project! Keep us posted on the project. I'll look forward to your first outing with it.
 
The trailer looks great, ND! I'm gonna have to go ahead and say that you are my hero. You know, for today....at the moment. Unfortunately,(for my girlfriend)you just gave me alot of ammo to undertake some DIY projects that I've been drawing up....
Keep up the good work, and please keep us posted.
 
So, quite a while ago, I bought a pair of fenders. These are 10x19x36 "Jeep Style" fenders, from Six Robblee's - and were about $72 for the pair. Fairly cheap in the overall scheme of things. These fenders come bare metal, with no brackets or attachment points of any kind. You have to figure that out for yourself.

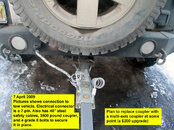
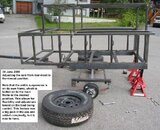
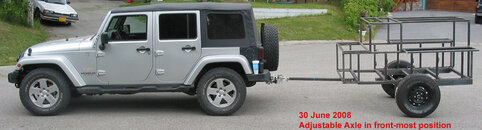
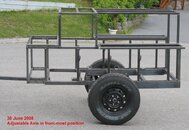
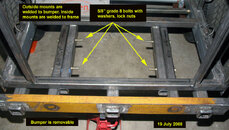
So, we looked at what we were doing and tried to figure out how to attach them. We had an added complication, in that the axle is relocatable, so the fenders need to be relocatable too. So, what we decided to do is bolt them on using the same bolts that bolt the axle carriage in place. This way, the attachment points for the fenders are always where the attachment points for the axle carriage are. Make sense? Well, we also decided to have an additional attachment point, for added strength. This extra point uses the same bolt holes that were already in place for the axle carriage.

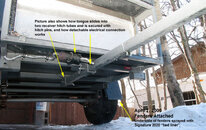
Anyway, so after figuring all this out, we needed to make some way for the fenders to bolt on. After rigging up some jigs to help us determine where we needed to put things, we welded two pieces of steel to the fenders. One is a rather thick piece, the other is a long piece of angle steel that runs along the front edge of the fender, which also has another piece welded to it, to make sort of an acute angle of steel that serves as the bracket. Anyway - we welded this stuff on and drilled holes as necessary and, voila - plain fenders have now become fenders that can be attached. I guess I should have taken some pictures before attaching them - but oh well. I'll take some later when I take them back off to do more painting and get pictures then.

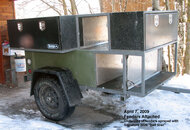
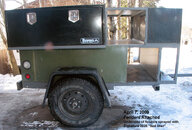
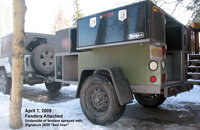
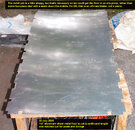
I had the fenders powder coated black, to match the rear bumper. They sort of match the steel boxes, provide some contrast from the gray that the frame is powder coated, and also provide some contrast to the silver that I will paint the exposed sheet metal surfaces. Since I had everything powder coated at once, it's hard to say what portion of the cost is attributable to the fenders, but since I got such a good deal on the powder coating, it's not unreasonable to guess that maybe $100, at most, is attributable to the fenders.

Finally, I had the underside of the fenders lined with some spray on bedliner stuff. After checking with a few places in town, I went with the guy who applies the Signature 2020 product. It's supposed to be harder and better than things like RhinoLiner. The cost here was $70 for both fenders.

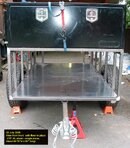
The fenders are easily removable, in that they are only held on with 3 bolts each, but to get to the bolts, you have to remove the tires - which means you have to jack it up. Sort of a pain in the ass, but it's not like I will be removing the fenders with any kind of frequency.

So, over all, I have a total of about $250 into the fenders, including the grade 8 1/2" bolts, lock nuts, and washers used to attach them and the powder coating and the spray liner on the undersides.

Some pictures attached.
 

Attachments

  • web_1.jpg
    web_1.jpg
    129.5 KB · Views: 222
  • web_2.jpg
    web_2.jpg
    116.4 KB · Views: 201
  • web_3.jpg
    web_3.jpg
    122 KB · Views: 253
  • web_4.jpg
    web_4.jpg
    71.2 KB · Views: 209
  • web_5.jpg
    web_5.jpg
    110.4 KB · Views: 238
  • web_6.jpg
    web_6.jpg
    132.6 KB · Views: 197
  • web_7.jpg
    web_7.jpg
    155.7 KB · Views: 313
  • web_8.jpg
    web_8.jpg
    125.4 KB · Views: 324
I found some early build pictures. Not going to post them all here unless someone really wants me to, but here is a choice selection showing some of the major elements and/or phases to building this thing.

30 - shows how the axle is on its own relocatable frame
32 - Jeep pulling early build of trailer
33 - frame and super structure basically completed.
51 - bumper complete
52 - floor notch job
54 - floor installed (rear)
55 - floor installed (front)

Cheers!
ND
 

Attachments

  • attachment-30.jpg
    attachment-30.jpg
    116.4 KB · Views: 170
  • attachment-32.jpg
    attachment-32.jpg
    79.3 KB · Views: 156
  • attachment-33.jpg
    attachment-33.jpg
    97.7 KB · Views: 172
  • attachment-51.jpg
    attachment-51.jpg
    110.9 KB · Views: 167
  • attachment-52.jpg
    attachment-52.jpg
    185.8 KB · Views: 166
  • attachment-54.jpg
    attachment-54.jpg
    123.8 KB · Views: 153
  • attachment-55.jpg
    attachment-55.jpg
    174.8 KB · Views: 194
Very cool. I have been wanting to build something similar for years. Awesome job!
 
That trailer looks awesome and should prove to be just what the doctor ordered. Here is a link for some solar powered battery chargers that aren't too terribly expensive Solar Trickle Chargers for Car, Truck, RV, Boat, Deep Cycle .

I am curious about the design of the tongueless trailer hitch. Is it just to facilitate easier storage?

Other than that, this thing rocks and I can certainly appreciate all the thought and design that went into this project!:cheers:
 
https://www.shearwater.com/products/perdix-ai/

Back
Top Bottom