
It’s all based on the direction of work.

You are using an out of date browser. It may not display this or other websites correctly.
You should upgrade or use an alternative browser.
You should upgrade or use an alternative browser.
Regulator test rig you don't need to suck.
- Thread starter njmorrell
- Start date
Please register or login

Welcome to ScubaBoard, the world's largest scuba diving community. Registration is not required to read the forums, but we encourage you to join. Joining has its benefits and enables you to participate in the discussions.
Benefits of registering include
- Ability to post and comment on topics and discussions.
- A Free photo gallery to share your dive photos with the world.
- You can make this box go away
Bob DBF
Contributor
Same thing motor can be a generator or motor depending on the input/output.
Depends on how the motor is built, some can some can't.
Most motors will regenerate.Depends on how the motor is built, some can some can't.
I think we have distracted this useful thread enough.
Moderators you may wish to remove this nonsense from the thread as it may be useful as a reference in future.
I have the parts for one and will probably use a coil of tubing to smooth out the operation of it as has been suggested.
Moderators you may wish to remove this nonsense from the thread as it may be useful as a reference in future.
I have the parts for one and will probably use a coil of tubing to smooth out the operation of it as has been suggested.
tmassey
Contributor
So, given that @rsingler recommended a magnehelic for regulator servicing, I went ahead and put together my own. I basically just threw it together with the simplest and least-expensive parts. tl;dr: it seems to work well, and is really straightforward to put together.
eBay parts:
12V 50kpa Vacuum pump. FYI, it seems that even 50kpa is overkill: I'm using the lowest 1/3 or so of motor control to hit full limit on the 0-4 magnehelic gauge. But it works if you're real gentle with the motor control knob. $10 shipped.
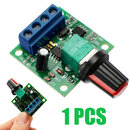
1.8-12V PWM motor controller. I went cheap and simple, with screw-down binding posts. $5.39 shipped.
Dwyer 2004 magnehelic. Big (4") 0-4 scale. Makes getting accurate measurements easy. New old stock, box beat up and stained, but gauge in perfect shape. $29 shipped.
Home Depot parts:
1/4" OD / 1/8" ID clear vinyl tubing. HD SKU #701968. $3.76.
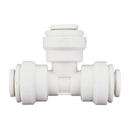
1/4" OD Push to Connect tubing tee. I was annoyed to have to pay $5.09 for this... (I have a box of them, but couldn't put my hands on them... )
)
Scrap parts:
12V DC Transformer wall-wart. Amazon if you don't have one.
18/2 wire: I used less than a foot of this, and any wire that will fit in the screw terminals will work. HD if you don't have any: they sell this by the foot.
Hooking this all up was *very* easy. If you can strip wire and operate a screwdriver, you can hook this up. Screw the + and - wires from the transformer into the clearly-labelled power screw terminals on the motor controller. Use a length of wire to hook the + and - motor screw terminals on the controller to the + and - terminals of the vacuum pump motor. (In my case, the + terminal was labelled with a small and subtle red mark: finding that was the hardest part of the process!") ). For testing, I simply twisted the wire on the terminals. I'll go back and solder them on, but if you don't, it'll likely still work just fine, or you could buy crimp-on terminals for the motor connection if you'd rather not solder.
). For testing, I simply twisted the wire on the terminals. I'll go back and solder them on, but if you don't, it'll likely still work just fine, or you could buy crimp-on terminals for the motor connection if you'd rather not solder.
Plug in the transformer and twist the controller knob. The motor will run from slow to fast!
Now, to hook up the tubing. For a quick test I temporarily put a small length of tubing from the vacuum port of the pump to the low pressure port of the gauge. Note that the gauge has two 1/4" NPT female low-pressure holes, and one of them must be capped off. Having a new in box gauge helped: it had all of the caps, barbed fittings and screws and adapters to set up and panel-mount the gauge. Also, be careful turning that knob when it's directly connected to the gauge: you don't have to turn it far at *all* to max out the gauge.
Once I knew everything worked correctly, I unplugged the tubing from the gauge and plugged it into the tee, then added a tube from the tee to the gauge. That left the third spot from the tee to connect the rest of the hose to: that's the hose you'll use to do the measurements. That's it: you now have a working magnehelic gauge with knob-controlled pump.
I haven't finished the part that connects to the second stage yet. I figure I'm going to have a couple of adapters for the 1/4" hose to connet to the second stage: one that will fit nicely over a second stage without a mouthpiece, and one that will fit nicely inside a mouthpiece already attached to a second stage.
To complete the assembly, I used a piece of scrap 1/4" fiberboard to panel mount the gauge, then simply drilled holes and used wire ties to mount everything else to the back of the board. Far from polished, but extremely functional, quick and cheap. I then used some nuts and bolts and an old blow-molded plastic case to mount everything to. I now have a nicely-contained, portable magnehelic in a case with enough room for a few second stage specific tools (like the inline adjustment tool.... ).
I attached a bunch of photos: the more interesting of the individual parts I used, as well as the front and back of the assembly before I put it in the case. The wiring and tubing diagrams are already in this thread, so I didn't bother with any pictures of those.


eBay parts:
12V 50kpa Vacuum pump. FYI, it seems that even 50kpa is overkill: I'm using the lowest 1/3 or so of motor control to hit full limit on the 0-4 magnehelic gauge. But it works if you're real gentle with the motor control knob. $10 shipped.
1.8-12V PWM motor controller. I went cheap and simple, with screw-down binding posts. $5.39 shipped.
Dwyer 2004 magnehelic. Big (4") 0-4 scale. Makes getting accurate measurements easy. New old stock, box beat up and stained, but gauge in perfect shape. $29 shipped.
Home Depot parts:
1/4" OD / 1/8" ID clear vinyl tubing. HD SKU #701968. $3.76.
1/4" OD Push to Connect tubing tee. I was annoyed to have to pay $5.09 for this... (I have a box of them, but couldn't put my hands on them...
)Scrap parts:
12V DC Transformer wall-wart. Amazon if you don't have one.
18/2 wire: I used less than a foot of this, and any wire that will fit in the screw terminals will work. HD if you don't have any: they sell this by the foot.
Hooking this all up was *very* easy. If you can strip wire and operate a screwdriver, you can hook this up. Screw the + and - wires from the transformer into the clearly-labelled power screw terminals on the motor controller. Use a length of wire to hook the + and - motor screw terminals on the controller to the + and - terminals of the vacuum pump motor. (In my case, the + terminal was labelled with a small and subtle red mark: finding that was the hardest part of the process!
). For testing, I simply twisted the wire on the terminals. I'll go back and solder them on, but if you don't, it'll likely still work just fine, or you could buy crimp-on terminals for the motor connection if you'd rather not solder.Plug in the transformer and twist the controller knob. The motor will run from slow to fast!
Now, to hook up the tubing. For a quick test I temporarily put a small length of tubing from the vacuum port of the pump to the low pressure port of the gauge. Note that the gauge has two 1/4" NPT female low-pressure holes, and one of them must be capped off. Having a new in box gauge helped: it had all of the caps, barbed fittings and screws and adapters to set up and panel-mount the gauge. Also, be careful turning that knob when it's directly connected to the gauge: you don't have to turn it far at *all* to max out the gauge.
Once I knew everything worked correctly, I unplugged the tubing from the gauge and plugged it into the tee, then added a tube from the tee to the gauge. That left the third spot from the tee to connect the rest of the hose to: that's the hose you'll use to do the measurements. That's it: you now have a working magnehelic gauge with knob-controlled pump.
I haven't finished the part that connects to the second stage yet. I figure I'm going to have a couple of adapters for the 1/4" hose to connet to the second stage: one that will fit nicely over a second stage without a mouthpiece, and one that will fit nicely inside a mouthpiece already attached to a second stage.
To complete the assembly, I used a piece of scrap 1/4" fiberboard to panel mount the gauge, then simply drilled holes and used wire ties to mount everything else to the back of the board. Far from polished, but extremely functional, quick and cheap. I then used some nuts and bolts and an old blow-molded plastic case to mount everything to. I now have a nicely-contained, portable magnehelic in a case with enough room for a few second stage specific tools (like the inline adjustment tool....
).I attached a bunch of photos: the more interesting of the individual parts I used, as well as the front and back of the assembly before I put it in the case. The wiring and tubing diagrams are already in this thread, so I didn't bother with any pictures of those.
Attachments


Pump box all built and functioning, but now I need to build the assembly for the mag and the regulator. I have the factory ScubaTools assembly, but need to get from the inhale orifice to my vacuum. What did you guys do?
The line to the vacuum is 1/4 OD tube (3/16 ID)

@BigRed96
Where did you get the end assembly? Mine is just a hole....
The line to the vacuum is 1/4 OD tube (3/16 ID)
@BigRed96
Where did you get the end assembly? Mine is just a hole....
You will be quite envious of the engineering precision and quality of my solution...Where did you get the end assembly? Mine is just a hole....
I would have used duct tape instead of electrical, but it was all I had at hand.

I DID buy some half inch Delrin rod to get turned, but it's one of those projects that I just haven't gotten around to yet.
Edit
Similar threads
- Replies
- 28
- Views
- 2,590
- Replies
- 0
- Views
- 954
- Replies
- 6
- Views
- 1,376
