Rebuilding regulator and BCD I just bought

Please register or login

Welcome to ScubaBoard, the world's largest scuba diving community. Registration is not required to read the forums, but we encourage you to join. Joining has its benefits and enables you to participate in the discussions.

Benefits of registering include

  • Ability to post and comment on topics and discussions.
  • A Free photo gallery to share your dive photos with the world.
  • You can make this box go away

Joining is quick and easy. Log in or Register now!

Hi, the curmudgeon is back.

We're really helpful folks here on SB.
And we're, bit by bit, giving helpful advice to two posters who are starting down the DIY road.

But the post above about shims being used for some "special situation" just really should be a red flag for all us helpful DIY'ers. As I said above, reg service isn't complicated, but it is precise. Well, add to that, if you're gonna do this, don't just be a part changer like the technicians we love to hate.

@rnln , buy Regulator Savvy from ScubaTools. Read it. Then take your regs apart. But not before, please?

For our contributors (and I'm guilty, too), let's not help our new buddies get hurt, okay? When a post shows such total unfamiliarity with regulator theory (sorry, @rnln ), I think a little "tough love" is in order. This is just my 2¢, and I'm writing as a member, not as a Moderator.
 
Thanks again James, and rsingler.

rsingler,
Thanks for considering the red flag on a new person. I appreciate your concern, but when I said special situation when adjusting the first stage, that is include in the situation James mentioned above. It is after assembled the regulator, then test/adjust just like in the video clips. (Thanks James, when I said "adjust", it include what you mention above include simming). Also, extra hoses and LP gauge for checking first stage regulator LP is also on my list. Maybe my terminologies is not precise enough?

To me, I think everyone has to start somewhere, include the pros.; who are making living on what they are doing. I still remember the first time starting to DIY changing brake pads and engine oil on my first car, many years ago; which was an easiest Japanese car to work on. After my dad was showing parts, explaining how things work, I still had to ask very silly questions. After going through many cars I owned include maintaining and modifying, from economy Japanese car to mid end Mercedes/BMW, classic cars to high performance 911, I still some times ask questions. To me, asking questions takes a very important part to reduce the rate of redo and enhance success.

Again, thanks for your concern. I will not stop, but I will take that into my consideration and be more/extra careful when working on and testing them.

Thanks again.
 
No worries, but as @rsingler pointed out, make sure you understand what you are doing, not just following steps in a checklist. If you don't know, ask (as you have been) and get a good grasp of how and why the reg works.
 
Thanks James,
I always being a careful person, reading and asking questions when I don't know and even when I just having doubt. I know some times that will set off alarms, but I rather being extra careful then assume. Still, I appreciate all inputs, because I will do the same to newbies when I become experienced, especially when it comes to life support devices.
Thanks everyone.
 
Finally, I received the kits from Double Vintage Hose today, stay awake to service my G250 right away tonight, I can't wait :D
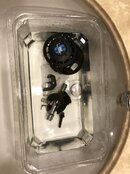
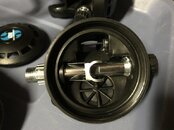
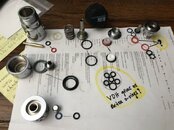
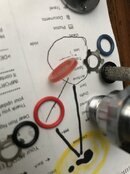
. Finally, the first one is done, not adjust yet. It went fairly smooth. Like I mentioned on earlier post, my regulators look like they are fresh new service before I got them. Silicone and o-rings feel like new except the viva valve o-ring. Anyway, the hardest parts for me are installing the o-rings on the Volcano orifice and the Viva valve. For the Volcano Orifice, have the o-ring on from the threated side first to avoid the sharp edges on the the other end. Still, I had to wrestle it so bad to get it in place. Same as the o-ring for the Viva valve. Anyone has a trick to make it easy on the o-rings?
 
put one on the orifice from the slotted end and push one on the viva thing the way it goes

and do some thumb exercises
 
Anyone has a trick to make it easy on the o-rings?
Very carefully, slide a hex key into the volcano orifice from the slot side (stay away from the sealing edge). With the orifice thus stabilized, it's easier to use your thumbnails to slip the oring into place.

Practice with a 5/32" hex key on a HP port plug with its stiffer 90 duro oring. The problem is the same: having the part skitter away from you just as you flip the oring over the top. Without the hex key, one often loses grip. Once you can do port plugs, the orifice is easy. But again, be careful of the cone edge.

As for the flow vane, there's nothing easy about that one. Try slipping a sharp brass pick inside the oring once you have it shouldered up against the plastic next to the oring land. Don't use the tip; instead slide the pick deeply through so you're using the shaft. Lever the oring until you can flip one side into the groove. Then remove the pick while holding that one side in place, and then use your fingernail to ooze the rest into the groove. Be careful that the pick tip doesn't damage the oring on insertion or removal.

Even a curmudgeon is willing to help! :coffee:
 
I feel that I am lucky in this game, right at the beginning. My second G250 and MK10 condition are not much different from my first G250. They are clean and look awesome.
 

Attachments

  • IMG_1812.JPG
    IMG_1812.JPG
    77.4 KB · Views: 160
  • IMG_1813.JPG
    IMG_1813.JPG
    64.7 KB · Views: 142
Now, I am on the MK10. Laying the old stuff and new kits side by side, I feel that some of the new o-rings aren't exactly the same thickness as the old one, but I guess if it is ok for Vintage Double Hose then it should be ok for me too? However, one of the o-rings is obviously different. The old o-ring is a square shape like the garden hose o-ring, the new one is a normal rounded. Also, the outside diameter is bigger. Do you also experience this?

The first pic is to tell where it goes. It goes to the bottom, where the end of the yoke nut comes in.
On second and third pics, the old 0-ring is on top of pic. The bottom brighter color is the new o-ring. The new o-ring has bigger outside diameter. It can go in but needs some force. It is a little too big for the spot. Do you guys install it anyway?
 

Attachments

  • IMG_1814.JPG
    IMG_1814.JPG
    57 KB · Views: 142
  • IMG_1815.JPG
    IMG_1815.JPG
    84.9 KB · Views: 153
  • IMG_1816.JPG
    IMG_1816.JPG
    52.3 KB · Views: 138
Sometimes Bryan puts in extra o-ring to make a kit compatible with more than one model. The extra o-ring is probably for a MK5 yoke retainer. The "garden hose" seal goes inside the high pressure chamber and seals the hp seat. I don't have one of Bryan's kits available, but sometimes that seal is replaced by a -013 seal- either one works. The smaller extra seals are most likely for port plugs. The large o-ring is a -017

Fun with o-rings: Odd sizes fit into each other/even sizes fit into each other. If you take the -017 you can just fit the seat retainer o-ring into it (-015) the -013 will fit into the -015, the -011 (hp port plug) will into the -013

I'll attach an annotated file to help you find the correct seals. BUT REMEMBER the piston stem seal is a high durometer -010 seal
 

Attachments

  • mk10 annotated.pdf
    227.2 KB · Views: 189
https://www.shearwater.com/products/swift/

Back
Top Bottom