Question Scubapro MK10 - spring positioner. Do I need one?

Please register or login

Welcome to ScubaBoard, the world's largest scuba diving community. Registration is not required to read the forums, but we encourage you to join. Joining has its benefits and enables you to participate in the discussions.

Benefits of registering include

  • Ability to post and comment on topics and discussions.
  • A Free photo gallery to share your dive photos with the world.
  • You can make this box go away

Joining is quick and easy. Log in or Register now!

kdlv

Contributor
Messages
103
Reaction score
91
Location
Sofia, Bulgaria
# of dives
200 - 499
Folks, 3 lame questions from my side

Some diagrams indicate the presence of a spring positioner.
Rev C from 12/1997 indicates only the presence of a washer/shim 01.060.101. #10 on the diagram
MK10-RevC.jpg

Rev M from 02/2001 of the diagrams however has now #34 - 10.500.118 which is a spring positioner washer. The piston, bushing and sleeve (#19,#33, #22) on the diagram look exactly like mine.
MK10-RevM.jpg

Same spring positioner/washer is on the previous Rev L as well from 03/99

Supposedly Rev M is the latest and I should have both at least 1 shim and the washer together contacting the main body and under the spring.

And then... there is the confusing MK10 Plus conversion infographic.
MK10 - Confusing parts diagram.jpg
My piston looks similar to the Plus on the graphic, but the rings are not amber. It has the TIB, but doesn't show the silicone sleeve (#19 on diagrams)! I know mine is normal (non-Plus) MK10. But this diagram doesn't show the silicone sleeve at all, wondering why...?

* Now... my MK10 is in pristine condition and it has been serviced recently. It appears to be a late model. But... there is no spring positioner, just a shim under the spring and the tallest HP seat is installed. I couldn't test the IP at low tank pressure, to see if it drops significantly. Should I source one? And do I need a shim under it? Probably not...

* Is there a need to lubricate the piston stem under #33 cap?

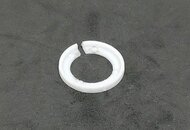
* What is the right position of 19? the groove is on the outside, or the flat surface is on the outside? I assume the groove is on the outside like on the photo and it was like that when I took the piston out. #19 is soft and it is very easy to turn it inside out. What's the purpose of it?

{and then I found this topic: When did MK10 get spring alignment washer (10-500-118) and why?}
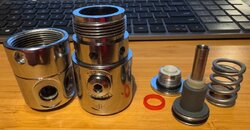
 

Attachments

  • 10-500-118.jpg
    10-500-118.jpg
    22.2 KB · Views: 131
  • my mk10.jpg
    my mk10.jpg
    72.4 KB · Views: 125
Your second diagram is of a MK10+ which has a different piston and seat from the MK10. You might already know that. That plastic centering washer is only for the MK10+ piston. The silicone sleeves you can use or discard, it doesn’t really matter. They were part of SP’s ongoing attempts at keeping ice from forming on the piston in very cold water. You don’t need to have an IP shim on both sides of the spring; sometimes they help to break up an annoying resonance that can occur with the MK10 and cause a sort of harmonica sound on inhalation at certain tank pressures.

When you say “my piston looks like the MK10+” do you mean it has a rounded edge instead of a sharp knife edge on the end of the shaft? If so, you have a MK10+, if not, regular MK10. It’s very important to be clear on this in terms of rebuilding, of course. And the MK10+ has a radically different seat and seat retainer. It’s basically a MK20 trapped in a MK10 body.

The amber o-rings were polyurethane that SP used for a few generations of their rebuild kits. They switched back to EPDM on later kits. The presence of these amber o-rings does not indicate either MK10 or MK10+, they can appear in any SP piston reg that was rebuilt during the time SP was using them. The problem I have had with polyurethane o-rings is their shelf life is not great. EPDM works really well, the only reason not to use those is if you are planning higher than 40% O2 use, in which case viton is the standard, but there are other characteristics of viton that are not great.
 
When you say “my piston looks like the MK10+” do you mean it has a rounded edge instead of a sharp knife edge on the end of the shaft? If so, you have a MK10+, if not, regular MK10.
It's a sharp edge piston, definitely MK10 (non Plus). The seat is also definitely MK10 (non Plus) I have seen older versions of MK10 however with a different shape of the thicker part of the stem under the gray cap. Without the little groove where the cap "clicks" onto. That's what i meant.

Ah, the silicone sleeve preventing ice... that makes sense. Thanks.

Strange thing with the spring positioner is that the diagrams (i.e. rev M) indicate this part is needed for both + and non + versions, but I now understand it is optional.

Thanks @halocline!
 
Strange thing with the spring positioner is that the diagrams (i.e. rev M) indicate this part is needed for both + and non + versions, but I now understand it is optional.

Thanks @halocline!
Someone else might know something I don’t, but I’ve worked on probably 20-25 MK10s over the years and I’ve never seen one with that centering washer. Only on the single MK10+ I ever worked on, which was a conversion from MK10 to MK10+.
 
So my first MK10 is whistling happily under pressure, but it works well and it's been rock solid over a week of diving I did in the summer with it.
Sourced another cosmetically good one.
Tested it briefly before opening it and... started leaking air immediately. Didn't feel like investigating further

Gave it premium spa treatment :), it wasn't used for ages. Completely dry on the inside, no traces of grease, plenty of salt and residue, some of the plating on the inside of the body was gone where the Piston o-ring contacts with it and the brass colour was visible, but it wasn't pitted and looked worth the effort to rebuild. Also the piston was in brilliant condition under magnification as well.

After several ultrasonic baths, all the residue came off, it came out totally clean. Dried it, left it overnight and rebuilt it today mostly with silicone grease, I used MCG-111 on the threads.
The IP was crazy high with the -|| (the tallest piston seat) that the regulator came with -> ~180 psi.
No idea what IP this reg held before that.

After switching to the lowest seat (+ mark), The IP went down to 153psi after cycling 20-30 times. It's been sitting there rock solid for a couple of hours, while I was working on other stuff.

The odd thing is that I have nothing else to remove, apart from the piston plastic hat (#33 in the diagram above).
So... I am tempted to get rid of it and just use a shim so the spring won't contact against the piston directly.

There was no shim between the spring and the body, yes I triple checked :)

Couple of questions:

1. Is it ok not to have shim between spring and body?
2. Is it ok not to have shim between spring and piston?
3. If (1) is ok, then is 150-155psi (50-200bar) acceptable? IP is rock solid, but this goes beyond 10 bar (10.3-10.7bar)
4. Otherwise do what? Remove the plastic piston hat, put a shim on the piston and the body and leave it like this?
5. What is this strange filter? It is not the typical sinter filter made of small spheres.

1758890668583.png
 
You should switch to a new -|| seat. The tallest seat will yield the lowest IP, while the + seat will yield the highest. The taller the seat, the less the mainspring needs to compress for the valve to seal, hence, a lower IP. 153 psi is still a bit higher IP than most seconds would like.
 
Thank you for the guidance, sir! I expected exactly the opposite behaviour, but now that you explained it, it makes perfect sense!

After changing to -||, the IP dropped rock solid to 130psi with 180bar tank. No whistle, no noise.
I took the whole screw cap and hp seat from my other whistling MK10.

When screwing the other HP seat cap to my whistling MK10, the noise was gone and it is now staying stable at 145psi at same 180bar. I don't plan to fiddle with it for now. I now have 2 reference 1st stages at both ends of the allowable IP range. Both of them are also perfect backup 1st stages (if I ever need to use one).

What about the sinter filter? I've already replaced it with a standard microsphere one, but curious if this is an old design or some aftermarket stuff.
What is a microsphere filter? You should replace the filter with a new conical filter that looks like th wold one, only clean.
 
Microsphere or wire mesh, either is fine.
It's just a manufacturing technique to acquire small pores
 
What about the sinter filter? I've already replaced it with a standard microsphere one, but curious if this is an old design or some aftermarket stuff.
It really depends on what gas the first stage is intended to handle. There are a few main techniques for making filters, each with its own strengths and weaknesses:

Sintering​

Sintered filters are relatively difficult and costly to manufacture compared to other types. The process starts with thousands of tiny spheres of metal (or another material). These are heated to just below their melting temperature so they fuse together at their contact points, locking into the final shape.
The result is a monolithic, highly porous structure, exactly what you want in a filter. The interconnected pores provide a large "empty volume" inside the filter body, which traps and absorbs particles efficiently. A good analogy is stacking thousands of tiny ping-pong balls into a cone shape: that’s essentially what the internal structure looks like.

Wire mesh​

Wire mesh filters are made using a variety of techniques, most commonly weaving or spinning fine wires. The process can be thought of like weaving a flat carpet first, then cutting and forming it into the desired conical shape. I must admit when this was explained to me, a lot went over my head.
Because of the nature of woven wire, the internal “empty volume" is much lower than in a sintered filter. This means lower dirt-holding capacity and less depth for capturing particles. There is one upside of mesh filters and it won't surprise anyone why some manufacturers gave them a try: They are significantly cheaper to produce than sintered ones.
Leaving aside the generally poorer performance of a mesh, there is a serious drawback in certain applications: oxygen service. Mesh filters are usually made of fine steel wire, and steel in that form is stupidly easy to ignite when exposed to high oxygen concentrations. That’s a non-starter for safe O₂ handling.

Polymers​

Polymer (plastic) filters can also be manufactured by sintering or by mesh fabrication. A sintered polymer filter works very well in standard air service, comparable to a bronze sintered filter, but it is completely unsuitable for oxygen service. It's even worse than a steel mesh, if that is possible...


For oxygen service, sintered bronze filters are one of the very few safe and reliable solutions. Even alloys that normally perform well in oxygen environments (such as Monel) can all of a sudden become easy to ignite when made into fine meshes.

This is why larger manufacturers almost universally use sintered bronze filters nowadays. It’s cheaper and safer in the long run to standardize on a single design that covers both oxygen and non-oxygen service, rather than risk a mesh filter ending up in the wrong regulator.
 

Back
Top Bottom