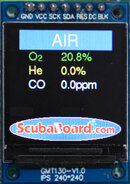
hello I hope someone will help me, I am a bit in trouble with the MD62 sensor, as never after having done the calibration of the various sensors, and having O2 20.9% and He 0%, if I pass air the oxygen sensor remains stationary or it moves a little but the He value rises but there is no helium in the cylinder that I am analyzing what am I wrong? thank you
You are using an out of date browser. It may not display this or other websites correctly.
You should upgrade or use an alternative browser.
You should upgrade or use an alternative browser.
Nitrox/Trimix & CO analyzer
- Thread starter Miyaru
- Start date
Please register or login
Welcome to ScubaBoard, the world's largest scuba diving community. Registration is not required to read the forums, but we encourage you to join. Joining has its benefits and enables you to participate in the discussions.
Benefits of registering include
- Ability to post and comment on topics and discussions.
- A Free photo gallery to share your dive photos with the world.
- You can make this box go away
As always we need more details please.
1. How many mV increase you see with air flow? Are you sure this is significant? To know this we need to know:
2. Have you calibrated your He sensor?
If you haven't calibrated then the output can't be interpreted
If you have calibrated how many mV you get at 100% He? How big the increase you see is compared to this? It might be just noise, or see below:
2. Are you using a flow restriction? Large flows of any gas can affect the reading due to several reasons (pressure build up, temperature difference etc).
3. Remember the He sensor is not specific to He. It senses any impurities (including CO2 etc). Is the air you measure clean (eg from a scuba tank) or from your breath?
Those are just few things to consider.
Well I had a fun weekend thanks to that ADS1115. I was really surprised how much I prefer using I2C to read analog sensors! I am going to order a couple ADS1263's and have boards made for them since the only BOB I can find for 1263 is an obscenely large one for raspberry pi.
As always we need more details please.
1. How many mV increase y.....
2. Have you calibrated your He sensor?
2. Are you using a flow restriction? ...
3. Remember the He sensor is not specific to He. ....
Those are just few things to consider.
You're right I'm sorry I was unclear, I need to understand, thanks for your help
1. How many mV increases do you see with airflow? about 1,45mV when I pass air and the value of He goes to 100% does this make me think that the calculations are wrong?
2. I calibrated your He sensor with 100% it gave me 580 mV
Yes I am using a flow restriction
Many thanks
Elaborate......Well I had a fun weekend thanks to that ADS1115.
....
I've changed the design for the analyser from Arduino to ESP32, which allows better graphics. It's also possible to load newer firmware versions.
Changes in the layout:

After the upload, the analyser will reboot and you'll see the Scubaboard logo. Use the left button to walk through the menu, use the right button to select an option.

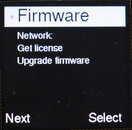
In the Firmware menu, select Network to add your SSID and Key (settings will be remembered) by following the instructions on the screen. (Only the options in this menu require an internet connection)
Next, choose Get license.
Finally, choose Upgrade firmware. A fully functional firmware will now be downloaded and installed.

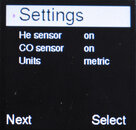
If you built the board with the helium part, turn helium on in the settings.
If you built the board with the CO part, turn CO on in the settings.
If you want the numbers in imperial, change the setting from metric to imperial.
Note: MOD and Equivalent Air Density Depth are still work-in-progress.

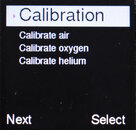
Once done, calibrate the analyser with 100% oxygen and 100% helium. The carbon monoxide doesn't need to be calibrated.
Why the option Get license ?
To prevent commercial exploitation, I've added the Scubaboard logo. Next to that, the firmware file requires a license to prevent unlimited copying. Send me a pm with the time&date you requested the license and I'll enable your analyser (when your post count is higher than 10).
Changes in the layout:
- Arduino nano has been replaced with ESP32 (30-pin WROOM version)
- Two color screen options: ST7789 (1.3" 240x240) and ILI9431 (2.2" or 2.4" 320x240). The ST7789 display has no CS pin, in that case no connection from pin D5 is required.
- Either use push buttons or capacitive touch buttons (type: TTP223). Advantage of the touch button: no moving parts and they work through a (polycarbonate) display cover.
- Lithium ion battery powered. Layout will get an update once the wireless charging option has been tested.
- Build the board. Solder the MD61 or MD62 sensor to the 2k2 resistors and the 500 Ohm potmeter.
- Add the ESP32 board to the software package Arduino IDE on your computer
- Load the sketch: File -> Examples -> ArduinoOTA -> OTAwebUpdater
- In the sketch, change 2 lines and fill in the SSID and key of your own WiFi network where it says xxx:
-
Upload the image to ESP32, it will connect to your WiFi network and start as a webserver. Check the serial monitor which IP address is assigned.Code:
const char* ssid = "xxx"; const char* password = "xxxx"; - In your browser, go to http://<ip address>/serverIndex
- For the ST7789 display, load this firmware file (note: I will discontinue the firmware for this display)
- For the ILI9341 display, load this firmware file

After the upload, the analyser will reboot and you'll see the Scubaboard logo. Use the left button to walk through the menu, use the right button to select an option.

In the Firmware menu, select Network to add your SSID and Key (settings will be remembered) by following the instructions on the screen. (Only the options in this menu require an internet connection)
Next, choose Get license.
Finally, choose Upgrade firmware. A fully functional firmware will now be downloaded and installed.

If you built the board with the helium part, turn helium on in the settings.
If you built the board with the CO part, turn CO on in the settings.
If you want the numbers in imperial, change the setting from metric to imperial.
Note: MOD and Equivalent Air Density Depth are still work-in-progress.

Once done, calibrate the analyser with 100% oxygen and 100% helium. The carbon monoxide doesn't need to be calibrated.
Why the option Get license ?
To prevent commercial exploitation, I've added the Scubaboard logo. Next to that, the firmware file requires a license to prevent unlimited copying. Send me a pm with the time&date you requested the license and I'll enable your analyser (when your post count is higher than 10).
Attachments
AliExpress #1
AliExpress #2
Other ILI9341 displays (2.2" or 2.4") will likely work as well. My choice for these displays was because of the perfect readability in the sun and the possibility to dimm the displays in a dark environment (e.g. cave) for a different project.
AliExpress #2
Other ILI9341 displays (2.2" or 2.4") will likely work as well. My choice for these displays was because of the perfect readability in the sun and the possibility to dimm the displays in a dark environment (e.g. cave) for a different project.
Similar threads
- Replies
- 7
- Views
- 2,063
- Replies
- 2
- Views
- 2,260
- Replies
- 16
- Views
- 3,045
- Replies
- 10
- Views
- 5,049
- Replies
- 21
- Views
- 5,120


