

You are using an out of date browser. It may not display this or other websites correctly.
You should upgrade or use an alternative browser.
You should upgrade or use an alternative browser.
Need (lots of) help on DIY light
- Thread starter bradsab
- Start date
Please register or login

Welcome to ScubaBoard, the world's largest scuba diving community. Registration is not required to read the forums, but we encourage you to join. Joining has its benefits and enables you to participate in the discussions.
Benefits of registering include
- Ability to post and comment on topics and discussions.
- A Free photo gallery to share your dive photos with the world.
- You can make this box go away
Codiak
Contributor
Your diagram is correct except that the LEDs connect to L- on the driver. Your wire sizes are fine. L+ is just the same point as B+, I provided two terminals there for applications where it would be convenient.
Please PM me your address so I can ship the drivers.
D
The doc was good though a "Dummies guide to wiring" would help even though I understood 80%.
Questions:
In Brads circuit, the switches would need to be rated to handle the 10A at 4.1 volts?
If so, I've yet to find a Reed or Piezo or MOSFET that would allow for a sealed unit.
Got any suggestions?
After spending many hours on this light over the last two months, working feverishly here at the last to get it done for my trip tomorrow, UPS lost the drivers DIWdiver made for me . He shipped them Next Day Air on Tuesday, but tracking doesn't show anything beyond Billing Info Recd'. Such is life!
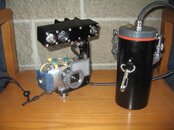
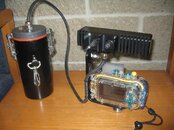
 I rigged up two dummy batteries to make my canister 2p3s and wired the light for direct drive. I don't have two power levels, just one somewhere between the high & low I would get with the drivers. With the drivers, I should get close to 1800 lumens on high, and about 700 on low from each LED. On direct drive I should get about 1200 lumens initially, but voltage begins to drop immediately (particularly when both floods are burning) and I end up somewhere below 700 lumens. And... I don't have a switch to turn it off. The switch I have to control the hi/off/lo function of the drivers won't carry enough amps to be able to use it for direct drive. I can hit a sweet spot in the middle of the spot/flood toggle and break the circuit, but it doesn't want to stay there because it is an on-on switch. Anyway, here are a couple of pics of the completed light.
. He shipped them Next Day Air on Tuesday, but tracking doesn't show anything beyond Billing Info Recd'. Such is life! I rigged up two dummy batteries to make my canister 2p3s and wired the light for direct drive. I don't have two power levels, just one somewhere between the high & low I would get with the drivers. With the drivers, I should get close to 1800 lumens on high, and about 700 on low from each LED. On direct drive I should get about 1200 lumens initially, but voltage begins to drop immediately (particularly when both floods are burning) and I end up somewhere below 700 lumens. And... I don't have a switch to turn it off. The switch I have to control the hi/off/lo function of the drivers won't carry enough amps to be able to use it for direct drive. I can hit a sweet spot in the middle of the spot/flood toggle and break the circuit, but it doesn't want to stay there because it is an on-on switch. Anyway, here are a couple of pics of the completed light.Attachments
DIWdiver
Contributor
@Bradsab
This circuit is a section from linear power supply's. It will generate a lot of power with big power consumption.
Same thing you can do more accurate and safe with LM337 conected parallel ( look current circuit ( output and GND connected with resitor ) and LMV641 is a 10 MHz, 12V, Low Power Amplifier !
Yes, you are correct that this is a linear supply, and yes it will have poor efficiency and generate lots of heat if you have lots of extra voltage. This driver is intended for applications where there is NOT lots of extra voltage, like Bradsab's. If you want to run one LED off a >6V pack, you really want a different driver. Several are under development by members of CandlePowerForums
I'm aware the LM641 is low power. If you look at the circuit though, you will see that there is a FET which carries all the LED current. That's the high-power device. The LM641 merely controls the FET.
The LM337 would be more accurate at low currents, but most people don't seem interested in that. At higher currents where everybody seems to be interested, the LM337 is slightly less accurate.
Any high/low switches would have to carry the full LED current, which is a disadvantage for some applications.
You'd need SEVEN parallel circuits to reach 10A. I won't even discuss trying to fit that on a 1" diameter board.
But here's the real killer...
Some of the manufacturers datasheets don't tell you this, but the minimum voltage overhead (or dropout voltage) of the LM337 is around 2.0V at 1.5A. I had to look at three datasheets before I found it buried down in the graphs section. Add to that the 1.25V you drop across the sense resistor, and you get a wopping 3.2V lost to the regulator circuit. Mine is 0.3V at 10A. That would make the MAXIMUM efficiency of an LM337 circuit about 53% for a single LED. Compare that to the MINIMUM of 75% for Bradsab's configuration.
There is a way to use a pass transistor to increase the current capability of the LM337. But that just increases the dropout voltage...
DIWdiver
Contributor
The doc was good though a "Dummies guide to wiring" would help even though I understood 80%.
Good idea. I'll do that. It may take me a little while though.
Questions:
In Brads circuit, the switches would need to be rated to handle the 10A at 4.1 volts?
If so, I've yet to find a Reed or Piezo or MOSFET that would allow for a sealed unit.
Got any suggestions?
In Bradsab's circuit there are two switches, each with two sections. SW1 is kind of unusual, due to his three LED/two driver operating modes. That one does need to handle the full LED current and battery voltage. But most users will simply connect battery (+) directly to the anode (+) of the LED, eliminating that switch.
SW2 is connected to the control pins of the driver. These wires do not carry LED current. In fact they carry barely any current at all, and can be as small as you care to work with. You could use any reed or nearly any FET you want to. Piezos wouldn't work though, since they are only momentary and the control connections need to be constant.
There are plenty of FETs that can handle 10A. If you want a good suggestion, buy a driver and read the part number off it.
 Or you could just look at the schematic in the datasheet.
D
DIWdiver
Contributor
The doc looks pretty good to me. I was able to wrap my head around nearly everything. Looks like this is going to be one of the best drivers out there. I was really not looking forward to running an array of 1400mA drivers. Also, OpenOffice Writer can export directly to pdf. It's on the toolbar right over by the print button.
EGad,
I tried several other methods of getting a PDF, but all resulted in huge files (>700K, which exceeds my attachment limit). But this resulted in a smaller file than the .DOC! It never occurred to me to look outside the print menu. Thanks. I will use this in the future.
D
lucca brassi
Contributor
Ok.
But position of your light is similar to flash - and you will get same problems as you will get with flash in water full of particles : their reflection which spoils photography.
That's why long arms with lights from side - to avoid particle light refections .
For measuring distance it is enough low power led light
EGad
Contributor
EGad,
I tried several other methods of getting a PDF, but all resulted in huge files (>700K, which exceeds my attachment limit). But this resulted in a smaller file than the .DOC! It never occurred to me to look outside the print menu. Thanks. I will use this in the future.
D
Glad I could help. To tell you the truth, I never even used that function myself. Just noticed it a while back, as I use OpenOffice. The request for a pdf jogged my memory so I opened up your file again, and there it was. I guess I'm not as computer literate as I used to be, as I seem to be re-teaching myself a lot of skills I used to be good at (OpenOffice, GIMP, CAD design, wiring schematics, etc.) I guess that's what happens when you go from computer work to bartending and music. Now I'll really be upset if I forget my favorite drink recipes.
E
DIWdiver
Contributor
Sales thread for my driver is now open in CPF.
Adjustable 10A linear constant current driver - CandlePowerForums
D
Adjustable 10A linear constant current driver - CandlePowerForums
D
Codiak
Contributor
Sales thread for my driver is now open in CPF.
Adjustable 10A linear constant current driver - CandlePowerForums
D
Driver works great!
Thanks
Similar threads
- Replies
- 7
- Views
- 769
- Replies
- 2
- Views
- 86
- Replies
- 4
- Views
- 990
- Replies
- 0
- Views
- 253
