MK10 Rebuilding Mods and Best Practices

Please register or login

Welcome to ScubaBoard, the world's largest scuba diving community. Registration is not required to read the forums, but we encourage you to join. Joining has its benefits and enables you to participate in the discussions.

Benefits of registering include

  • Ability to post and comment on topics and discussions.
  • A Free photo gallery to share your dive photos with the world.
  • You can make this box go away

Joining is quick and easy. Log in or Register now!

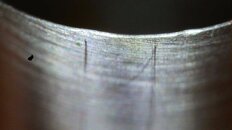
This is the only thing I can find on the new MK10s piston.
On closer inspection of the new piston it looks like the edge is dented in the area of the scratches. I'd have to agree with you @Bloody Knuckles, looks like there's the problem.
 

Attachments

  • SingleShot0000.jpg
    SingleShot0000.jpg
    40 KB · Views: 65
On closer inspection of the new piston it looks like the edge is dented in the area of the scratches. I'd have to agree with you @Bloody Knuckles, looks like there's the problem.
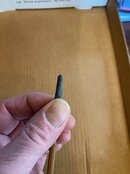
Yes, it looks like you have a bit of a challenge on your hands. Unfortunately, that's one of the shortcomings of working with these old toys. The consumable hard parts, like the piston & spring are well, "hard" to come by. Unless you have a bucket of extra parts lying around...It is what it is. You have a couple of options. Set it aside for possible donor parts in the future or give it a whirl. You have nothing to loose and experience to gain. From the pic (and pic's can be deceiving) it looks like the knife edge has been distorted out of concentricity. If that's the case, getting the knife edge to seal on the conical HP seat will most likely be an impossibility. Otherwise, follow @RSlinger's methodology for How to Restore a Knife Edge Piston. The original scope of this thread was "Mods and Best Practices". I'll share mine when it comes to reconditioning the piston knife edge. I use a tapered bamboo chop stick. The bamboo is quite stiff and can take a lot of pressure without breaking). I wrap the tip with a piece of micro mesh that's about 1" x 1.5" (essentially the sample pack size provided on Ebay cut into 4 equal size pieces). Matchup one of the corners of the micro mesh with the chopstick tip and roll it up so it fits nice and tight (see attached). Insert that into the knife edge end just far enough so you can appropriately match the interior angle of the knife edge. As I am right handed, I put my left thumb at the top of the piston stem (at the knife edge) and apply pressure while pulling on the piston head towards my body. Once you get the angle established rotate the piston head while doing your best to maintain a consistent angle. Like anything else, it takes a little practice and some patience. The condition of the knife edge will dictate the grit required and time needed. I've started with grits all the way down to 2400 but typically 4000, 6000 & 8000 seem to do the trick. If in fact the knife edge has been distorted out of concentricity you can always take an old seat and flip it over so the flat side is now the sealing surface. If you like you can polish that with micro mesh accordingly. The goal here isn't to get the first stage into a "diving" condition but if you can get it to lock up or I should say, "momentarily stabilize" without drifting to badly you can use it to operate air tools and fill up tires etc. As a disclaimer, I would like to say, I'm in no way an expert nor do I have any certifications in regulator repair / maintenance. I've been diving for 43 years but only started doing my own maintenance about 3 years ago. I know what your going through. Just about the time you think you have something figured out, reality throws you a curve ball. Like RSlinger likes to say, "simple but precise" ... It's the precise part that tends to be an ass kicker from time to time.
 

Attachments

  • IMG_1393.jpg
    IMG_1393.jpg
    79 KB · Views: 50
I have successfully rebuilt 4 MK10s over the last couple of days.

Towards the end I got pretty fast and pulling one apart to change the HP seat or add shims as needed.

My learned tips would be to:
  • Use new seats and don’t try to reuse an old one.
  • Go ahead and sand/micromesh/polish each piston and save the headache of trying to chase down the unit not hitting its pressure or creeping. (I built a tool to help some with this. I’ll post it in a bit. I’d like to modify it some after using it.)
  • Have a piece of glass or mirror handy to use during the polishing to hear against and get the piston edge flat.
  • A USB microscope is pretty handy to have. I downloaded a random piece of software so I could view on my computer and not just my phone. Plugable (This is the link to the software.)
  • Have lots of o-rings because the kits don’t have squat in them.
  • If the HP seat is stuck in the retaining cap, put it in the freezer for a bit then try to blow it out.
  • I soaked all my parts in a small slow cooker with some dish soap and let it sit overnight. That really seemed to clean the parts up well. Then I used the ultrasonic before final cleaning.
  • Brass gun cleaning brushes worked well to clean the internal o ring recess.
  • It’s not all that difficult of a job. Just a little aggravating. 😁
 
Sounds like your making good progress and I hope having some fun. In regards to the HP seat getting stuck in the retainer, I've used the freezer trick with mixed results and of course it takes a little time. If you come across another "sticky" one, try this...

I use to use the threaded bar in a vise to hold the first stage while removing the HP seat retainer but after the multi tool slipped on me a couple of times (with the results you'd expect), I came up with an alternative method. Before removing any hoses, place the first stage on the tank valve with the retainer facing up (DO NOT PRESSURIZE). Utilize the multitool to remove the retainer by getting right over it while applying a downward force. Carefully apply a counter clockwise rotational force on the multitool while ensuring it stays square and flat. Once removed (if you intend to remove the HP seat), flip the retainer over and place it in the recess. Place a 3/4" deep socket over the exposed seat. Push down on the socket and give it a quick burst of air. Under normal circumstances it should pop right out. (The socket contains the HP seat and prevents you from "shooting your eye out" :p). If you come across a stubborn one, you can place a suitable size o-ring under the retainer and clamp the socket down to the first stage with a wood clamp or other suitable tool. Give it another burst of air & presto. I had one where the freezer trick did not work and after several attempts without success, I came up with this procedure and it worked nicely. Anyway, just a thought.

I totally agree about using a new seat (if available). If you do intend or attempt to reuse the seat, don't remove it from the retainer. If you must remove it for cleaning inspection etc. make sure you index the location of the seat by marking the rim of the retainer and the seat with a sharpie (permanent marker). This may help ensure the geometry of the knife edge set remains in the same location when you reinstall it.

Also regarding the HP seats, I find the gray ones marked on the bottom with either an X (tall), -I (taller) or -II (tallest) tend to be the most forgiving regarding a consistent lock up. (I've tried the Trident A242's and the older Scubapro (white, pink, red, blue seats) but personally have experienced mixed results. They seem to be better suited to the MK5. I'm sure you know this, but for those who may not, the taller seat's will result in a corresponding reduction in IP due to the reduced piston travel necessary to overcome the spring force and establish a seat (lock up). The benefit being you can adjust the IP without a complete disassembly that's necessary to install or remove shims.

Looking forward to seeing the tool you mentioned above. I've had a few ideas myself.
 
That’s a good idea about the socket. I’ll have to give it a try. I’ve got a -II in one that
I then had to add 3 shims to. I couldn’t get the -II out so I just went with it. I’d rather go with a -I or maybe even a +. I’ll try the freezer socket trick and see if I can get it changed and remove the shims.
 
Haven’t been around this board in a few years, but I’m very familiar with working on MK10s. The plus seat results in the highest IP of the three seat sizes. So if you want to lower IP, use the - or = seat. Edit: I see someone else suggested that. The taller the seat, the lower the IP, all other things equal.

With my MK10s, the problem is usually IP in the low range, so I have hoarded as many + seats as I can. I like the MK10, I’ve used them extensively in cave diving, but I still like the MK5 the best out of all the SP balanced piston regs. It’s difficult to find DIN retainers for them, but otherwise they are fantastic. If you use HP tanks, maybe the MK20/25 is a better choice in that they use bushings to help control the HP piston o ring from extruding and causing IP to rise. I dive with AL80s almost exclusively these days so for me that’s a non issue.

Another thing that may help you with a MK10 that has high IP, especially at tank pressures above 3000PSI, is using a 90 duro polyurethane o-ring. SP went through a phase using them for that reason. They don’t have great shelf life and I would bet that’s why SP went to EPDM. But if you find good fresh stock of PU o-rings for the HP piston, they do work very well.
HALOCLINE, I know you don't know me from squat. I've been lurking in the shadows for many years and have been a looong time reader of your posts. The many exchanges you've had with DA Aquamaster, Couv, Awap, RSingler and a few others gave me the inspiration and confidence to undertake the path of DIY regulator repair & maintenance. Not to hijack Timmyjane's thread, but I just wanted to personally say thank you sir! It truly warms my heart that your still on this "side of the grass"... Have you kept in touch with DA Aquamaster? If so, please pass along my many, many thanks. You guy's are awesome and very much appreciated. I hope you continue to share your insights and wisdom...That kind of stuff you can't learn in a book :cool:
 
Haven’t been around this board in a few years, but I’m very familiar with working on MK10s. The plus seat results in the highest IP of the three seat sizes. So if you want to lower IP, use the - or = seat. Edit: I see someone else suggested that. The taller the seat, the lower the IP, all other things equal.

With my MK10s, the problem is usually IP in the low range, so I have hoarded as many + seats as I can. I like the MK10, I’ve used them extensively in cave diving, but I still like the MK5 the best out of all the SP balanced piston regs. It’s difficult to find DIN retainers for them, but otherwise they are fantastic. If you use HP tanks, maybe the MK20/25 is a better choice in that they use bushings to help control the HP piston o ring from extruding and causing IP to rise. I dive with AL80s almost exclusively these days so for me that’s a non issue.

Another thing that may help you with a MK10 that has high IP, especially at tank pressures above 3000PSI, is using a 90 duro polyurethane o-ring. SP went through a phase using them for that reason. They don’t have great shelf life and I would bet that’s why SP went to EPDM. But if you find good fresh stock of PU o-rings for the HP piston, they do work very well.
Thanks for the info! I was having a lot of issues with high IP but the SP Tech Service Manual seemed to have my issue diagnosed correctly. Once I refinished the knife edge completely and then installed a brand new seat the regs started hitting 130-135 almost like magic. Before I was pushing 145-150 with a little creep. I installed Viton Duro 90 #10 internal oring and used the EPDM 70A 017 on the piston. I have some 017 90s in my future o ring cart. Do you have any experience with a Viton vs PU o ring and how the regulator reacts?

Why do you like the MK5 best? I was gifted a MK5 from the amazing @James79. I took it apart yesterday and it is in the slow cooker. I am looking forward to learning more about it. I went ahead and ordered some of the trident replacement seats for the MK5/10 so I'd have some on my table to play with.

I would like to mirror @Bloody Knuckles's comments. I have read through a lot of your older posts and comments while learning about the MK10 and what was involved. I also appreciate all the time you put into sharing information.
 
I have successfully rebuilt 4 MK10s over the last couple of days.

Towards the end I got pretty fast and pulling one apart to change the HP seat or add shims as needed.

My learned tips would be to:
  • Use new seats and don’t try to reuse an old one.
  • Go ahead and sand/micromesh/polish each piston and save the headache of trying to chase down the unit not hitting its pressure or creeping. (I built a tool to help some with this. I’ll post it in a bit. I’d like to modify it some after using it.)
  • Have a piece of glass or mirror handy to use during the polishing to hear against and get the piston edge flat.
  • A USB microscope is pretty handy to have. I downloaded a random piece of software so I could view on my computer and not just my phone. Plugable (This is the link to the software.)
  • Have lots of o-rings because the kits don’t have squat in them.
  • If the HP seat is stuck in the retaining cap, put it in the freezer for a bit then try to blow it out.
  • I soaked all my parts in a small slow cooker with some dish soap and let it sit overnight. That really seemed to clean the parts up well. Then I used the ultrasonic before final cleaning.
  • Brass gun cleaning brushes worked well to clean the internal o ring recess.
  • It’s not all that difficult of a job. Just a little aggravating. 😁
I have (I think) 9 MK10's (one is actually an mk10+) now and have been servicing them for 10 years now. Outside the very first one I got new in 1993, the rest were all ebay purchases - first to get my two boys the same gear I have and then to get extras/spares/pony use. Many were under $40. I've been looking at MK25's but have yet to find one under $100 - they also seem to have more parts, so that's a negative for me over the mk10.
I've never had to micromesh a piston (but will look into that ebay sampler to be ready if needed) and most of the time I have reused the seats (I have some new ones, just haven't had the need to use them). To remove the seat, I just take the yoke and use it to hold the seat holder over a tank and crack the valve (have your hand over it or the seat can shoot across the room).
I get all my orings online and make up my own kits - to have them handy and also bring a couple in my emergency kit
I've also started using punches to create spacers and the washer for the turret.
I have the brass tip for the piston oring but will look and print your 3d printed one to pack in my emergency kit!
 

Back
Top Bottom