
Don't know if you have dove these regs before but if not, be aware they are prone to squeal when you breath at higher tank pressures. Not all do but it's not uncommon. We have used them up to 3k but they work a lot better once you get below 2k or so.

You are using an out of date browser. It may not display this or other websites correctly.
You should upgrade or use an alternative browser.
You should upgrade or use an alternative browser.
Mistral rebuild clarification question.
- Thread starter Ghost95
- Start date
Please register or login

Welcome to ScubaBoard, the world's largest scuba diving community. Registration is not required to read the forums, but we encourage you to join. Joining has its benefits and enables you to participate in the discussions.
Benefits of registering include
- Ability to post and comment on topics and discussions.
- A Free photo gallery to share your dive photos with the world.
- You can make this box go away
OP
Thanks Herman, I look forward to hearing it. This reg will mostly be used on steel 72's that may get pumped to 2800.
Another question, do any of the tools i got from you to hold and work on the DAAM's work for this reg? Thanks
Another question, do any of the tools i got from you to hold and work on the DAAM's work for this reg? Thanks
I will not use my Mistral on any tank above 2475 psi. If you look at the seat, it is a piece of metal (brass) with a circle drilled out and filled with a plastic material that forms the seat. Imbedded into this plastic is a piece of metal that the pin pushes against. On at least some of these there is no metal beneath the pin's metal disc in the center. I destroyed one seat by mounting it onto a AL 80 at 3000 psi, as that metal disc was pushed into the plastic and to the side, causing a very loud and bad free flow. So I simply don't do that now.
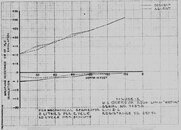
Something people don't realize is that the Mistral had U.S. Navy Experimental Diving Unit (Navy EDU) approval for use with the Navy. The breathing curve of the Mistral was actually better on inhalation than the more expensive DA Aquamaster. The breathing curve became almost effortless at depth.
The U.S. Air Force Pararescue local purchased Mistral regulators for use with their parascuba jumps for NASA. You can see the configuration in the below photo with the parascuba in the upper right photo (the one with the parachute "sticking out" making exit from the aircraft harder).
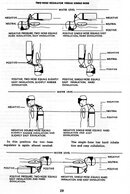
Now, the other thing is that with any double hose regulator, you want to mount it on the tank and wear it very low on your back, between the shoulder blades. Why? Because there is a potentially high "head" of water between the regulator and the center of the lungs if the regulator is mounted high above the back. Bill Barada explained this in the below diagram in his book, Let's Go Diving, produced by U.S. Divers Company.
Something people don't realize is that the Mistral had U.S. Navy Experimental Diving Unit (Navy EDU) approval for use with the Navy. The breathing curve of the Mistral was actually better on inhalation than the more expensive DA Aquamaster. The breathing curve became almost effortless at depth.
The U.S. Air Force Pararescue local purchased Mistral regulators for use with their parascuba jumps for NASA. You can see the configuration in the below photo with the parascuba in the upper right photo (the one with the parachute "sticking out" making exit from the aircraft harder).
Now, the other thing is that with any double hose regulator, you want to mount it on the tank and wear it very low on your back, between the shoulder blades. Why? Because there is a potentially high "head" of water between the regulator and the center of the lungs if the regulator is mounted high above the back. Bill Barada explained this in the below diagram in his book, Let's Go Diving, produced by U.S. Divers Company.
Attachments

OP
Thanks for the info John. I have been working with my DAAMs on tank positioning. I'm using a copy of the VDH plate, sometimes with a VDH wing, sometimes with no buoyancy device. It's been a fun experience. Looking forward to getting the Mistral done and experiencing easy breathing everyone talks about.
I'll keep the tanks for the Mistral lower than the 2800 to preserve the seats I guess. They're hard to find. I wish I could find new made replacements for those and the DAAM. I don't have a Royal Aquamaster yet but when i find one for a good price I'll sell one of the rebuilt DAAMs and rebuild a Royal.
Have a good day.
Vancetp
Registered
There is a tricky to replace o'ring in the valve body, which seals the pin from air leakage past it. It isn't critical that the seal is perfect, as many other singlestage regulators don't have any kind of seal on the pin. Point is, if it looks fairly good, is not cracked, feels fairly springy when poked with a soft pick, and you can feel a bit of grip on the pin when installing it, you really don't have to replace it.
I always replace them, b/c I have the technique down, but you might want to save yourself the bad language and feelings of inferiority that invariably comes with your first attempt...
I always replace them, b/c I have the technique down, but you might want to save yourself the bad language and feelings of inferiority that invariably comes with your first attempt...
Scuba Lawyer
Contributor
I use a small blunt-nose tweezer to pinch the o-ring in half and insert it most of the way into the body. I then use a dull plastic pic to work all sides down until it pops into position. I've had more than one o-ring go a-flying into the nether regions of time and space.  Good luck with the rebuild!
Good luck with the rebuild!
OP
Thanks for the tip. It will go easy or it won't. Going to try it after work today. I'll take a couple pictures and post an update.I use a small blunt-nose tweezer to pinch the o-ring in half and insert it most of the way into the body. I then use a dull plastic pic to work all sides down until it pops into position. I've had more than one o-ring go a-flying into the nether regions of time and space.
OP
Hello all.
Well, it's assembled. Guys you were right about the little o-ring. I didn't have too much of a problem but I can see if you've never worked with small o-rings where that could be a total pain.
Things went together pretty easy for a first try and I took a little time trying to get the lever height right. Is there a procedure for doing that? You know, first tighten these screws, then adjust the lever with the thumb screws, and then re-tighten all the screws? It just wasn't very intuitive.
Anyway, I got it together and put it on a tank and took the first breaths. Seemed to breathe pretty hard. I adjusted the levers a couple more times and it free flowed, then got harder to breathe...
Then I remembered... Single stage, unbalanced, lower pressure. My pony was at 3000.
I drained the point a little bit and you could already tell a difference. I bet at 1000 psi this thing will breathe for me.
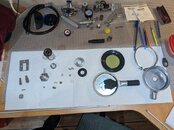
Anyway it's together. Super simple design and really easy to rebuild. Can't wait to dive it.
Thanks for your help. I'll update after a dive or two.
Pictures coming.
Safe diving.
Well, it's assembled. Guys you were right about the little o-ring. I didn't have too much of a problem but I can see if you've never worked with small o-rings where that could be a total pain.
Things went together pretty easy for a first try and I took a little time trying to get the lever height right. Is there a procedure for doing that? You know, first tighten these screws, then adjust the lever with the thumb screws, and then re-tighten all the screws? It just wasn't very intuitive.
Anyway, I got it together and put it on a tank and took the first breaths. Seemed to breathe pretty hard. I adjusted the levers a couple more times and it free flowed, then got harder to breathe...
Then I remembered... Single stage, unbalanced, lower pressure. My pony was at 3000.
I drained the point a little bit and you could already tell a difference. I bet at 1000 psi this thing will breathe for me.
Anyway it's together. Super simple design and really easy to rebuild. Can't wait to dive it.
Thanks for your help. I'll update after a dive or two.
Pictures coming.
Safe diving.
Similar threads
- Replies
- 11
- Views
- 1,738
- Replies
- 3
- Views
- 1,053
- Replies
- 1
- Views
- 1,257
- Replies
- 2
- Views
- 2,048
- Replies
- 7
- Views
- 925
